You should pull the plugs on that right side. Their condition will give a pretty good indicator as to your issue. If that's oil smoke, one or both should be wet black or sooty. If it's steam, one or both plugs will be nice and clean. If they're wet with gas, your carbs are dumping raw unvaporized fuel into the cylinders.
Also, I wouldn't be running it so casually with those carb leaks. Especially if you've also seen "sparks". That doesn't sound like a good combination. The carbs need attention. I'm glad that's in the immediate plan.
My New Old Bike - 1982 Gl 1100I Rebuild
Moderators: Brant, Sagebrush, Forum Moderators
-
desertrefugee
- SUPER BIKER!!!!

- Posts: 3947
- Joined: Fri Nov 11, 2011 9:33 pm
- Location: Chandler, AZ, USA
Re: My New Old Bike - 1982 Gl 1100I Rebuild
- Life is not about waiting for the storms to pass. It's about learning to ride in the rain.
-
bigburlybug

- Cast Iron Member

- Posts: 75
- Joined: Sun May 22, 2016 11:12 pm
- Location: Fort Wayne, In
Re: My New Old Bike - 1982 Gl 1100I Rebuild
I live for danger Muwahaha! You're rightdesertrefugee wrote:You should pull the plugs on that right side. Their condition will give a pretty good indicator as to your issue. If that's oil smoke, one or both should be wet black or sooty. If it's steam, one or both plugs will be nice and clean. If they're wet with gas, your carbs are dumping raw unvaporized fuel into the cylinders.
Also, I wouldn't be running it so casually with those carb leaks. Especially if you've also seen "sparks". That doesn't sound like a good combination. The carbs need attention. I'm glad that's in the immediate plan.
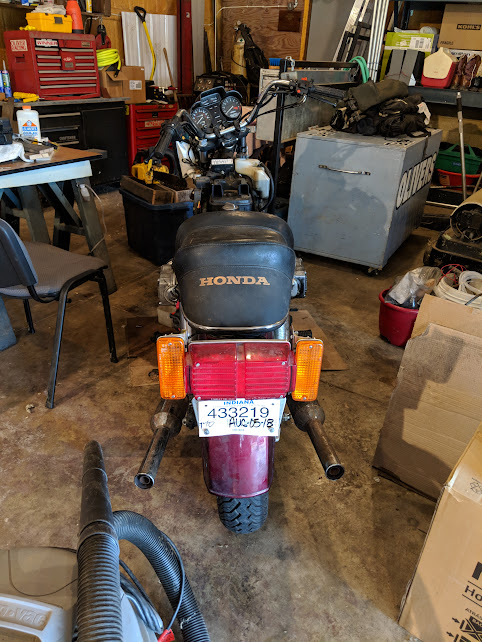
As for the plugs, left side had a tad bit more oil than the right side did. Its been two days since I started it so I'm guessing the plugs would be dry of gas even if that was the issue.

#4 plug on left, #3 plug on right
There's definitely carb issues that need to get fixed.


There is some nasty mystery gunk that may be from when I reused a gas line for the first try without a fuel filter (its was replaced by try 2 with a fuel filter). I don't think I missed cleaning that amount of material in there when i cleaned the carbs. Anybody have a guess what that stuff could be and the possible implications?
The spring on float needle #3 is also completely stuck in the un-compressed position so it got thrown in some carb cleaner. I also have another float needle for replacement if I can't get it to work easily. Float #2 moves not quite as well as the others so its getting cleaned or replaced or well. I know I check all of these for proper operation before putting the carbs back together again.
Basically, all the carbs need a complete clean and redo. Maybe I'll figure out where those two left over guide pins are supposed to go as well.
If you even dream of beating me, you better wake up and apologize! 
Muhammad Ali
Bikes - 1982 Gl1100 I
Muhammad Ali
Bikes - 1982 Gl1100 I
-
bigburlybug
- Cast Iron Member
- Posts: 75
- Joined: Sun May 22, 2016 11:12 pm
- Location: Fort Wayne, In
Re: My New Old Bike - 1982 Gl 1100I Rebuild
Hello,
So I cleaned all the carbs up. They were full of what looked like wood chips which didn't burn, even after putting a propane torch to them.

There was one float needle completely jammed and another that wasn't moving properly so I stole two needle floats from the other set of carbs. Checked the jets which were clean and all the small tunnels which were also free flowing. I put them all back together, found an o-ring on my chair that I can't find a home for and am missing an o-ring that goes in-between the carb and plenum body. Sadly +1-1 doesn't lead to a zero sum here
So I took the good needle floats from the original carbs and put them back on the bought carbs figuring maybe the purchased set would work properly. Put the bought carbs on the bike and, with a lot of hope but not optimism, I fired up the bike again.
So I cleaned all the carbs up. They were full of what looked like wood chips which didn't burn, even after putting a propane torch to them.
There was one float needle completely jammed and another that wasn't moving properly so I stole two needle floats from the other set of carbs. Checked the jets which were clean and all the small tunnels which were also free flowing. I put them all back together, found an o-ring on my chair that I can't find a home for and am missing an o-ring that goes in-between the carb and plenum body. Sadly +1-1 doesn't lead to a zero sum here
So I took the good needle floats from the original carbs and put them back on the bought carbs figuring maybe the purchased set would work properly. Put the bought carbs on the bike and, with a lot of hope but not optimism, I fired up the bike again.
If you even dream of beating me, you better wake up and apologize!
Muhammad Ali
Bikes - 1982 Gl1100 I
Muhammad Ali
Bikes - 1982 Gl1100 I
-
bigburlybug
- Cast Iron Member
- Posts: 75
- Joined: Sun May 22, 2016 11:12 pm
- Location: Fort Wayne, In
Re: My New Old Bike - 1982 Gl 1100I Rebuild
I didn't rebuild the petcock and the brake cleaning is going slow, there's a lot of rust to strip off. I did take the first set of carbs and mix and match needle float jets until all but the #4 carb seemed to be good and the #4 had a pretty decent float needle that might get better after soaking in some gas. I stuck them back on and tried it right before I went camping. It was a good start to the weekend. 
If you even dream of beating me, you better wake up and apologize!
Muhammad Ali
Bikes - 1982 Gl1100 I
Muhammad Ali
Bikes - 1982 Gl1100 I
-
bigburlybug
- Cast Iron Member
- Posts: 75
- Joined: Sun May 22, 2016 11:12 pm
- Location: Fort Wayne, In
Re: My New Old Bike - 1982 Gl 1100I Rebuild
So its been a bit since I've given an update but there's been progress nonetheless. First off is a cleaner gas tank. Before it had about a 1/4" of rust gunky gas. Now there's hardly any rust in the tank

It took about 30 hours of electrolysis using an xbox power supply and a clothes hanger at 12 v and 9.6 amps. That got most of the rust out and another two nights with five gallons of vinegar in the tank got it the rest of the way clean.
Next up was the brakes, which were also pretty dirty.

Lots of aluminum foil to polish everything up, cleaned out all of the holes and new rubber everywhere. I had a convenient breaker bar to help push the pistons back in.

So the front brakes were done and I was itching to take it for a brief ride. I pushed it around a bit to make sure I had stopping power, then took it down the driveway.
It took about 30 hours of electrolysis using an xbox power supply and a clothes hanger at 12 v and 9.6 amps. That got most of the rust out and another two nights with five gallons of vinegar in the tank got it the rest of the way clean.
Next up was the brakes, which were also pretty dirty.
Lots of aluminum foil to polish everything up, cleaned out all of the holes and new rubber everywhere. I had a convenient breaker bar to help push the pistons back in.
So the front brakes were done and I was itching to take it for a brief ride. I pushed it around a bit to make sure I had stopping power, then took it down the driveway.
If you even dream of beating me, you better wake up and apologize!
Muhammad Ali
Bikes - 1982 Gl1100 I
Muhammad Ali
Bikes - 1982 Gl1100 I
-
Old Fogey
- Honored Life Member

- Posts: 7704
- Joined: Mon Aug 27, 2007 11:31 pm
- Location: Glasgow, Scotland
- Contact:
Re: My New Old Bike - 1982 Gl 1100I Rebuild
An exercise in persistence! That's the way it has to be sometimes with these old bikes. But you are getting there. 
"Impossible Is Just a Level of Difficulty!..."
If I'd wanted you to understand, I would have explained it better! (Johann Cruyff)
I’d give my right arm to be ambidextrous!
If I'd wanted you to understand, I would have explained it better! (Johann Cruyff)
I’d give my right arm to be ambidextrous!
-
bigburlybug
- Cast Iron Member
- Posts: 75
- Joined: Sun May 22, 2016 11:12 pm
- Location: Fort Wayne, In
Re: My New Old Bike - 1982 Gl 1100I Rebuild
I am indeed. Still have half of the riding season left so I'm hoping to get it on the road soon.Old Fogey wrote:An exercise in persistence! That's the way it has to be sometimes with these old bikes. But you are getting there.
But for that, I need lights (camera, action)
https://photos.app.goo.gl/tc6ePw98ty9FpmSL9
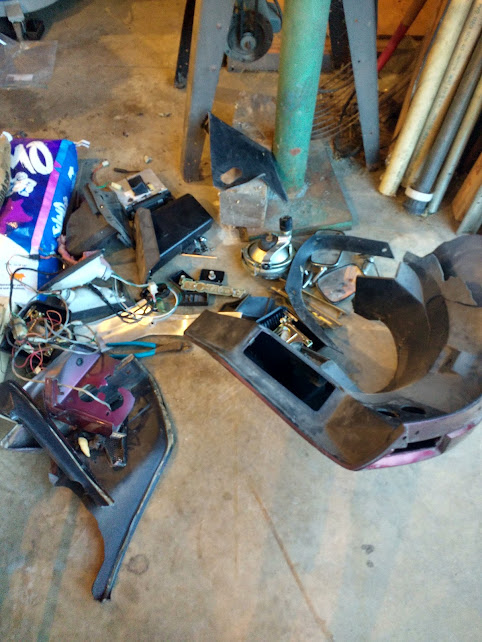
But before I could put lights on the bike, I needed some lights. I hem hawed around a little figuring out how I wanted to go about the whole thing and decided to go all original and see what I could on a budget. So I tore apart the fairing to get at the lights and pull all the good parts off for future resale or gifting. The fairing itself was pretty well smashed from the wreck 30 years back so its going in the trash. It made stuff way easier to get out since I could grip it and rip it whenever needed or bring out the hammer.
Got a lot of stuff out of it though.
I put all the lights back on and tested them out. If they weren't going to work, they were going to get an immediate upgrade to LED. As it was, they worked out fine, I'm going to do the LED conversion later when I have a better idea on what I want. And I'm gonna go look at Toolbox's post for research since he has done a lot of work with lights.
The horns seemed the easiest place to start, so pulled out the 3d printer and printed me out some brackets.

3d printed bracket with horns
I made two of them to clamp onto the frame around the radiator. It fit surprisingly well for the first fit and it didn't need another. A little electrical tape to make a vibration absorber and to snug it up a bit and it was good to go.

The next easiest was going to be the front headlight. In the removed parts bin, I found two nice brackets that fit around the fork tubes perfectly. Clamped them down nice and tight, cut and bent some flat iron stock, and threaded a bolt through the mounting holes on the headlight where it used to fit into the Vetter fairing. There's only two points of contact for the lights so it will probably bounce around a little bit. Good enough to add its part to be road legal and that's all I'm going for at this point.
To finish off the front, I drilled a hole in the front blinker plastic casing, and threaded a bolt onto the same bracket used for the headlight.

I like the look of the front pretty well but all those lights are pretty deep so it doesn't look all that great from the side. Road legal though, so I'm happy.
And bringing up the rear was the rear. Since it was super easy, I left the rear/brake light right where it was. I tried 3d printing another bracket for the rear blinkers and it turned out how I was expecting this time, that is to say, not at all. Instead, I put my dubious welding skills to work and made one out of flat stock.

Good thing this doesn't need to be structural
Yeah, still need lots more practice welding. I'm thinking it'll hold up though.
The vertical piece touches the rear/brake light and the horizontal is threaded inbetween the nut and the rear/brake light mount so the blinkers will stay relatively straight when going down the road.
Its a big booty, but it doesn't look half bad; and its road legal.
i did all of this two weeks ago and just realized today I forgot about mirrors
If you even dream of beating me, you better wake up and apologize!
Muhammad Ali
Bikes - 1982 Gl1100 I
Muhammad Ali
Bikes - 1982 Gl1100 I
-
Track T 2411

- Honored Life Member
- Posts: 8511
- Joined: Thu May 29, 2008 9:37 pm
- My Album: http://www.ngwclub.com/gallery/v/wingmans/Track+T+2411/
- Location: Prairie du Sac Wisconsin
Re: My New Old Bike - 1982 Gl 1100I Rebuild
Making good progress! Concerning the mirrors, the stock handlebar perches are tapped for mounting standard mirrors. Honda just put in a plastic plug to fill the hole on the Interstate and Aspy... lots of aftermarket mirrors available for cheap!
"I have no special talent. I am only passionately curious." - Albert Einstein
"He that is good with a hammer tends to think everything is a nail" - Abraham Maslow
"If you can't take the time to do it right the first time, how are you ever going to find the time to do it over?" -Unknown
Current Rides:
'Grumpy' - '81 Standard, now fully dressed.
'Layla' - '81 Standard w/dealer installed fairing and Hondaline bags.
'Scarlett' '76 'Survivor' nekkid as a j-bird!
Under Construction:
The 'Jalopy' '78-'79 Mash-up
'Quikie' '81 gl1100I back on the lift, project with the step-son!
In The Shed:
'81 gl1100I barn find aka "Josie, the farmer's daughter." (almost comatose build)
'77 gl1000, roller parts bike.
'82 gl1100I, 'Old Crusty' titled roller parts bike (free!)
'82 gl1100I, My first 'Wing, and an expensive lesson!
New2U Bike? Read Me.
-
- Similar Topics
- Replies
- Views
- Last post