So while I'm waiting on some parts, I took the opportunity to hear what a GL1000 sounds like with open headers...
The 70's called and I answered. 1975 GL1000 project
Moderators: Brant, Sagebrush, Forum Moderators
-
old_smokey
- Cast Iron Member

- Posts: 71
- Joined: Mon Apr 08, 2019 4:09 pm
- Location: Manitoba
Re: The 70's called and I answered. 1975 GL1000 project
Last edited by old_smokey on Fri Aug 20, 2021 4:44 pm, edited 1 time in total.
-
old_smokey
- Cast Iron Member
- Posts: 71
- Joined: Mon Apr 08, 2019 4:09 pm
- Location: Manitoba
Re: The 70's called and I answered. 1975 GL1000 project
Looking for some advice. My stator cap is seized in place. The previous owner had already rounded off the 17mm nut badly. I tried vice grips and channel lock pliers after two days of penetrating oil, but no luck. They just ripped chunks of soft aluminum out. I used a heat gun on it too, but don’t want to keep doing that as it’s close to the fuel tank.
Last night I got some really good purchase with the channel locks and tried to work it back and forth to break loose. Well it broke loose alright, but only the middle section. Oh boy.
I could fit a dremel cut off wheel in there, so I cut a small notch to tap with a cold chisel. But it’s not budging one bit. Any other tips to get this thing free? I really don’t want to pull the motor and rear cover for this stupid cap!!
I thought maybe if I can somehow get access with a long drill bit, I could make two small holes in opposite sites, and use a large circlip tool to engage on the outer edge for more leverage. I can't get the vice grips on the outer edge of the cap because it's recessed in the engine case.
That, or I'll try to cut more notches so I can tap with the chisel in multiple areas, not just one spot. I don't want to smash the cap to bits and have them flying into the engine though. It's both a brutal and delicate task...
Ah, and just for some good news to balance out the bad. Here's a video with of the wing idling like a beauty with some loaner Staintune pipes on stock headers.
- Attachments
-
- IMG_3952.JPG (91.22 KiB) Viewed 339 times
-
desertrefugee

- SUPER BIKER!!!!

- Posts: 3947
- Joined: Fri Nov 11, 2011 9:33 pm
- Location: Chandler, AZ, USA
Re: The 70's called and I answered. 1975 GL1000 project
Nice bike. Short of spinning that cap off, it's already destroyed. I guess you could break it up completely and remove it in bits.
- Life is not about waiting for the storms to pass. It's about learning to ride in the rain.
-
old_smokey
- Cast Iron Member
- Posts: 71
- Joined: Mon Apr 08, 2019 4:09 pm
- Location: Manitoba
Re: The 70's called and I answered. 1975 GL1000 project
Yeah, but how to do that with the engine in place, and prevent those bits from falling into the engine? I almost need to stuff a rag into that hole or something, then keep trying to spin it off with the chisel. If it breaks up, so be it.
-
pidjones
- SUPER BIKER!!!!
- Posts: 3238
- Joined: Wed May 22, 2013 4:06 pm
- Location: East TN
Re: The 70's called and I answered. 1975 GL1000 project
The cap on my '79 was jambed and boogered. I was able to get it off by patiently tapping a chisel on the edge of it with my lightest hammer. Luckily, I had saved the cap from the junker.
"Love 'em all.... let God sort 'em out!"
Ex 2006 GL1800 - the Black Pearl SOLD! to make room for:
2021 Can-Am Spyder RT Limited Dark Chalk Metallic
1975 Red GL1000 project - ex Pistol Pete project
1972 Triumph T150V Trident rescue - finished and FOR SALE!
1976 Yamaha RD400c
1978 GL1000 with '75 engine - the Hunley
Ex 1978 GL1000
Ex 1979 GL1000
Ex '79 CB750F rat bike
Ex '86 SEi
Ex '77 GL1000
Ex '76 RD400
Ex '72 Penton 125 set up for flat track
Ex '73 RD250
Ex '68 TR6C - chopped
-
Rat

- Photo Gallery Admin

- Posts: 15480
- Joined: Fri Oct 21, 2005 9:59 pm
- My Album: https://www.ngwclub.com/gallery/v/wingmans/rat/
- RIP: cookie
- Location: Toronto .... Canada
Re: The 70's called and I answered. 1975 GL1000 project
Yeah .... I’d try drilling a couple of shallow holes around the edge to give your chisel somewhere to grab .... there’s an 'O' ring in there so the penetrating oil is counter productive
Gord
Gord
"I'd rather Ride than Shine"
‘14 KLR650 ... not a rat ... yet
‘84 GL1200i ‘R2B6' (Rat to Be 6, the last, adopted by twowings)
My Original 'RAT' was a hybrid '82 CB900/1100F
‘14 KLR650 ... not a rat ... yet
‘84 GL1200i ‘R2B6' (Rat to Be 6, the last, adopted by twowings)
My Original 'RAT' was a hybrid '82 CB900/1100F
-
old_smokey
- Cast Iron Member
- Posts: 71
- Joined: Mon Apr 08, 2019 4:09 pm
- Location: Manitoba
Re: The 70's called and I answered. 1975 GL1000 project
Success! I tried a sharper cold chisel in a different spot, with a heavier hammer. After ten taps or so I had movement. Oh did my heart sing at that point haha. It came off nice and clean.
Lucky for me, I had a brand new cb750 valve inspection cap in my parts bin, which is the same part number. A bit of anti seize and the cap is back in working order.
Also, I scored this nice set of Hondaline luggage after work! One small crack in a side pannier, repairable, but otherwise it all looks good!
- Attachments
-
- 50AD5E8E-FC61-4835-87A0-1418637E1C8F.jpeg (186.57 KiB) Viewed 321 times
-
- 03AC989C-2F0F-40C2-9029-23BC0C3BA3C0.jpeg (115.57 KiB) Viewed 321 times
-
- 8C23AE55-0374-4CFF-8E07-1D2AA73F692D.jpeg (259.46 KiB) Viewed 321 times
-
old_smokey
- Cast Iron Member
- Posts: 71
- Joined: Mon Apr 08, 2019 4:09 pm
- Location: Manitoba
Re: The 70's called and I answered. 1975 GL1000 project
So I still can’t get the bike to run without popping. I thought I’d have a closer look at the timing. I took the points plate off and oh boy. The advance unit was seized solid with old grease. I had to really work it apart, clean thoroughly and lube it up. It snaps closed now, success!
Also someone used some long screws in the points. It looks like they maybe have been shredded by the advance at some point. There was some metal flakes inside the points housing. Jeez what a mess.
I set the timing as per the manual, setting the points gap at the little indent on the end of the advance lobe. However that is not the spot I get max gap, at all...?? So I set the points gap instead at the highest point on the lobe and greatest opening. Is this common?
Setting the static timing seems impossible with my current points. They just have such mood engagement, this is a futile exercise. I might be able to get it running a bit better with these but it’s time to replace this entire assembly.
Have a look at the photo of the whole assembly in place. This is how far advanced I need to rotate the points plate according to me meter. Surely this is wrong though. The two slots in the head casting and points plate, should they line up closely?
- Attachments
-
- DFE40601-4E38-45D7-AF8C-4701F834D2A9.jpeg (176.21 KiB) Viewed 310 times
-
- 9BC8F6E5-BDFC-4C77-8127-3579E9C7DBEA.jpeg (156.77 KiB) Viewed 310 times
-
- 4BE1EFDB-E6EA-45AC-A469-38C10C54C70B.jpeg (163.73 KiB) Viewed 310 times
-
- 35381377-CE56-42B5-8371-2E743DCA81EC.jpeg (174.66 KiB) Viewed 310 times
-
- 56E3B42D-C9BA-4305-ACE5-D86DC1AE45EF.jpeg (180.92 KiB) Viewed 310 times
-
ericheath

- Honored Life Member

- Posts: 9581
- Joined: Wed Jul 29, 2009 11:20 am
- Location: Winnipeg, Manituba
Re: The 70's called and I answered. 1975 GL1000 project
There is a locating pin behind the advance mechanism. Perhaps the advance plate was not on the pin?
Or did you have two timing marks on your belt pulleys? Some had two marks and it would be easy to set them to the wrong mark.
When correct, the two slots in the points plate should line up fairly close to the two slots in the housing cover. You must be advanced too much. Pic of pin is in the manual.
Whatever I suggest here should be given ample time for a moderator to delicately correct. I apologize in advance.
77 WING, 1200 engine with 77 heads, cams, gl1100 foot pegs, Magna V65 front end, 764A carbs, [-gone Suzuki M109 monoshock--, replaced with gl1100 shocks] gl 1200 swing arm, gl1500 final drive, wheel and rear brakes Valkyrie seat, Meanstreak tank, Sportster pipes, Power Arc ignition off crank.
77 Wing. black
83 Wing, in pieces
"Continuing education is important even if the subject matter is fairly useless (as in this case)."---Greg Foresi
-
ericheath
- Honored Life Member
- Posts: 9581
- Joined: Wed Jul 29, 2009 11:20 am
- Location: Winnipeg, Manituba
Re: The 70's called and I answered. 1975 GL1000 project
Here’s a pic of a later style pulley. They were the same on some 1000 style pulleys
- 3B659EFE-31C8-4DEB-86AD-879C4075332A.png (290.46 KiB) Viewed 307 times
Whatever I suggest here should be given ample time for a moderator to delicately correct. I apologize in advance.
77 WING, 1200 engine with 77 heads, cams, gl1100 foot pegs, Magna V65 front end, 764A carbs, [-gone Suzuki M109 monoshock--, replaced with gl1100 shocks] gl 1200 swing arm, gl1500 final drive, wheel and rear brakes Valkyrie seat, Meanstreak tank, Sportster pipes, Power Arc ignition off crank.
77 Wing. black
83 Wing, in pieces
"Continuing education is important even if the subject matter is fairly useless (as in this case)."---Greg Foresi
77 WING, 1200 engine with 77 heads, cams, gl1100 foot pegs, Magna V65 front end, 764A carbs, [-gone Suzuki M109 monoshock--, replaced with gl1100 shocks] gl 1200 swing arm, gl1500 final drive, wheel and rear brakes Valkyrie seat, Meanstreak tank, Sportster pipes, Power Arc ignition off crank.
77 Wing. black
83 Wing, in pieces
"Continuing education is important even if the subject matter is fairly useless (as in this case)."---Greg Foresi
-
ericheath
- Honored Life Member
- Posts: 9581
- Joined: Wed Jul 29, 2009 11:20 am
- Location: Winnipeg, Manituba
Re: The 70's called and I answered. 1975 GL1000 project
Just looked at your earlier pics and you have the right marks lined up on the left pulley, so that’s not your issue. M
Whatever I suggest here should be given ample time for a moderator to delicately correct. I apologize in advance.
77 WING, 1200 engine with 77 heads, cams, gl1100 foot pegs, Magna V65 front end, 764A carbs, [-gone Suzuki M109 monoshock--, replaced with gl1100 shocks] gl 1200 swing arm, gl1500 final drive, wheel and rear brakes Valkyrie seat, Meanstreak tank, Sportster pipes, Power Arc ignition off crank.
77 Wing. black
83 Wing, in pieces
"Continuing education is important even if the subject matter is fairly useless (as in this case)."---Greg Foresi
77 WING, 1200 engine with 77 heads, cams, gl1100 foot pegs, Magna V65 front end, 764A carbs, [-gone Suzuki M109 monoshock--, replaced with gl1100 shocks] gl 1200 swing arm, gl1500 final drive, wheel and rear brakes Valkyrie seat, Meanstreak tank, Sportster pipes, Power Arc ignition off crank.
77 Wing. black
83 Wing, in pieces
"Continuing education is important even if the subject matter is fairly useless (as in this case)."---Greg Foresi
-
old_smokey
- Cast Iron Member
- Posts: 71
- Joined: Mon Apr 08, 2019 4:09 pm
- Location: Manitoba
Re: The 70's called and I answered. 1975 GL1000 project
My pulleys only have one mark. I read about that beforehand and checked. I took pictures of each pulley lined up while at T1 just incase I questioned things later on, so that should all be good.
I think what might be happening is that the advance cam was so gummed up that it was rotating partially at random times, then getting stuck. So I would set my points gap at a particular spot, and then after an engine rotation or two that would go out the window again. That would explain why I could set my gap and then 5 minutes later it would have seemingly tripled. It would also explain why I would set the static timing at one spot, and then minutes later I'd need to rotate the whole plate quite a lot to get it to work again.
Now that the advance is installed correctly and operates smoothly, things should be better. However you can see my points are advanced much too far. I'm using a buzzer feature on my multimeter.The connection between my points is poor. Sometimes it doesn't want to create continuity, unless I tap the points and suddenly it starts buzzing. I think I'm going to set the plate just slightly advanced relative to those two slots in the casting, and see how it feels. In the mean time, I'll be ordering new ignition components as this is clearly not a long term solution.
-
old_smokey
- Cast Iron Member
- Posts: 71
- Joined: Mon Apr 08, 2019 4:09 pm
- Location: Manitoba
Re: The 70's called and I answered. 1975 GL1000 project
Well it's running quite nicely now...!!!
I tried rotating the points to align with the two slots in the engine casting but it ran like crap. Would hardly idle, would hang, bog down, just nasty. I put it back to my static mark, and I've got this!
I tried rotating the points to align with the two slots in the engine casting but it ran like crap. Would hardly idle, would hang, bog down, just nasty. I put it back to my static mark, and I've got this!
-
Jonesz
- Silver Member

- Posts: 906
- Joined: Mon Apr 24, 2017 9:03 pm
- Location: Manitoba, Canada
Re: The 70's called and I answered. 1975 GL1000 project
Sounds pretty good and those pipes do too. BTW I have gone the naked route but had a set of those original Hondaline bags on my brand new 1979 Gl1000 back in the day. Liked them a lot. Think they were made by Samsonite and were excellent quality and very easy to take off and use like suitcases when motelling etc. You will like them.
Jonesz
1983 GL1100 Aspencade named "Freki" currently undergoing change to a standard. Sold
1999 Valkyrie CT 1500 goes by the moniker "Valerie"
1978 Gl1000 "Loki" new project going to be a Cafe Convertible
1979 Suzuki GS850. Sold
1983 GL1100 Aspencade named "Freki" currently undergoing change to a standard. Sold
1999 Valkyrie CT 1500 goes by the moniker "Valerie"
1978 Gl1000 "Loki" new project going to be a Cafe Convertible
1979 Suzuki GS850. Sold
-
old_smokey
- Cast Iron Member
- Posts: 71
- Joined: Mon Apr 08, 2019 4:09 pm
- Location: Manitoba
Re: The 70's called and I answered. 1975 GL1000 project
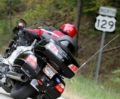
Just back from an EXCELLENT first ride. 50km of highway. I had a slight burp out the left pipe at stops twice. Otherwise it was near flawless. Pulls harder than I expected and is so smooth.
The suspension is a joke, and the brakes aren’t much better, so that needs work. I also think my steering bearings are maybe a touch loose. Now we’re into tuning and maintenance though. Boy what a joy this was to ride.
The suspension is a joke, and the brakes aren’t much better, so that needs work. I also think my steering bearings are maybe a touch loose. Now we’re into tuning and maintenance though. Boy what a joy this was to ride.
- Attachments
-
- 75201583-FDD8-4102-9F75-45818D2817FE.jpeg (226.92 KiB) Viewed 279 times
Last edited by old_smokey on Fri Aug 20, 2021 4:46 pm, edited 1 time in total.
-
- Similar Topics
- Replies
- Views
- Last post
-
- 13 Replies
- 1457 Views
-
Last post by Tbell
-
- 102 Replies
- 7724 Views
-
Last post by leonardhcross
-
- 17 Replies
- 1448 Views
-
Last post by heDONist
-
- 16 Replies
- 1482 Views
-
Last post by BrooksGL1000