Page 4 of 7
Re: new project: 1975 Gl1000
Posted: Sat May 22, 2021 7:35 am
by Whiskerfish
Oh and Muriatic acid is like 10 bucks a gallon at Lowes.
Re: new project: 1975 Gl1000
Posted: Sat May 22, 2021 10:33 am
by Dr. Frankenstein
Wow...! I at first thought that was a cave! Or a septic tank...!
"Never Give Up - Never Surrender"!

Re: new project: 1975 Gl1000
Posted: Mon May 24, 2021 8:07 pm
by nakedinterstate81
Whiskerfish wrote: ↑Sat May 22, 2021 7:15 am
I would do nuts and bolts first. then evaluate what is left. I have had good luck with nuts and bolts and then Muriatic acid. Generally I can have a tank clean in a hour or less.
How do you treat the tank after the muriatic acid?
I have left the acetone in the tank over night and it was gone the next day. It dissolved a good chunk of the Kreem flakes but not all of it. The walls are still covered.
The MEK dissolved a good chunk of kreem in an less than an hour that I tested in a small glass container. So I ordered a gallon of that.
In the meantime, the carburetor had one last sonic bath in a low simple green solution after I wrestled out the eight emulsion tubes. They were packed in congealed fuel.
After rinsing in warm water it now looks like a furry peace of lead

There are a lot of powdery white spots on it.
Re: new project: 1975 Gl1000
Posted: Mon May 24, 2021 8:23 pm
by Whiskerfish
nakedinterstate81 wrote: ↑Mon May 24, 2021 8:07 pm
SNIP
How do you treat the tank after the muriatic acid?
SNIP
I flushed it with copious amounts of fresh water then vacuumed it out to get it dry (stuck the vacuum hose in there and walked away for about an hour) then a good spray of WD-40 while it waited for it first fill up with gas. I know others have had success using them but I am not a fan of coatings. I just do my best to keep my tanks full.
Re: new project: 1975 Gl1000
Posted: Tue Jun 08, 2021 8:38 pm
by nakedinterstate81
I was wondering how to rotate the fuel tank periodically with the MEK inside and found that it fits very snug into an old front tire. The brackets fit right in there. I plugged everything up and rotated the tank a bit every day. So far the MEK has dissolved almost all of the tank liner and is awaiting a final acid bath.
Moving on to rebuilding the forks. It looks like the oil lock did not come out and is still stuck in there.
How to get it out without damage?

Re: new project: 1975 Gl1000
Posted: Fri Jun 11, 2021 11:33 pm
by nakedinterstate81
The oil lock is still stuck in there.
So I am just going to leave it in there and bolt the stantion back in

Moving onto the front engine cover. All 12 of the 13 bolts came out easily but the top left one did not budge at all.
It's the one that is obstructed by the left subframe and has a small protruding boss, close to the water ways.
I broke two impact bolt removers and two bits.
Had to grind off the head and wiggle the front cover off.
Too bad the frame is right in front of it.
Five heating and quenching cycles later with the propane torch and one hour of carefully wiggling it back and forth with a vise grip, it finally came out with a lot of fighting.
Of course the oil filter bolt was rounded off and needed a dremel surgery.
The water pump is not moving at all and is encrusted with dried coolant.
I am going to replace the whole thing with my GL1100 cover and a new pump.
Took out the front engine mount plate and the thermostat and found a bunch of half inch sized crystalized coolant nuggets in there. So why not go all the way and replace the water pipe o-rings and clean the top of the engine?
None of the bolts holding the water pipes down turned, even after a day of soaking in PB blaster.
Access is restricted from the top so I am going to leave these as is and postpone it until I have to take the engine out.
I could not find a way to test the water pipes in the book or online.
Any Ideas?
Re: new project: 1975 Gl1000
Posted: Sat Jun 12, 2021 6:41 am
by pidjones
I've always been able to remove the oil lock by a slight tap from the bottom. I really think that at this point you should pull the engine (or even easier, take the frame off of the engine). Sharp shocks downward on the water tube elbow screws might loosen them, but beware that I've had two snap. New water tube o-rings would be wise after cleaning mating surfaces. What would you propose to test on the water tubes? New thermostats are readily available at most all parts stores, but you may have to make a new housing o-ring by super-glueing o-ring cord to the right size. Beware that many have found even incorrect gasket thickness on the front cover has prevented proper gear shift operation.
Re: new project: 1975 Gl1000
Posted: Sat Jun 12, 2021 3:56 pm
by nakedinterstate81
I was wondering how one can check that the water tubes are not leaking before putting everything together.
I don't have any help lifting the frame off and the wheels are being relaced.
Re: new project: 1975 Gl1000
Posted: Sat Jun 12, 2021 4:44 pm
by 5speed
robin1731 wrote: ↑Tue May 18, 2021 1:36 pm
Track T 2411 wrote: ↑Tue May 18, 2021 6:25 am
Do the carb numbers match?
I would squirt carb or brake cleaner down that hole and see where it goes. Definitely not a stock Wing setup...
Wear safety glasses if you do that.
how are you suppose to know the passage is clear if you don't get cleaner in your eyeball?

Re: new project: 1975 Gl1000
Posted: Sun Jun 13, 2021 1:31 am
by nakedinterstate81
I would rather have cleaner in my eyeballs than trying to bang in K&L fork seals that are 12.5 mm thick instead of 11 mm.
So no more aftermarket seals and more OEM.
However, the day was not lost after cursing me for not doing my seal dimensions homework.
Silly me trusted an eBay description while studying for an engineering degree
I spent three hours heating and wrenching the old spokes out.
I don't blame them. They have been in there for 36 years and put up an incredible fight.
Some where not so lucky and have been executed with the power tool. About half of them.
New Buchanan's stainless spokes are on the way and now is a good time to polish out the rim and hub after I relocate the bench top grinder to accommodate the wheel dimensions.
The valve covers received a good brushing with the prymemx wheels.
Re: new project: 1975 Gl1000
Posted: Sun Jun 13, 2021 5:39 pm
by pidjones
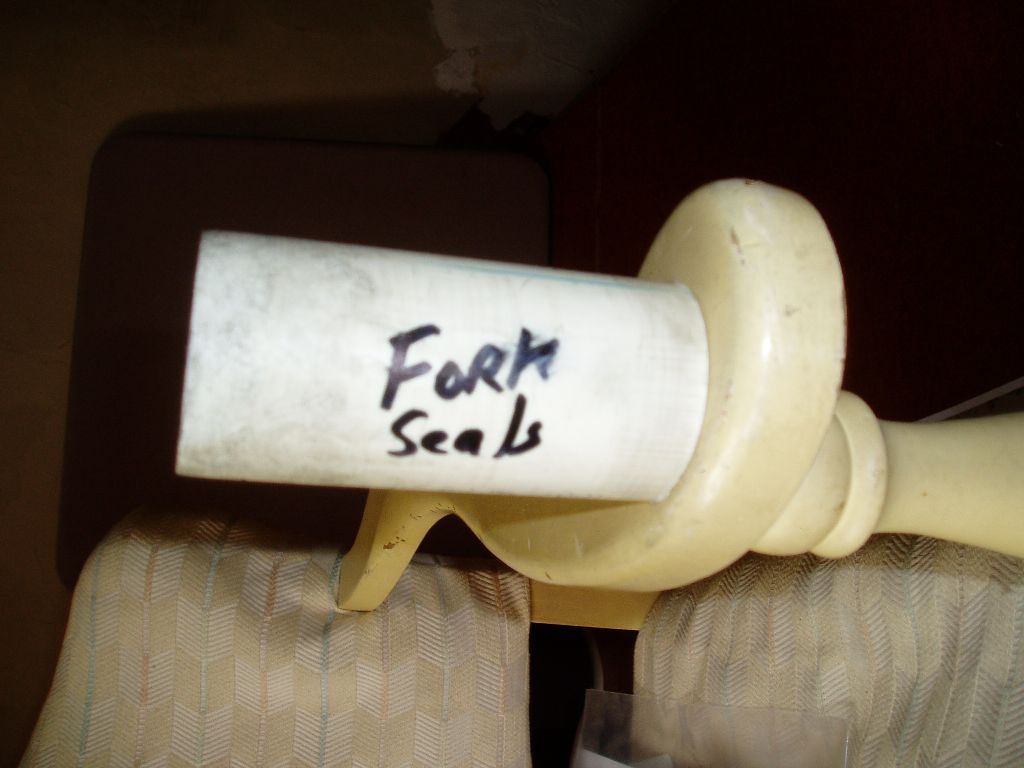
I always use some PVC pipe shaved down just a bit on the end to tap in seals. Works great. Wood block on top of the pipe and pound away - installed in seconds.
Re: new project: 1975 Gl1000
Posted: Mon Jun 14, 2021 7:06 am
by Whiskerfish
pidjones wrote: ↑Sun Jun 13, 2021 5:39 pm
I always use some PVC pipe shaved down just a bit on the end to tap in seals. Works great. Wood block on top of the pipe and pound away - installed in seconds.
YEP got one hanging on the wall in the shop just for fork seals.
Re: new project: 1975 Gl1000
Posted: Mon Jun 14, 2021 8:22 am
by nakedinterstate81
I use a pvc pipe as well. Also the copper exhaust gaskets fit in there.
The problem was that the advertised "fits 1975" seal height was 12.5 mm instead of 11mm (book).
That's 1.5 mm too thick and did not expose the ridge where the clip slips into.
Re: new project: 1975 Gl1000
Posted: Fri Jun 18, 2021 11:33 pm
by nakedinterstate81
Hello Gents,
Since the K&L seals (photo #1) were too thick (12.5mm) to expose the clip groove, I ordered new ones from eBay, trying to save some bucks on shipping.
The original seal dimensions in the service book calls for 37x48x11 which is part # 51495-467-405.
One seller advertised an NOS seal set with that part number (photo #2) and it is 10.5 mm thick, comes with an extra ring and some instructions. It fits perfectly!
The other seller advertised the same seal with the same part number and shipped me (#3 photo) in a Honda labeled bag with a wrinkly paper slip saying 91255-467-671. This seal did not fit since it is 12.5mm thick.
They also look very similar to the K&L seals.
I am not in a hurry to get the forks back in but I find it pretty confusing to procure the correct seals. Unless I find a good source for the correct seals.
I paid under $15 with free shipping for each seal. The correct one (#2) was only $10 with free shipping but only one available.
Sigh! I feel like there is a Honda fork seal conspiracy in force.
Re: new project: 1975 Gl1000
Posted: Sun Jun 20, 2021 7:24 pm
by nakedinterstate81
Moving onto the timing belts.
I moved the crank to TDC and everything aligns perfectly.
Took the belts and tensioners off and noticed these perforated shields in there and two metal strips.
I did not have these on my Gl1100.
Are these heat shields?
Anyway, they sit on the boss for the tensioners and including the metal strips add 3.5 mm to the offset so I guess I have to add washer if I leave these out.
My KIA tensioners don't fit in there with the rectangular protruding boss rubbing on the bolt heads of my tensioners (arrows). I guess I will have to grind these out like I did on my Gl1100.
Given the age of the bike ( I know miles don't matter), but it has been sitting for 40 years, I am considering pulling the heads at this point.
Would you agree?
The guy who sold me the bike operates a machine shop and would refresh the heads for $80 each.
Plus I still have a complete engine seal kit left over from the gl1100 bike.
