My 8100 mile 76 LTD, the Olde Wing
Moderators: Brant, Sagebrush, Forum Moderators
-
Fred Camper

- Vice President

- Posts: 6912
- Joined: Wed Aug 12, 2009 9:38 pm
- My Album: http://www.ngwclub.com/gallery/v/wingmans/Jeff+Bozeman/
- Location: Metro Detroit
- Contact:
Re: My 8100 mile 76 LTD, the Olde Wing
Good progress. Keep in mind that many of us do not think rotors with lower mass are better. Pads can form to the minor glooves. New rotors are fine, but just not a fan of thinner ones. .
Proud member of the NGW Cartel (Rochester MI)
1977 GL1000 BADDOG (April 2012 BOTM)
1976 LTD - '993 LTD...and so it begins'
You should remember that it's peace of mind you're after and not just fixing the machine. R.Pirsig
1977 GL1000 BADDOG (April 2012 BOTM)
1976 LTD - '993 LTD...and so it begins'
You should remember that it's peace of mind you're after and not just fixing the machine. R.Pirsig
-
DET17
- Zinc Member

- Posts: 50
- Joined: Fri Jul 15, 2022 6:06 am
- Location: East TN
Re: My 8100 mile 76 LTD, the Olde Wing
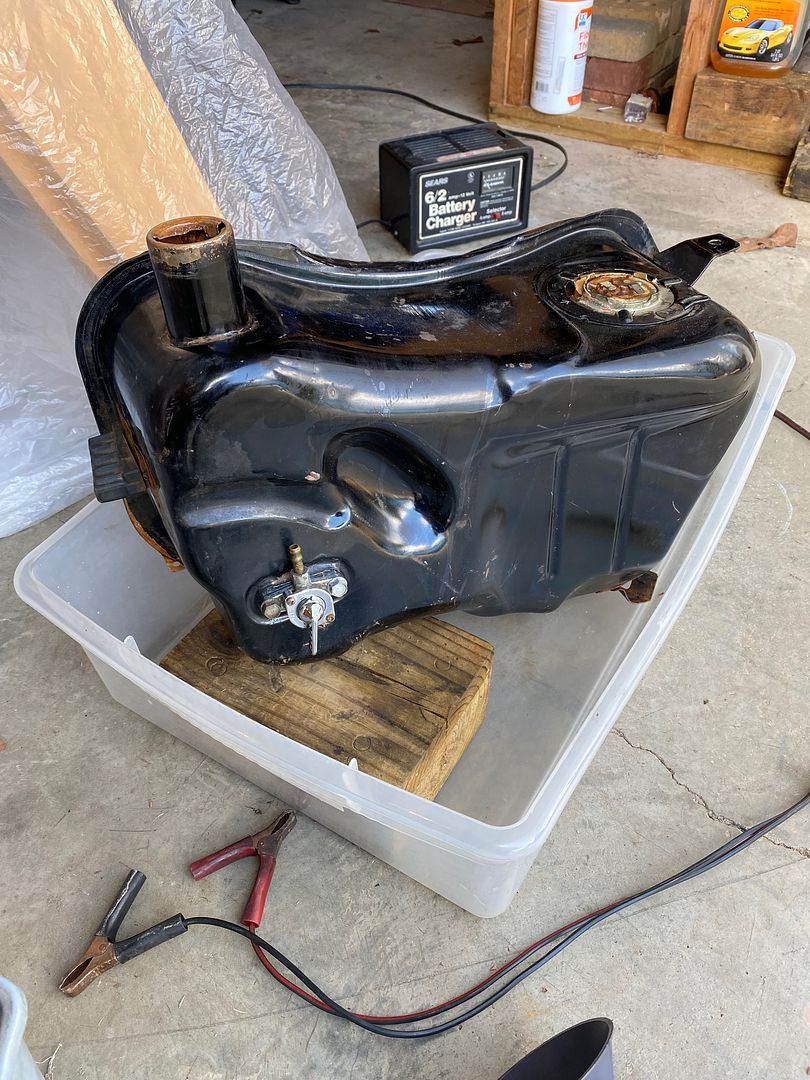
Fuel tank resurrection!
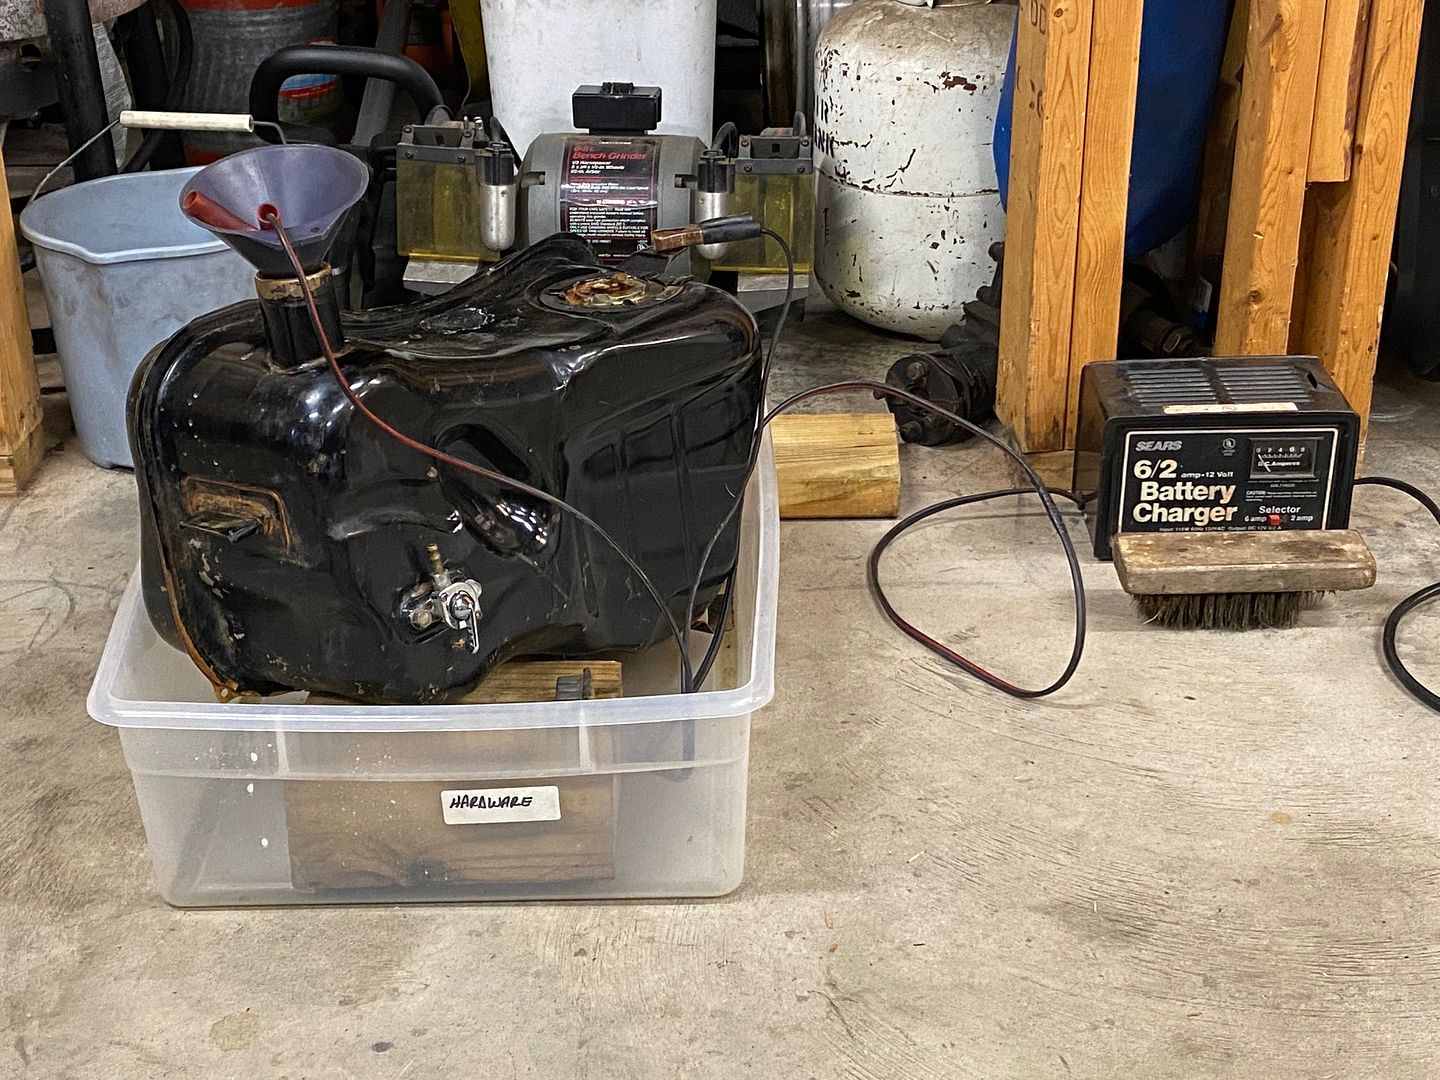
Well my original 8100 mile tank had been KREEMED by the PO; I was advised not to use it as found. With that one in the wings (for now), I purchased a pair of GL1 tanks off eBay. Taking the best of the two, I began the electrolysis de-rustification. The excellent link on NGW details everything in the process, so here just the pics:
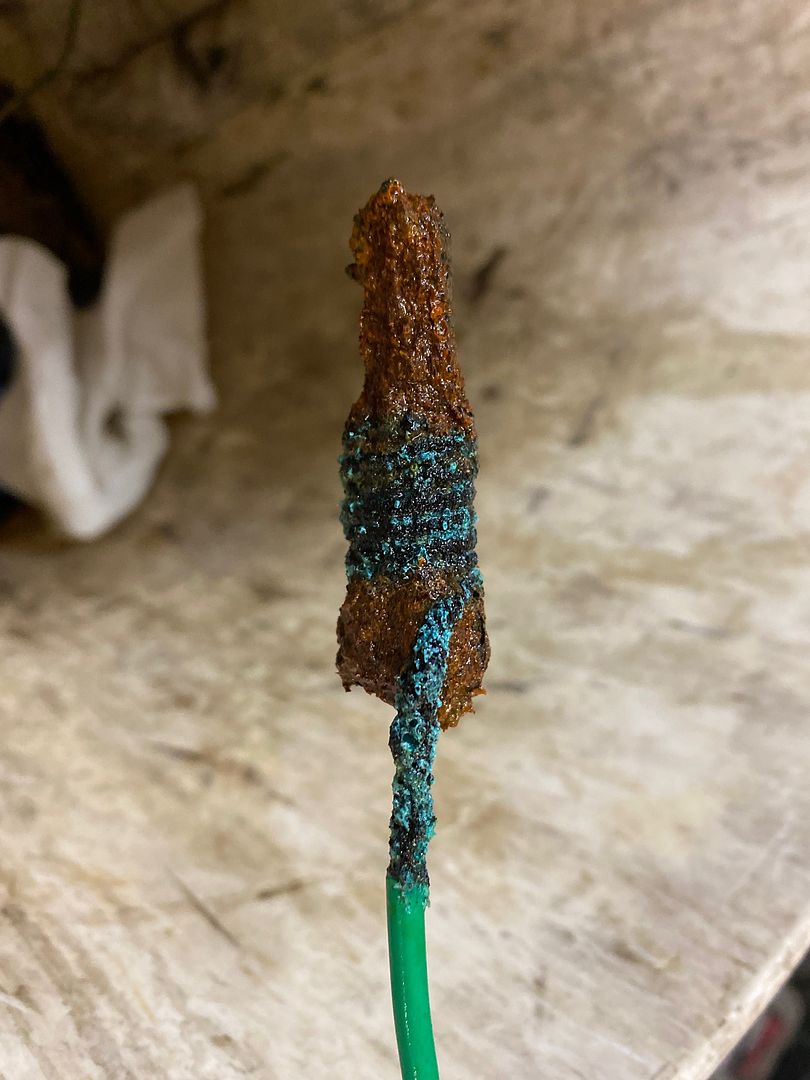
The rust "magnet" seen here at the end of a #10 piece of solid copper:
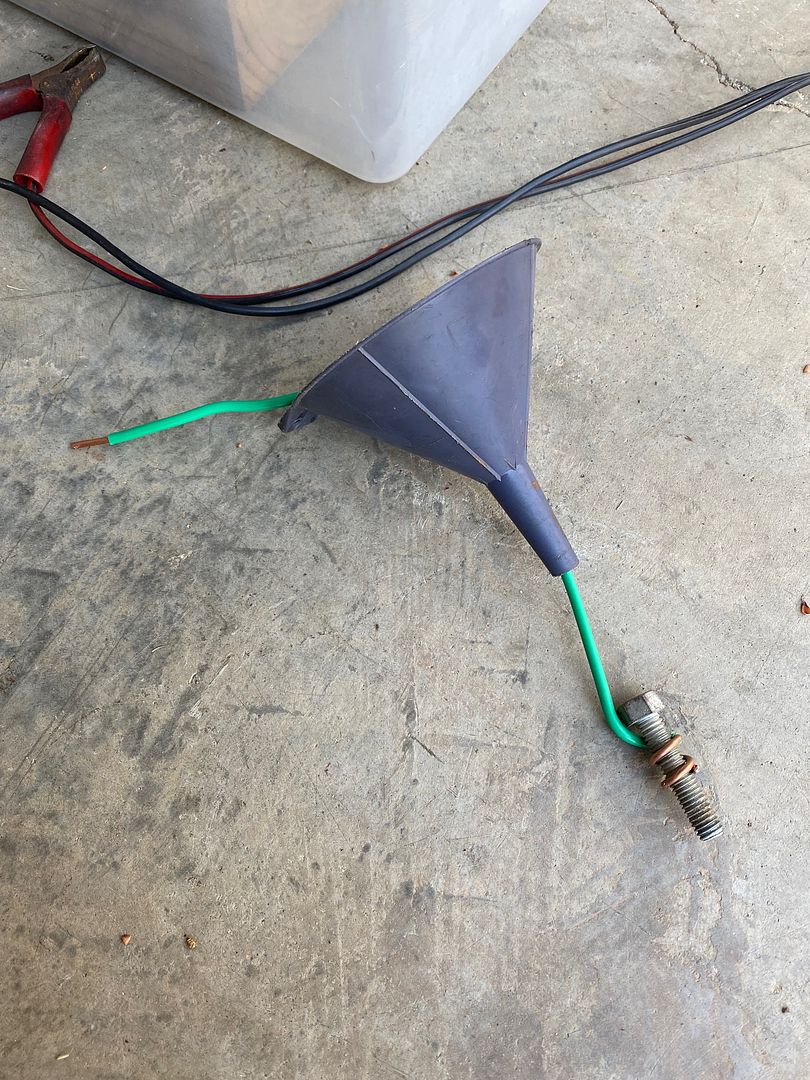
Here is what the magnet looks like after some electrolysis cleaning time:
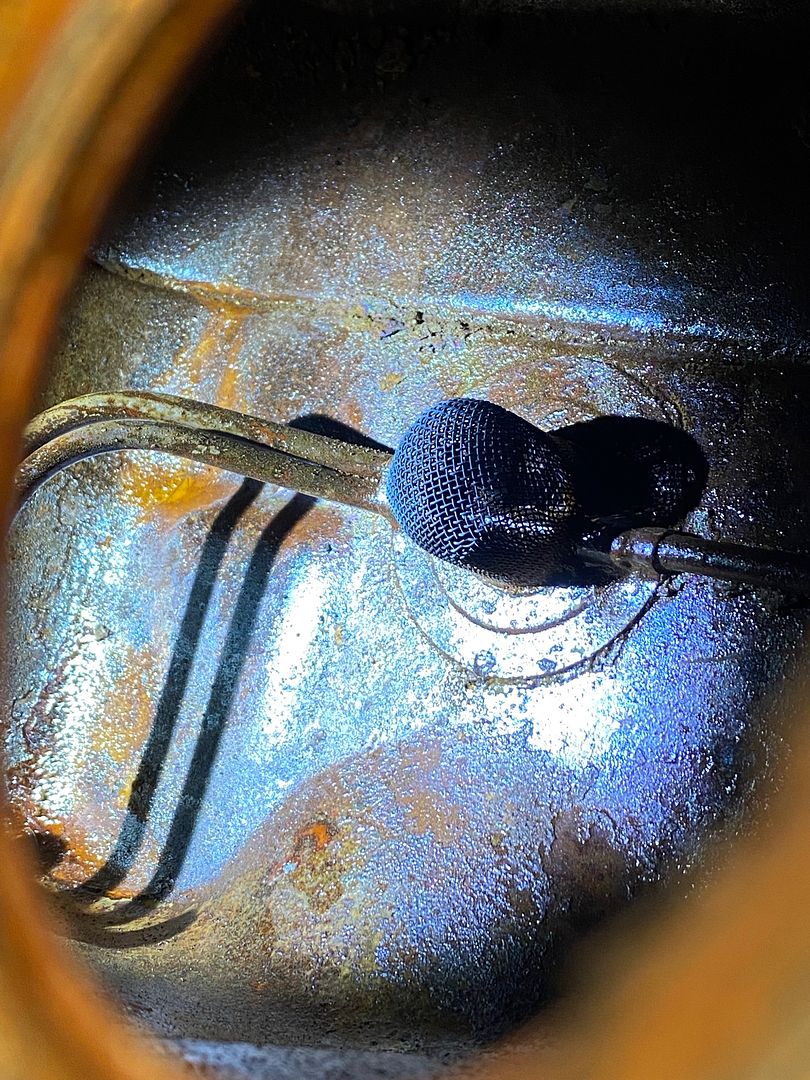
Right or wrong, I chose this tank to start with because it had the OE debris screen still intact on the primary feed fuel line:
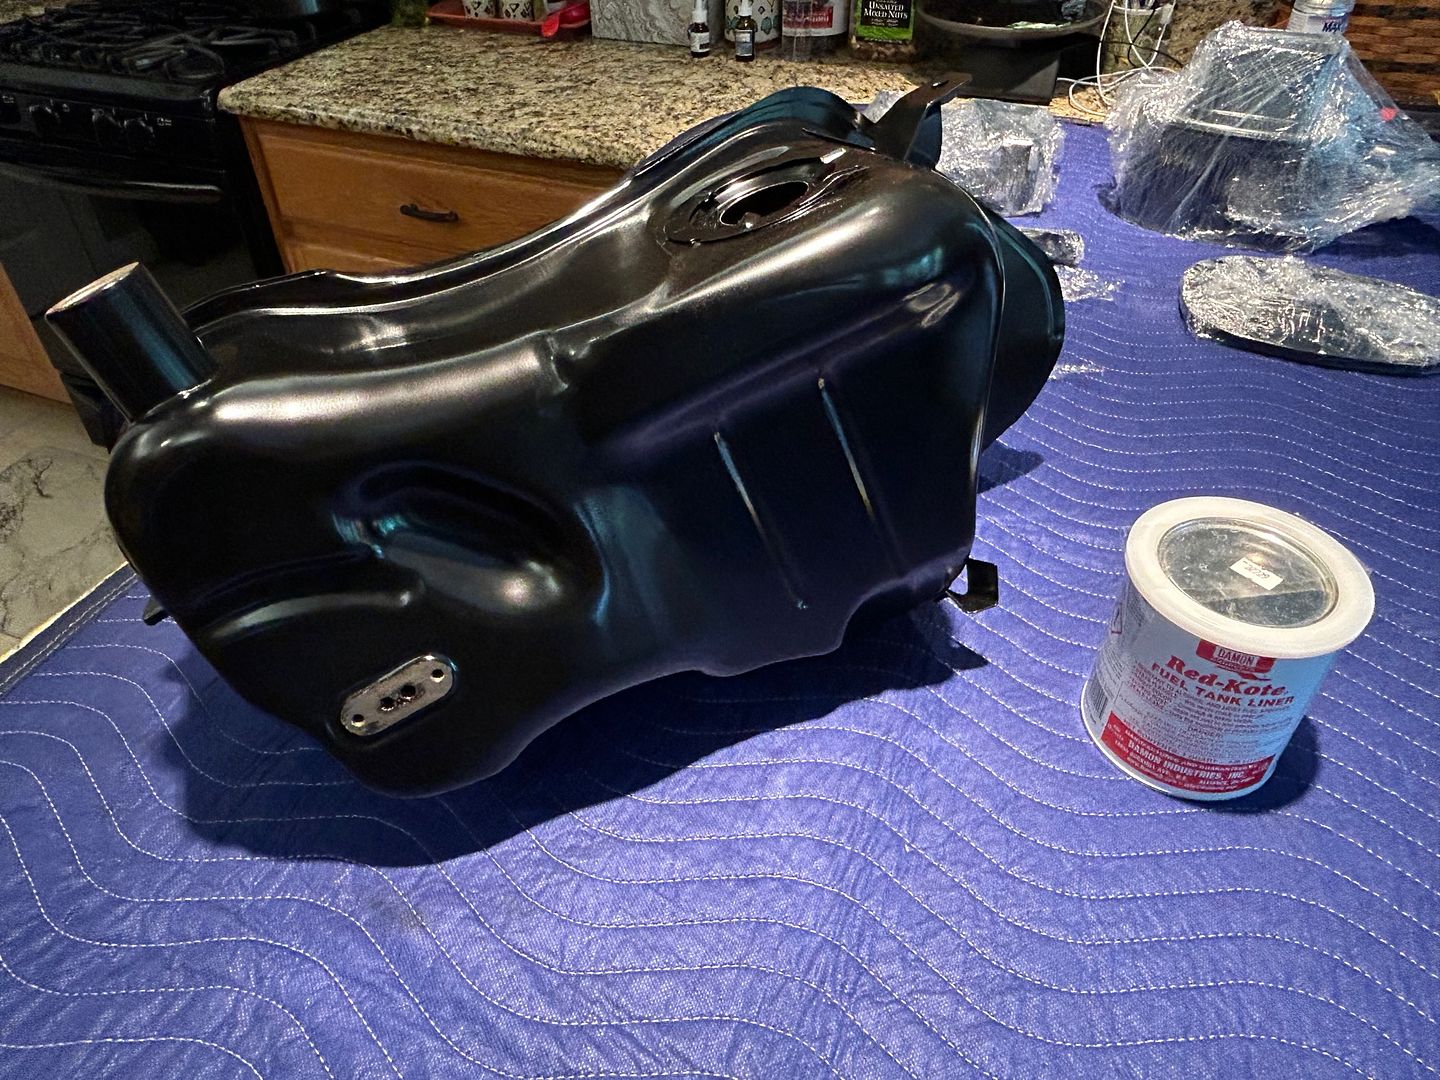
With the process "loaded", I let her simmer a couple weeks on & off. My original sacrificial elements (copper wire & bolt) were so corroded they broke off the #10 copper. I rebuilt that portion with another steel bolt and MANY wraps of copper. I did learn via other sites that starting with hot water does accelerate the reaction and quicken the rust conversion to the type which flakes off easily. Eventually there was no more rust & crud being transferred to the anode (or was it the cathode?), so I flushed the tank and ran a quart of isopropyl alcohol thru it to suck up the water. The next step will be sealing the tank with Red-Kote which was my choice lining material.
I had a pile of steel components which needed refinishing, all original black Honda steel. I decided to take the lot of it to my local powder coating company and let them semi-gloss black everything. The company confirmed that they cannot PC steel fuel tanks if they have chemical compounds within, as part of their powder process requires oven baking the finish on the outside. I must say the finished product looks pretty darn good IMO :
Up next - Roto-rooting the reserve fuel feed and the Red Kote installation and results.
Well my original 8100 mile tank had been KREEMED by the PO; I was advised not to use it as found. With that one in the wings (for now), I purchased a pair of GL1 tanks off eBay. Taking the best of the two, I began the electrolysis de-rustification. The excellent link on NGW details everything in the process, so here just the pics:
The rust "magnet" seen here at the end of a #10 piece of solid copper:
Here is what the magnet looks like after some electrolysis cleaning time:
Right or wrong, I chose this tank to start with because it had the OE debris screen still intact on the primary feed fuel line:
With the process "loaded", I let her simmer a couple weeks on & off. My original sacrificial elements (copper wire & bolt) were so corroded they broke off the #10 copper. I rebuilt that portion with another steel bolt and MANY wraps of copper. I did learn via other sites that starting with hot water does accelerate the reaction and quicken the rust conversion to the type which flakes off easily. Eventually there was no more rust & crud being transferred to the anode (or was it the cathode?), so I flushed the tank and ran a quart of isopropyl alcohol thru it to suck up the water. The next step will be sealing the tank with Red-Kote which was my choice lining material.
I had a pile of steel components which needed refinishing, all original black Honda steel. I decided to take the lot of it to my local powder coating company and let them semi-gloss black everything. The company confirmed that they cannot PC steel fuel tanks if they have chemical compounds within, as part of their powder process requires oven baking the finish on the outside. I must say the finished product looks pretty darn good IMO :
Up next - Roto-rooting the reserve fuel feed and the Red Kote installation and results.
-
Fred Camper
- Vice President
- Posts: 6912
- Joined: Wed Aug 12, 2009 9:38 pm
- My Album: http://www.ngwclub.com/gallery/v/wingmans/Jeff+Bozeman/
- Location: Metro Detroit
- Contact:
Re: My 8100 mile 76 LTD, the Olde Wing
Good Progress for sure. Do ensure you clean out both petcock lines before the red coat and again after.
Proud member of the NGW Cartel (Rochester MI)
1977 GL1000 BADDOG (April 2012 BOTM)
1976 LTD - '993 LTD...and so it begins'
You should remember that it's peace of mind you're after and not just fixing the machine. R.Pirsig
1977 GL1000 BADDOG (April 2012 BOTM)
1976 LTD - '993 LTD...and so it begins'
You should remember that it's peace of mind you're after and not just fixing the machine. R.Pirsig
-
DET17
- Zinc Member
- Posts: 50
- Joined: Fri Jul 15, 2022 6:06 am
- Location: East TN
Re: My 8100 mile 76 LTD, the Olde Wing
Clutch system redux.
With the bike in the current disassembled state, it seemed the perfect time to "stage zero" the clutch cable system. I reckoned the low mile drivetrain surely doesn't need actual clutch work, but the cable was low hanging fruit with the fuel tank out of the way.
Found an NOS Japan made clutch cable (not OE, but at least JAPAN and not the garbage being produced now). My manual showed me the proper routing path.... and my original 76 cable appeared not to have been buggered with. The clutch was not friendly to pull as found, so I looked over the whole system. First, removed the OE sticky cable and routed the new one:
Used some tips from a 40+ year HONDA bike mechanic for the clutch adjustment. Nearly identical to the factory manual, with a few differences. Here are the guy's thoughts on same:
https://www.motorcycleproject.com/text/clutches.html
Well with the new cable installed and adjusted per the sage, it was still a real bugger to actuate. Clearly the control end of the clutch must be deficient. Some disassembly quick showed me that pivot bolt at the clutch perch was badly worn, as was the OE lever. Found the Honda PN's for replacements, and snapped up some NOS parts off eBay. When the clutch lever arrived, I was in for a surprise:
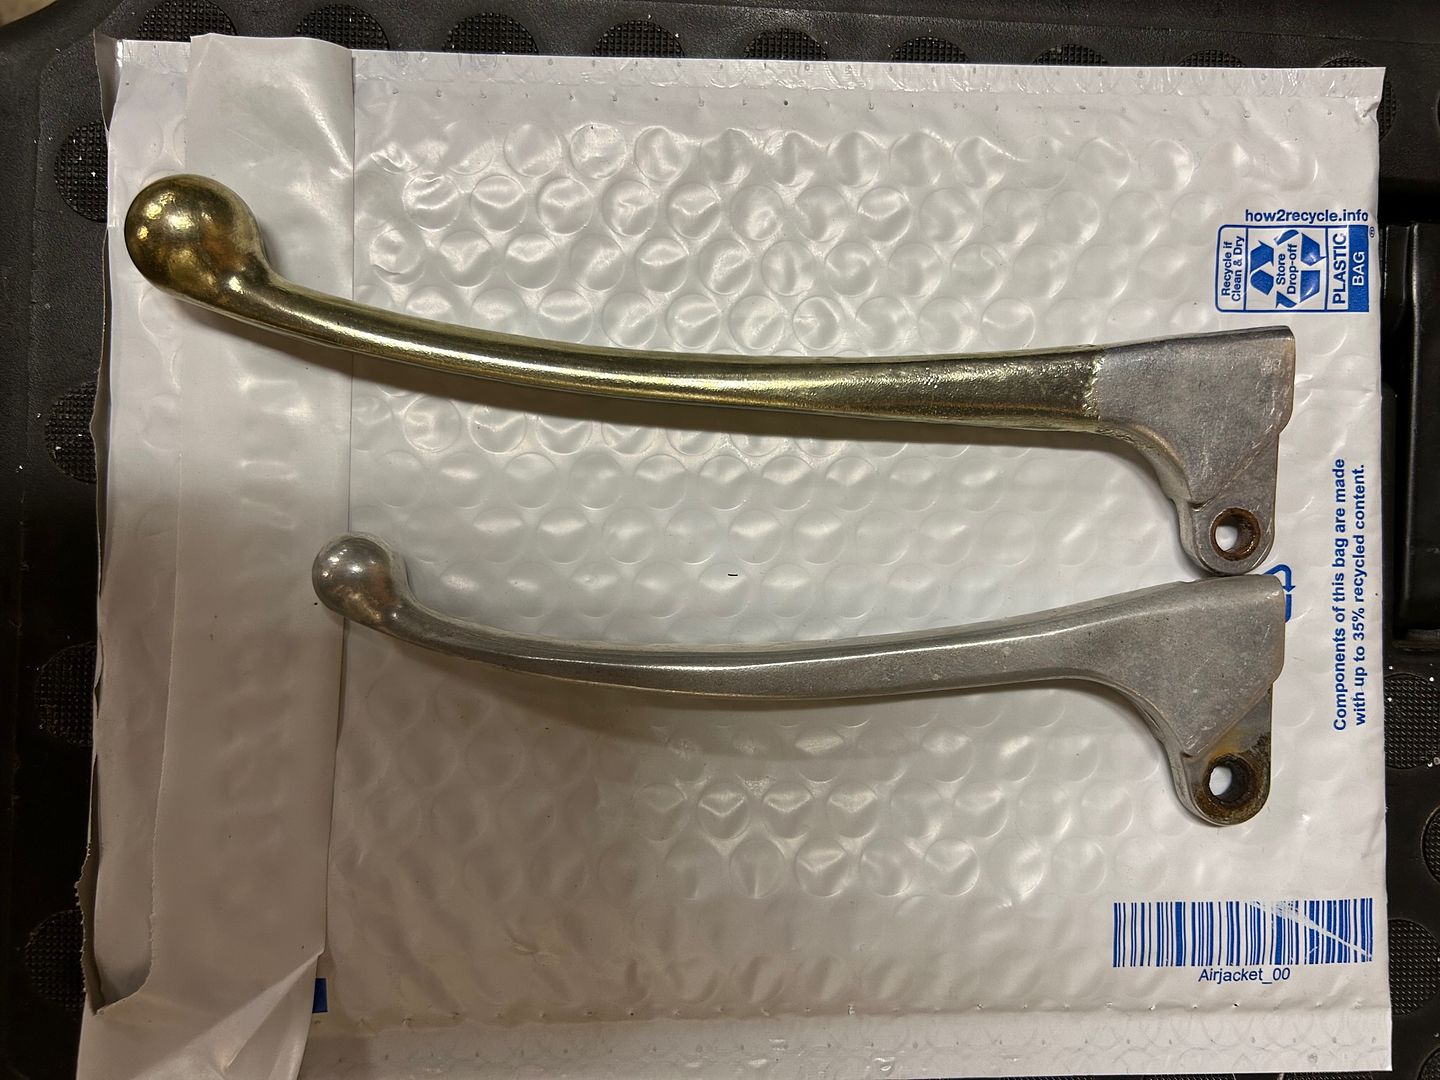
As you see, this NOS replacement (I believe the PN claims to be 75-77) is a good bit longer than my 1976 stocker? Part of a silent recall by HONDA to remedy the miserable clutch pull force required? I sure can't say but the seller claimed this was an NOS part....for GL1 posterity it was listed as 53178-431-003. I noted that in the NOS lever pivot shoulder bolt bore appears to be fitted with a "bushing" or at least a low friction treatment.
My old clutch lever pivot shoulder bolt was a dead soldier, as you can clearly see the wear here:
Assembled everything with my standby Teflon bicycle grease at the pivots:

Now, the finished product is actually smooth and acceptable from my viewpoint. Clutch release force with all new items and the longer leverage seems better than I expected for this vintage system. No worries or further contemplation of converting to a hydro setup.

With the bike in the current disassembled state, it seemed the perfect time to "stage zero" the clutch cable system. I reckoned the low mile drivetrain surely doesn't need actual clutch work, but the cable was low hanging fruit with the fuel tank out of the way.
Found an NOS Japan made clutch cable (not OE, but at least JAPAN and not the garbage being produced now). My manual showed me the proper routing path.... and my original 76 cable appeared not to have been buggered with. The clutch was not friendly to pull as found, so I looked over the whole system. First, removed the OE sticky cable and routed the new one:
Used some tips from a 40+ year HONDA bike mechanic for the clutch adjustment. Nearly identical to the factory manual, with a few differences. Here are the guy's thoughts on same:
https://www.motorcycleproject.com/text/clutches.html
Well with the new cable installed and adjusted per the sage, it was still a real bugger to actuate. Clearly the control end of the clutch must be deficient. Some disassembly quick showed me that pivot bolt at the clutch perch was badly worn, as was the OE lever. Found the Honda PN's for replacements, and snapped up some NOS parts off eBay. When the clutch lever arrived, I was in for a surprise:
As you see, this NOS replacement (I believe the PN claims to be 75-77) is a good bit longer than my 1976 stocker? Part of a silent recall by HONDA to remedy the miserable clutch pull force required? I sure can't say but the seller claimed this was an NOS part....for GL1 posterity it was listed as 53178-431-003. I noted that in the NOS lever pivot shoulder bolt bore appears to be fitted with a "bushing" or at least a low friction treatment.
My old clutch lever pivot shoulder bolt was a dead soldier, as you can clearly see the wear here:
Assembled everything with my standby Teflon bicycle grease at the pivots:
Now, the finished product is actually smooth and acceptable from my viewpoint. Clutch release force with all new items and the longer leverage seems better than I expected for this vintage system. No worries or further contemplation of converting to a hydro setup.
-
Whiskerfish

- President
- Posts: 36923
- Joined: Thu Feb 16, 2006 9:34 pm
- My Album: http://www.ngwclub.com/gallery/v/wingmans/whiskerfish/
- Location: Norfolk Va
Re: My 8100 mile 76 LTD, the Olde Wing
Very nice. People under estimate the effectiveness of that lever upgrade. It really does make a significant difference in the pull required.
"Agreement is not a requirement for Respect" CDR Michael Smith USN (Ret) 2017
"The book is wrong, this whole Conclusion is Fallacious" River Tam
"Yea I do dance awkwardly, and I am having more fun than you" Taylor Swift
2008 GL1800 IIIA "TH3DOG"
1984 GL1200 Standard
1975/6/7/8/9 Arthur Fulmer Dressed Road bike
1975 Naked Noisy and Nasty in town bike
Psst. oh and by the way CHANGE YOUR BELTS!!!!
-
Fred Camper
- Vice President
- Posts: 6912
- Joined: Wed Aug 12, 2009 9:38 pm
- My Album: http://www.ngwclub.com/gallery/v/wingmans/Jeff+Bozeman/
- Location: Metro Detroit
- Contact:
Re: My 8100 mile 76 LTD, the Olde Wing
But the cable replacement was also very effective at reducing effort. Nice work.
Proud member of the NGW Cartel (Rochester MI)
1977 GL1000 BADDOG (April 2012 BOTM)
1976 LTD - '993 LTD...and so it begins'
You should remember that it's peace of mind you're after and not just fixing the machine. R.Pirsig
1977 GL1000 BADDOG (April 2012 BOTM)
1976 LTD - '993 LTD...and so it begins'
You should remember that it's peace of mind you're after and not just fixing the machine. R.Pirsig
-
mryellow

- Lead Member

- Posts: 9
- Joined: Wed Nov 10, 2010 9:29 am
- Location: Chelsea, AL
Re: My 8100 mile 76 LTD, the Olde Wing
"By wetting a full sheet of wet-or-dry paper thus sticking it to the granite slab, I was able to recreate a nice finish on the gasket surface:"
What grit sandpaper did you use to resurface the heads?
What grit sandpaper did you use to resurface the heads?
-
DET17
- Zinc Member
- Posts: 50
- Joined: Fri Jul 15, 2022 6:06 am
- Location: East TN
Re: My 8100 mile 76 LTD, the Olde Wing
From memory, I started with 600 and finished it with 800. Might have begun with a "used" piece of 400 on one head surface which was worse than the other. The original aluminum surfaces cleaned up nicely! The key to the granite slab method is to wet the slab, then stick the wet-N-dry paper to it. The paper sticks very well to the granite slab surface when wet.
-
DET17
- Zinc Member
- Posts: 50
- Joined: Fri Jul 15, 2022 6:06 am
- Location: East TN
Re: My 8100 mile 76 LTD, the Olde Wing
Honestly on my Olde Wing the cable was a much smaller portion of the force required. When the new lever and pivot bolt were installed, the force was reduced by at least 50%. No hydro conversion needed for my machine!Fred Camper wrote: ↑Sun May 28, 2023 8:25 am But the cable replacement was also very effective at reducing effort.
-
DET17
- Zinc Member
- Posts: 50
- Joined: Fri Jul 15, 2022 6:06 am
- Location: East TN
Re: My 8100 mile 76 LTD, the Olde Wing
Overdue for a restoration status update.
Found a pair of NOS Vesrah pads for my rear brakes; first had to return a pair of mis-labeled organic pads to the eBay seller. Reassembled & asided the rear caliper now loaded with pads:
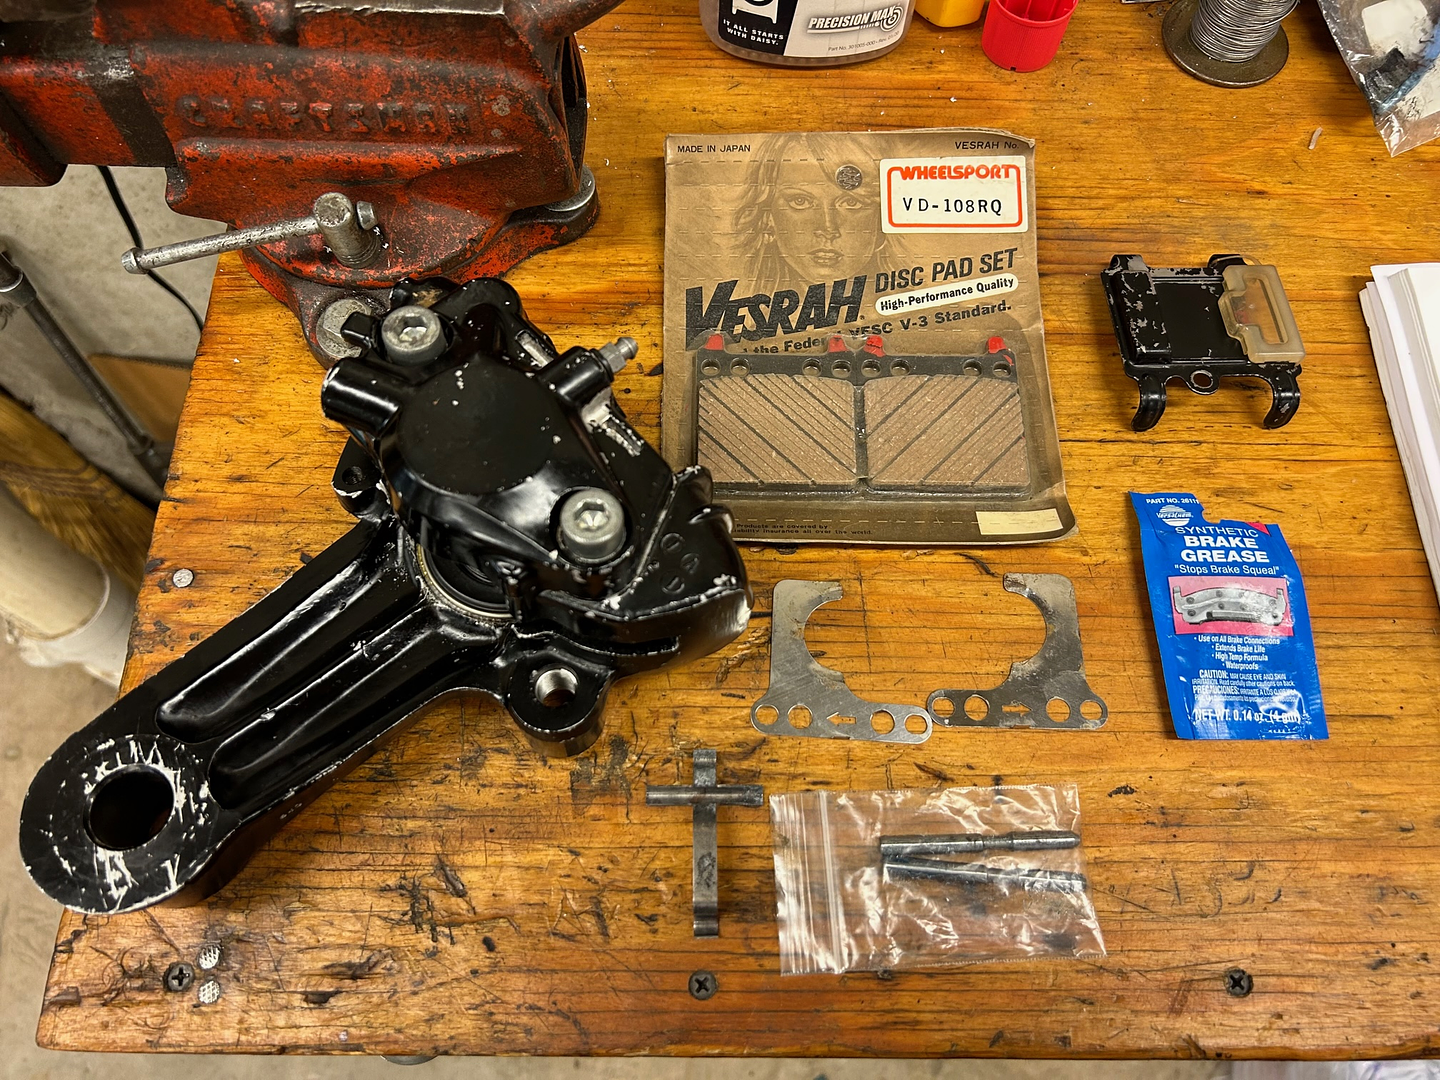
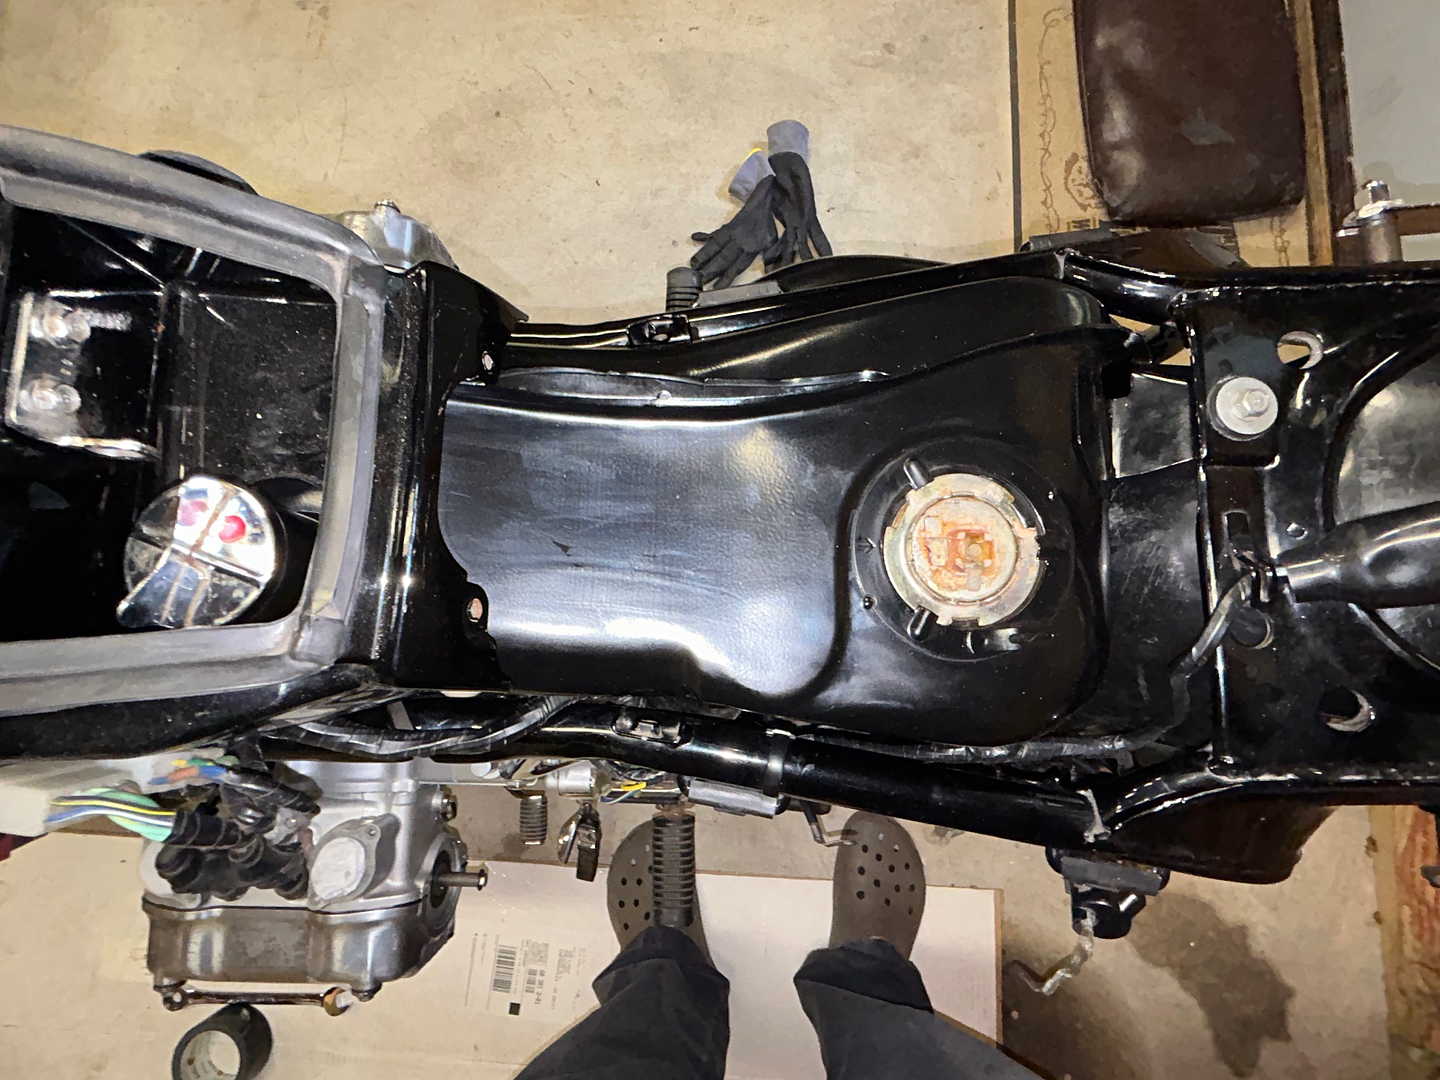
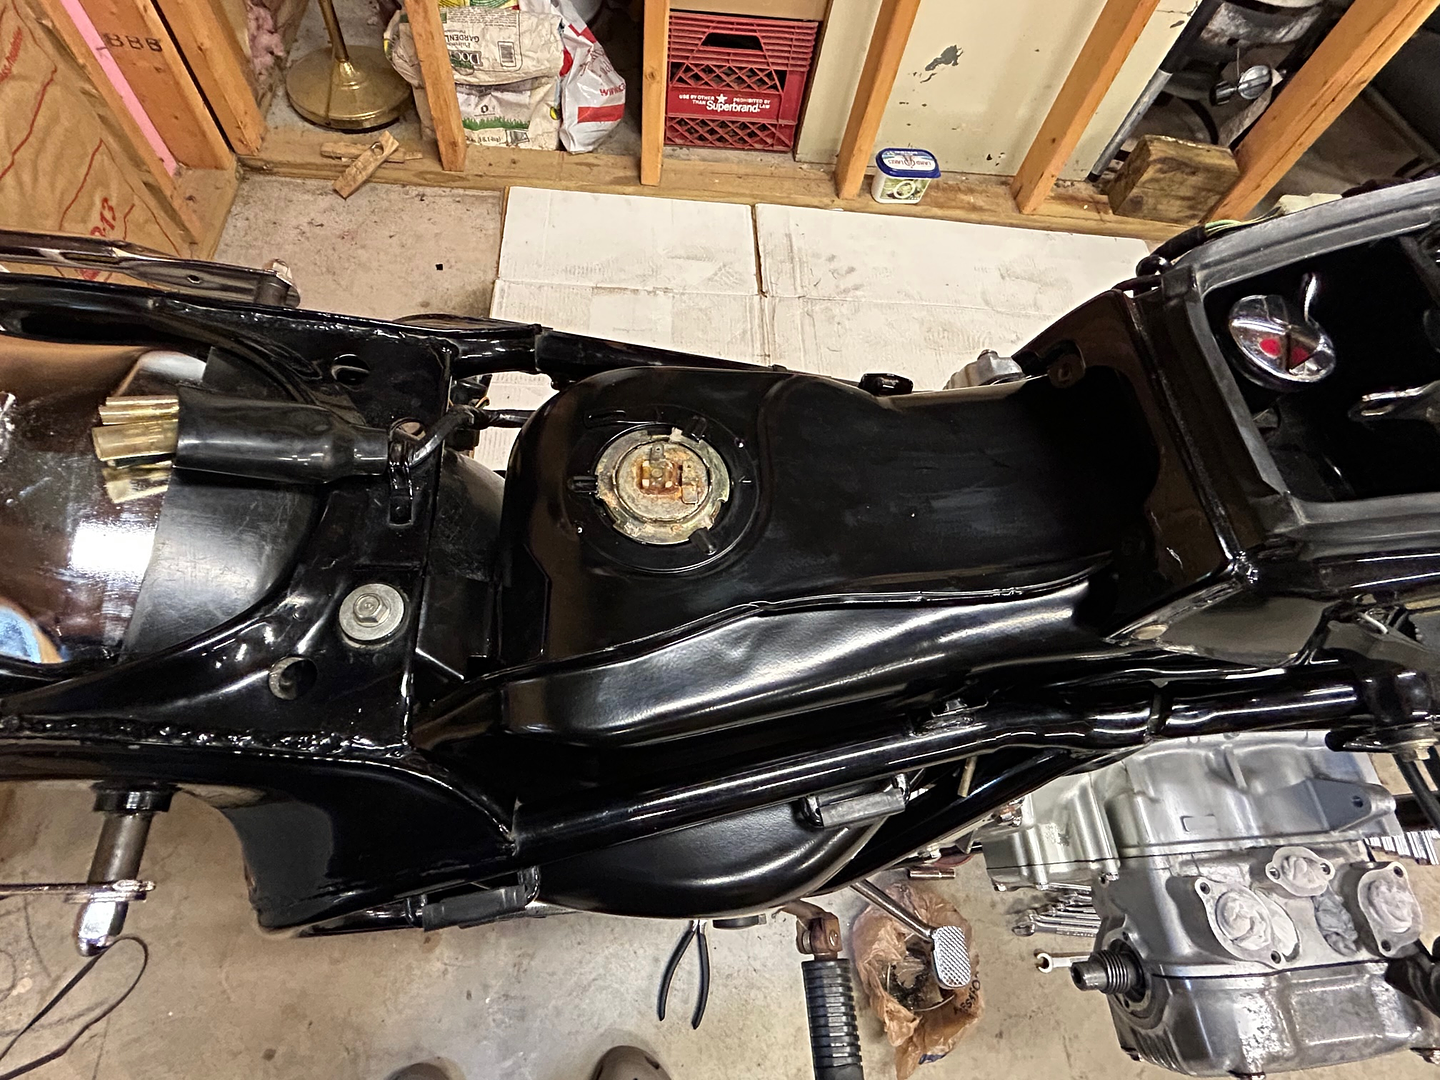
Not going to risk the 47 year old DOT rear hose, I bought a replacement from an eBay seller, so that enabled the final reassembly of the entire rear brake system. I had previously completed the fuel tank which was both powder coated and "double sealed" with Red-Kote. Performed an actual wet test with 2.5 gallons of fuel to see if any pin holes escaped the sealant. She passed a several hour test (although the duct tape which I had plugging the fuel petcock didn't fair as well).
With the tank commissioned, it was time to install it hopefully for the last time. With the rear brake system still out, the shelter had the 4 each fasteners removed so I could lift it enough to provide clearance for the fill nozzle. I also had the rear brake switch & wiring harness out of the way. One must also "take care" of the clutch cable to ensure it doesn't bind on the tank. You old sages know this, but by George that tank is TIGHT when you thread it into position! I even soaped up the rubber feet located on the bottom before she slid into final position. Wow, HONDA got every bit of fuel capacity out of this GL1 design.
With the tank finally in position, the rear brake system with new hose was installed. Then rear drive and rear wheel were installed next. I learned a couple things about these old machines. First off, when you want things to stay attached, use Loctite BLUE. Cleaned these hub studs with brake cleaner, then applied the Blue and torqued to spec.
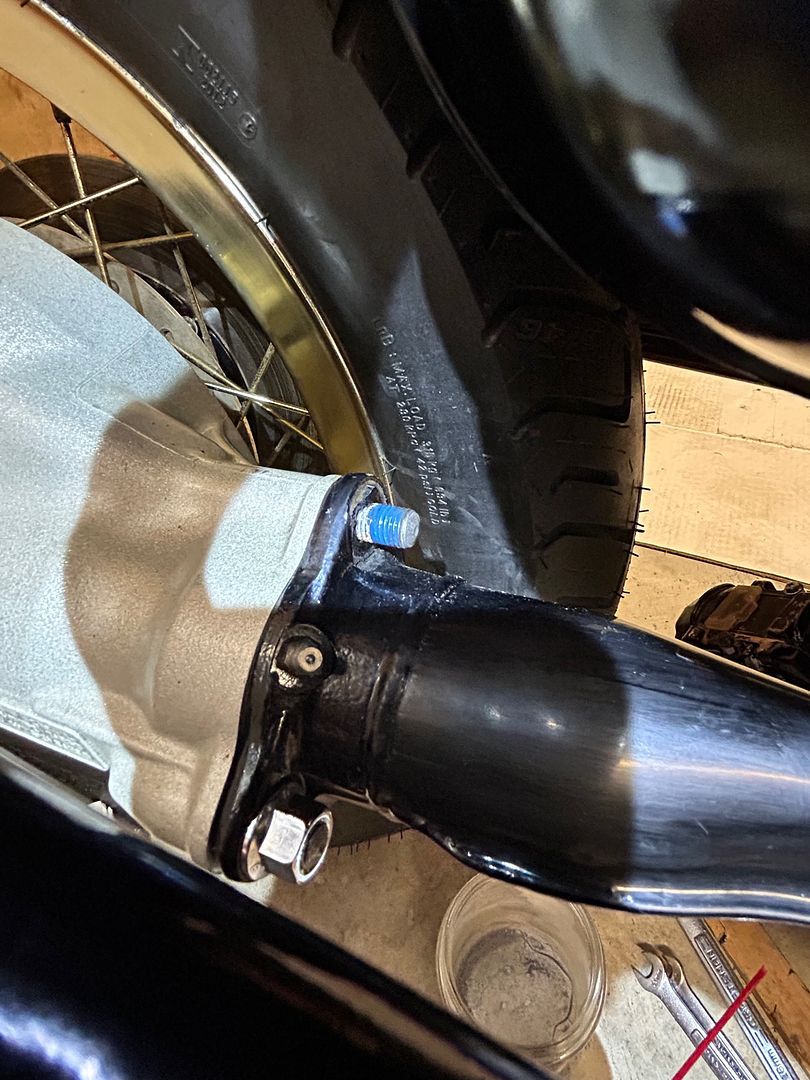
Next, I attempted to install the rear drive wheel, and had to do it at least twice, maybe three times to get it right. I mistakenly installed the rear caliper on the rotor/wheel, and tried to fit the shaft drive. Wrong! Go back and take the brake caliper off, as well as the machined seal spacer. Finally succeeded in getting the rear drive shaft & splined drive installed. However the rear axle shaft wouldn't feed thru? Several more attempts made in vain.... and I realized the drive unit was not co-axial with the rear wheel. In my haste to do things the smart/easy way, I torqued those 3 studs prior to fitting the rear axle shaft. That was my next mistake! Go back and loosen the 3 nicely Loctited studs so the drive could rotate slightly. Finally we have JOY, and the axle shaft slid into place.
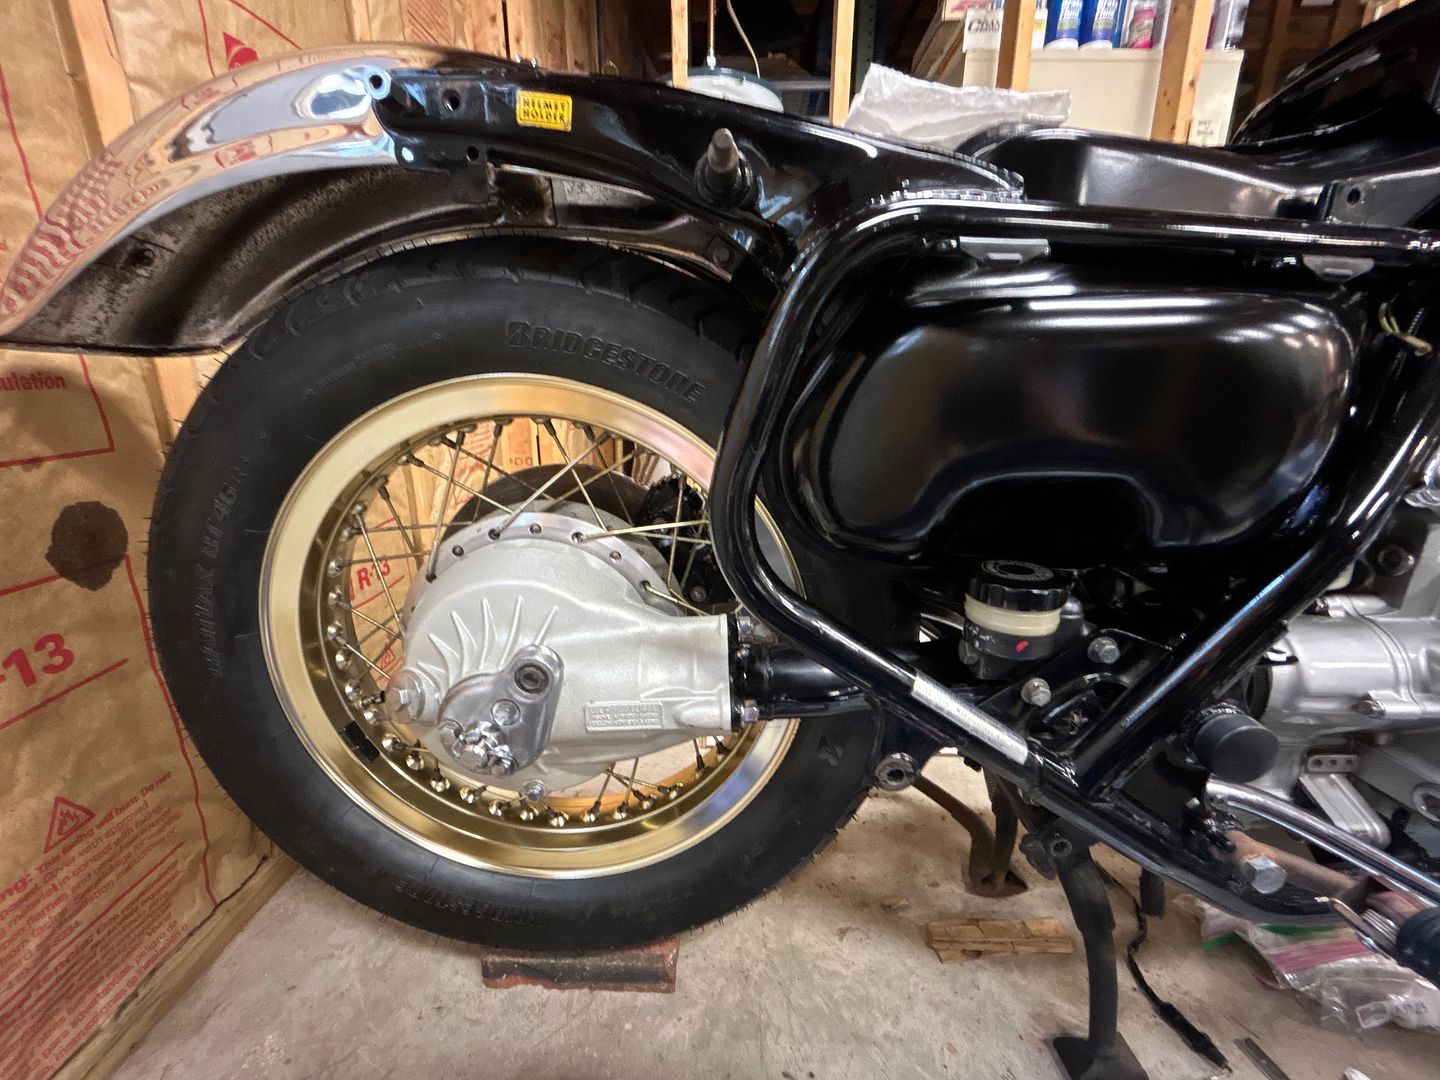
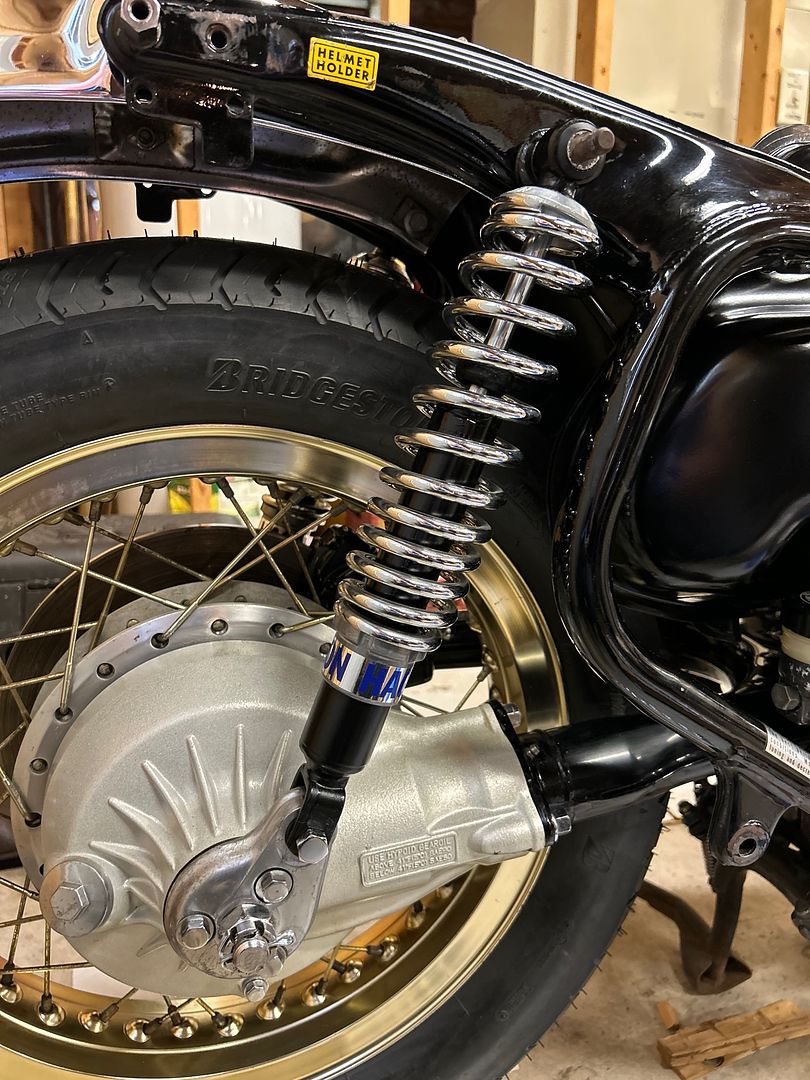
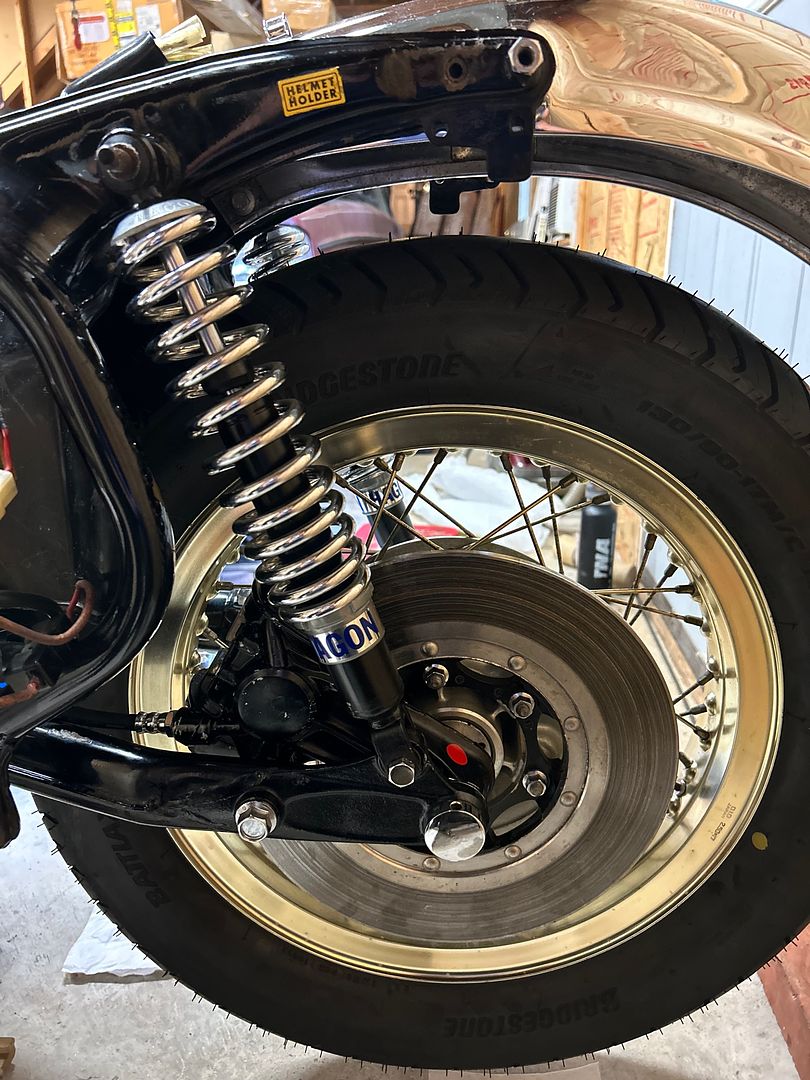
Did a bit of research on rear dampers & springs, as my OE parts were dead soldiers. Best bang for the bang based upon my web sleuthing were the HAGON units. Here they are, installed each side:
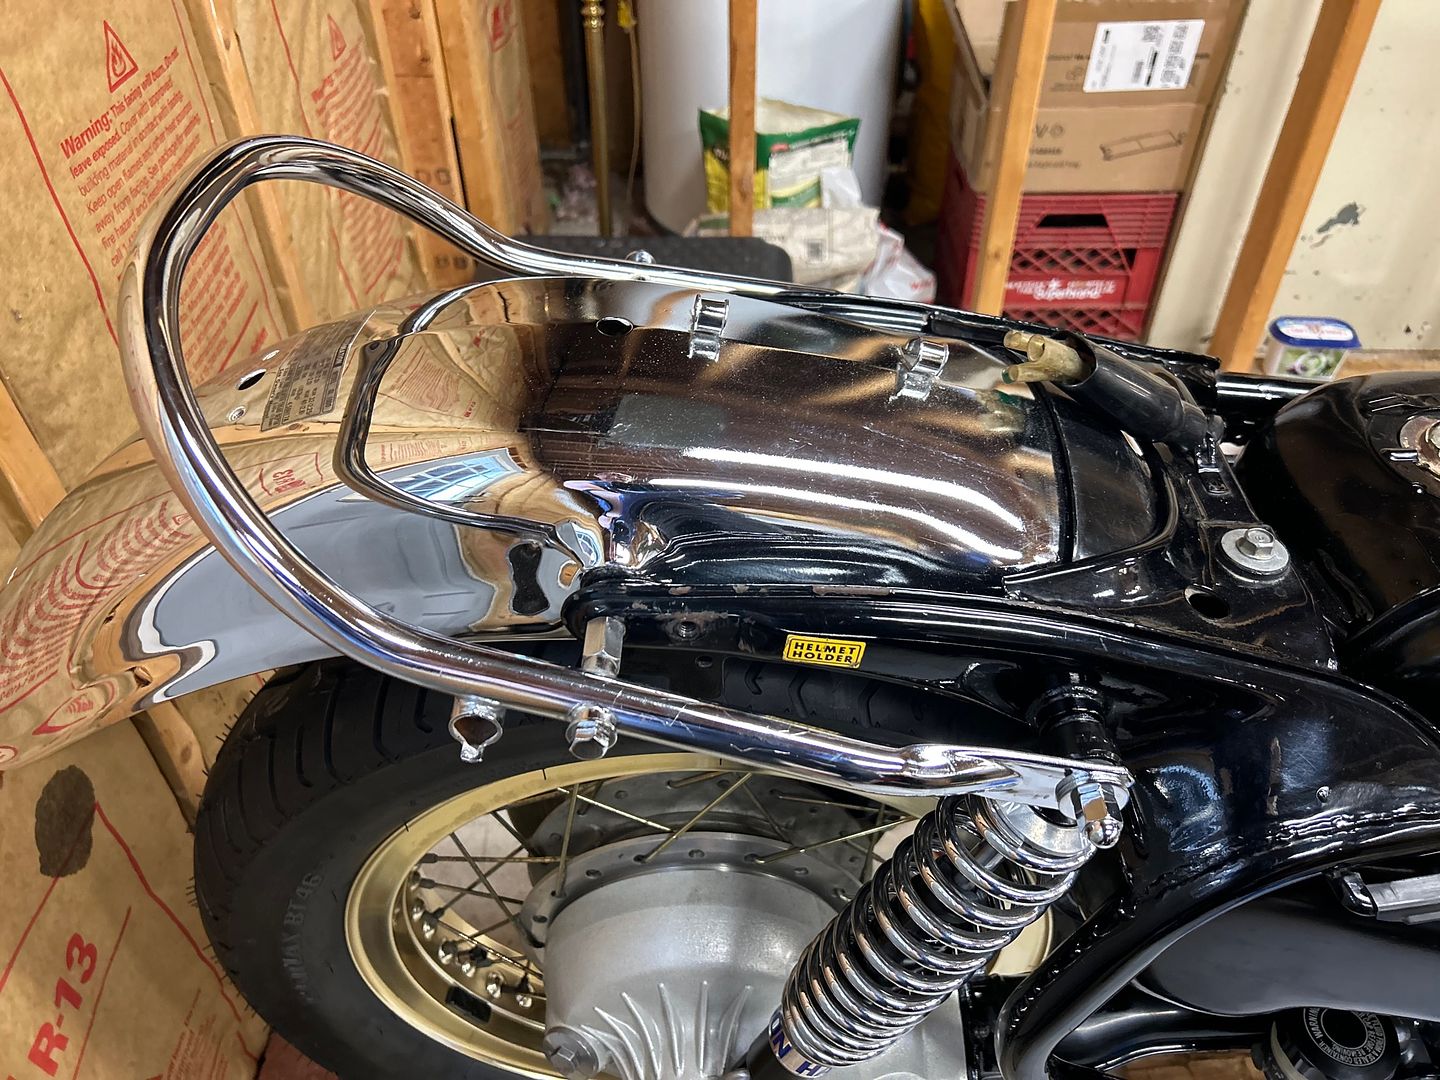
Finally, my 76 LTD arrived with an intact "rear grab bar" I believe it is called. While mine has some fine scratches in the chrome, it is otherwise unmolested. Ken Gray, who I've bought a lot of GL1 parts from (the Pistol Pete collection), advised me that this bar is pretty hard to find and they fetch a good buck. For now I'll leave mine with original chrome.... glad I've got something for the wife to hang onto when she rides the Olde Wing with me!
Up next - rebuilding the battery area electrical goodies.
Found a pair of NOS Vesrah pads for my rear brakes; first had to return a pair of mis-labeled organic pads to the eBay seller. Reassembled & asided the rear caliper now loaded with pads:
Not going to risk the 47 year old DOT rear hose, I bought a replacement from an eBay seller, so that enabled the final reassembly of the entire rear brake system. I had previously completed the fuel tank which was both powder coated and "double sealed" with Red-Kote. Performed an actual wet test with 2.5 gallons of fuel to see if any pin holes escaped the sealant. She passed a several hour test (although the duct tape which I had plugging the fuel petcock didn't fair as well).
With the tank commissioned, it was time to install it hopefully for the last time. With the rear brake system still out, the shelter had the 4 each fasteners removed so I could lift it enough to provide clearance for the fill nozzle. I also had the rear brake switch & wiring harness out of the way. One must also "take care" of the clutch cable to ensure it doesn't bind on the tank. You old sages know this, but by George that tank is TIGHT when you thread it into position! I even soaped up the rubber feet located on the bottom before she slid into final position. Wow, HONDA got every bit of fuel capacity out of this GL1 design.
With the tank finally in position, the rear brake system with new hose was installed. Then rear drive and rear wheel were installed next. I learned a couple things about these old machines. First off, when you want things to stay attached, use Loctite BLUE. Cleaned these hub studs with brake cleaner, then applied the Blue and torqued to spec.
Next, I attempted to install the rear drive wheel, and had to do it at least twice, maybe three times to get it right. I mistakenly installed the rear caliper on the rotor/wheel, and tried to fit the shaft drive. Wrong! Go back and take the brake caliper off, as well as the machined seal spacer. Finally succeeded in getting the rear drive shaft & splined drive installed. However the rear axle shaft wouldn't feed thru? Several more attempts made in vain.... and I realized the drive unit was not co-axial with the rear wheel. In my haste to do things the smart/easy way, I torqued those 3 studs prior to fitting the rear axle shaft. That was my next mistake! Go back and loosen the 3 nicely Loctited studs so the drive could rotate slightly. Finally we have JOY, and the axle shaft slid into place.
Did a bit of research on rear dampers & springs, as my OE parts were dead soldiers. Best bang for the bang based upon my web sleuthing were the HAGON units. Here they are, installed each side:
Finally, my 76 LTD arrived with an intact "rear grab bar" I believe it is called. While mine has some fine scratches in the chrome, it is otherwise unmolested. Ken Gray, who I've bought a lot of GL1 parts from (the Pistol Pete collection), advised me that this bar is pretty hard to find and they fetch a good buck. For now I'll leave mine with original chrome.... glad I've got something for the wife to hang onto when she rides the Olde Wing with me!
Up next - rebuilding the battery area electrical goodies.
-
Whiskerfish
- President
- Posts: 36923
- Joined: Thu Feb 16, 2006 9:34 pm
- My Album: http://www.ngwclub.com/gallery/v/wingmans/whiskerfish/
- Location: Norfolk Va
Re: My 8100 mile 76 LTD, the Olde Wing
I am on my second set of Hagons on my 79 dresser. Best I have found for the money. First pair I think went over 100,000 miles.
Your resto is coming along Beautifully!!
Your resto is coming along Beautifully!!
"Agreement is not a requirement for Respect" CDR Michael Smith USN (Ret) 2017
"The book is wrong, this whole Conclusion is Fallacious" River Tam
"Yea I do dance awkwardly, and I am having more fun than you" Taylor Swift
2008 GL1800 IIIA "TH3DOG"
1984 GL1200 Standard
1975/6/7/8/9 Arthur Fulmer Dressed Road bike
1975 Naked Noisy and Nasty in town bike
Psst. oh and by the way CHANGE YOUR BELTS!!!!
"The book is wrong, this whole Conclusion is Fallacious" River Tam
"Yea I do dance awkwardly, and I am having more fun than you" Taylor Swift
2008 GL1800 IIIA "TH3DOG"
1984 GL1200 Standard
1975/6/7/8/9 Arthur Fulmer Dressed Road bike
1975 Naked Noisy and Nasty in town bike
Psst. oh and by the way CHANGE YOUR BELTS!!!!
-
fitscott
- Cast Iron Member

- Posts: 84
- Joined: Thu Jul 09, 2020 8:32 am
- Location: Comfort TX
Re: My 8100 mile 76 LTD, the Olde Wing
Hello, Can you tell me where you got the Hagons please?
-
DET17
- Zinc Member
- Posts: 50
- Joined: Fri Jul 15, 2022 6:06 am
- Location: East TN
Re: My 8100 mile 76 LTD, the Olde Wing
Thank you sir! Trying to "do it right", so I don't have to "do it over"Whiskerfish wrote: ↑Thu Jun 29, 2023 7:19 am Best I have found for the money.
Your resto is coming along Beautifully!!
I bought my shock setup from Omnia Racing..... they are in Italy. Here is the link I used to purchase the HAGON units:
info@omniaracing.it
-
fitscott
- Cast Iron Member
- Posts: 84
- Joined: Thu Jul 09, 2020 8:32 am
- Location: Comfort TX
Re: My 8100 mile 76 LTD, the Olde Wing
Thank you
-
DET17
- Zinc Member
- Posts: 50
- Joined: Fri Jul 15, 2022 6:06 am
- Location: East TN
Re: My 8100 mile 76 LTD, the Olde Wing
Made some more progress.
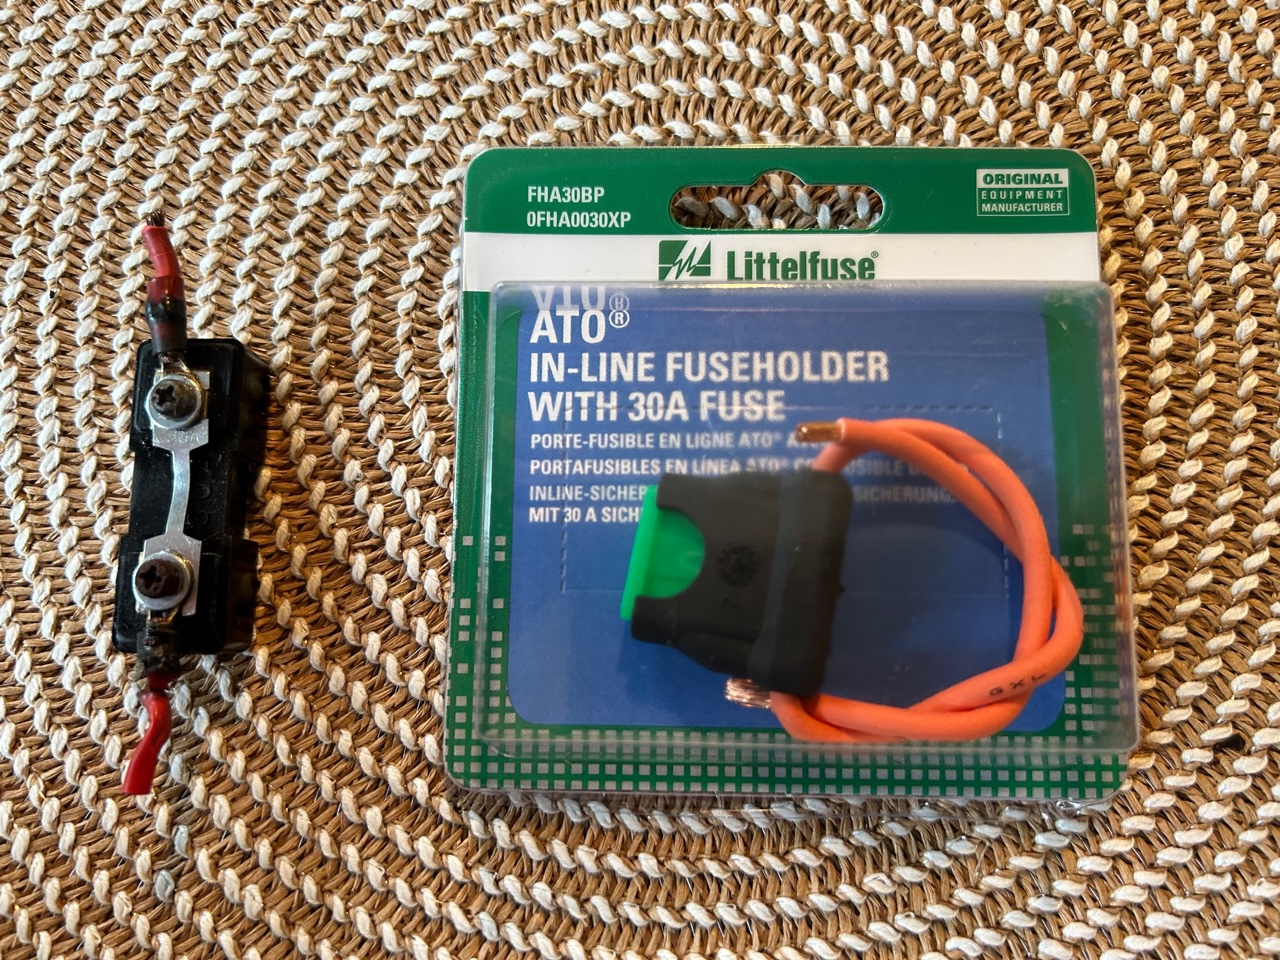
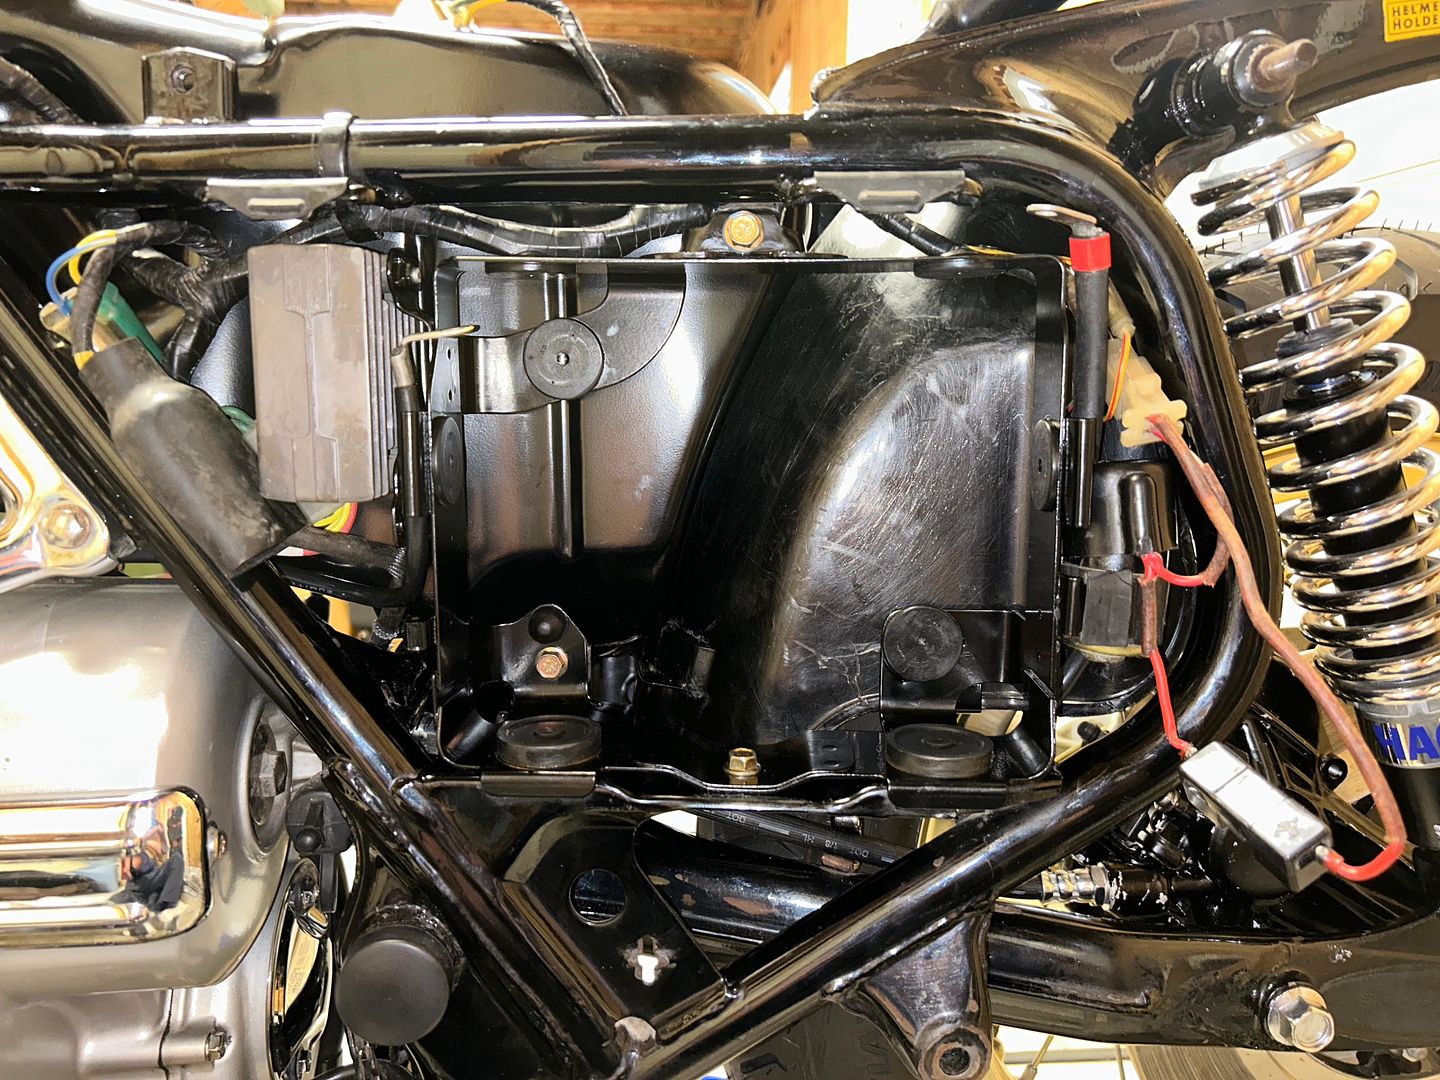
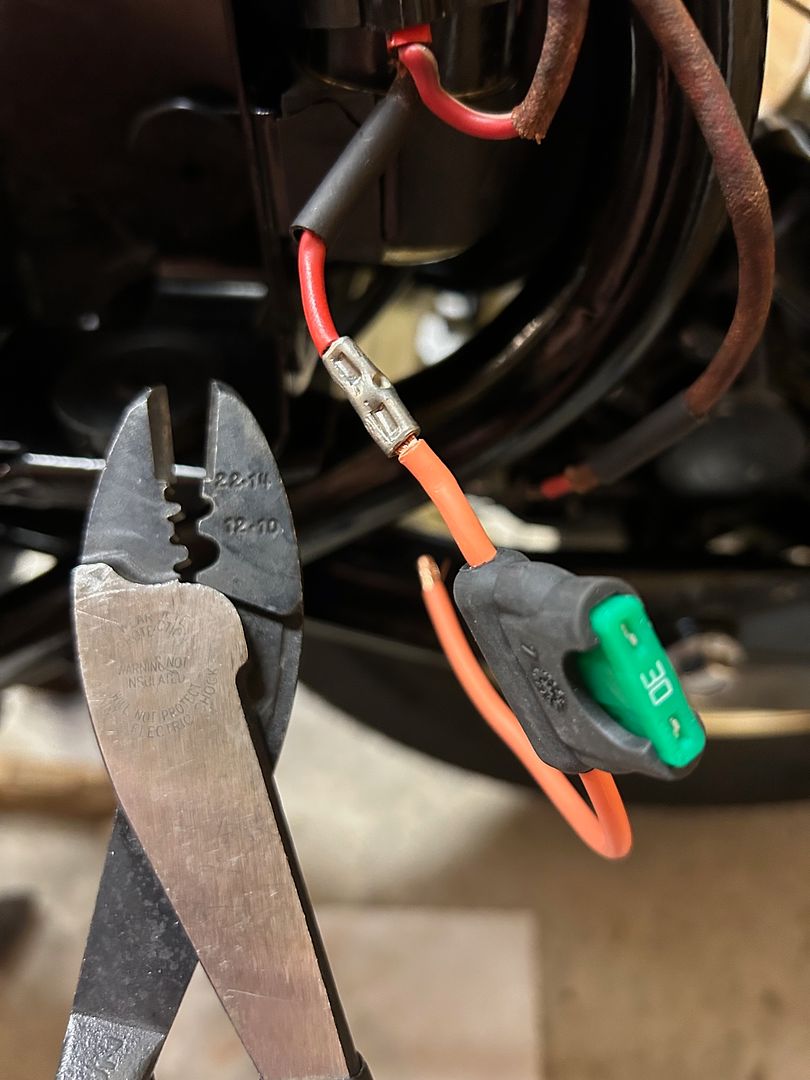
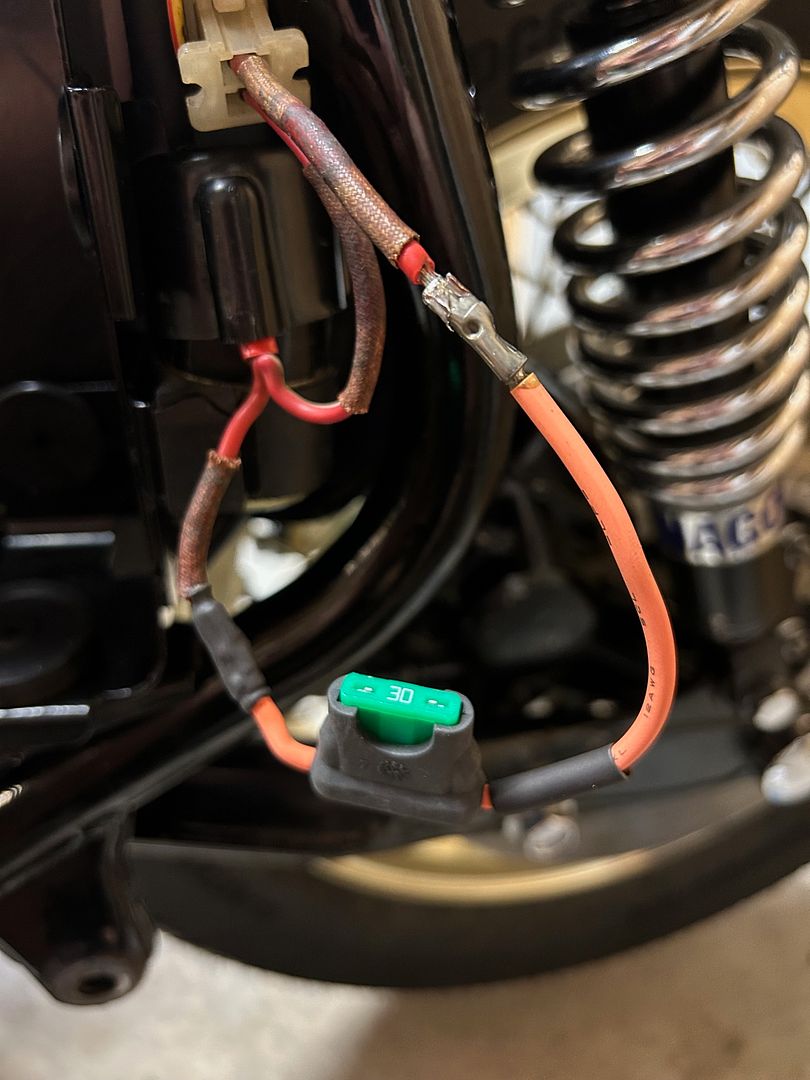
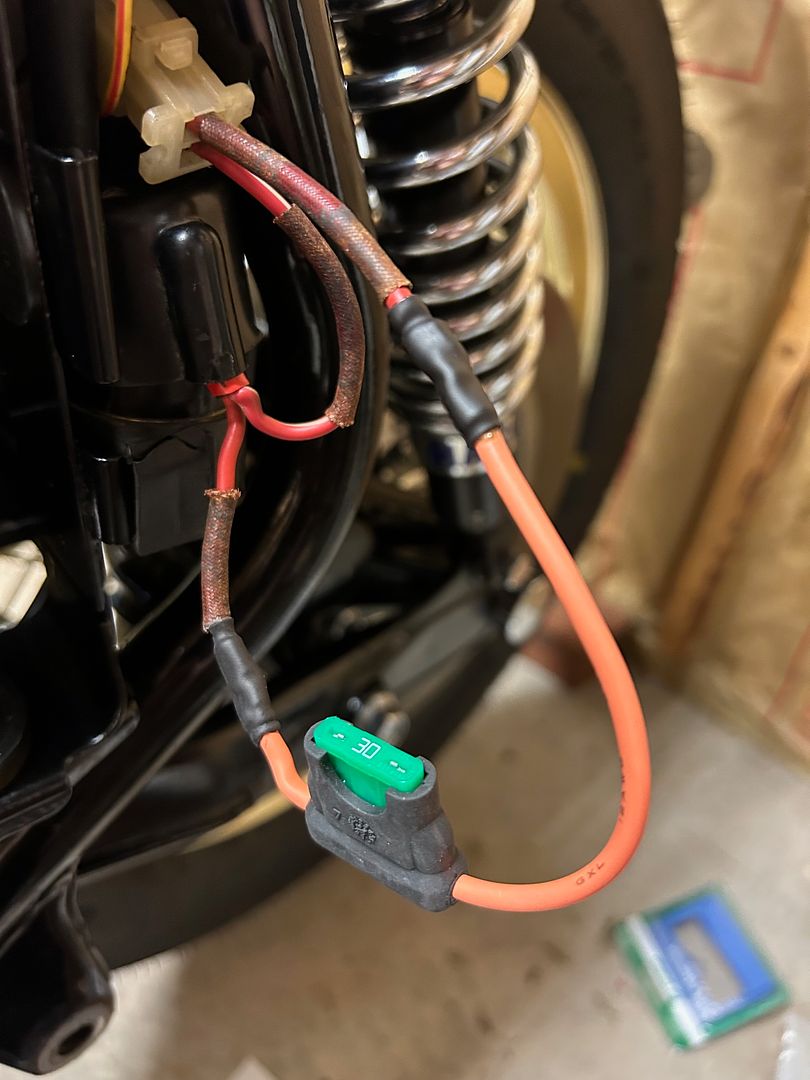
First, when I was cleaning up the battery area electrical hardware I noticed the 30A main fuse holder soldered ends were "toasty". High resistance creates heat and reduces voltage, and I wasn't comfortable banking on the HONDA solution (now 47 years old). So I found a modern blade fuse to replace the ancient JAPAN solution:
No reason to risk reliability when there is a more robust solution. I've done a fair bit of electrical work in my car hobby vehicles, and I follow the MAD Electrical strategy for connections: strip wire length to match the tinned copper sleeve connector, crimp & stake, solder & heat shrink. Whatever you are planning to revise/repair/improve electrically with a 12V system, I would follow Mark's advice (but be prepared for a long conversation when you place your phone order!). OK, here are the pics, starting with the refreshed battery area:
My shameless plug for MAD Electrical:

In the local area, I also ordered a pair of the fuel shutoff O-rings from the only supplier I could find in Germany. Light coat of vaseline so they don't pinch....and she's ready for petrol in the tank.

Up next: saving an old exhaust header that had been dropped & gouged.
First, when I was cleaning up the battery area electrical hardware I noticed the 30A main fuse holder soldered ends were "toasty". High resistance creates heat and reduces voltage, and I wasn't comfortable banking on the HONDA solution (now 47 years old). So I found a modern blade fuse to replace the ancient JAPAN solution:
No reason to risk reliability when there is a more robust solution. I've done a fair bit of electrical work in my car hobby vehicles, and I follow the MAD Electrical strategy for connections: strip wire length to match the tinned copper sleeve connector, crimp & stake, solder & heat shrink. Whatever you are planning to revise/repair/improve electrically with a 12V system, I would follow Mark's advice (but be prepared for a long conversation when you place your phone order!). OK, here are the pics, starting with the refreshed battery area:
My shameless plug for MAD Electrical:
In the local area, I also ordered a pair of the fuel shutoff O-rings from the only supplier I could find in Germany. Light coat of vaseline so they don't pinch....and she's ready for petrol in the tank.
Up next: saving an old exhaust header that had been dropped & gouged.
-
- Similar Topics
- Replies
- Views
- Last post