I have taken a lot out of this forum since joining last year and undertaking my 75 wing project.
Before undertaking my 75 I had completed 3 x cx500 restorations but all with cheap rattle can paint jobs.
I have done a lot of work ground up on this project and I am in the middle of my first spray gun paint job. I did a fair bit of research but could not find much info on a step by step process for both the metal and plastic covers. I really am a novice and have been taking notes and step by step photos as I go along. I would like to add it to the forum somewhere to assist other people venturing into their first spray job.
I set a couple of rules for myself before I started
$250 au job max
Did not want to bite off more than I could chew
Not a show winner but very good
Easy steps for a myself doing it the first time in simple format.
I am by no means a spray painter (in fact I am a baker) and am just putting it together for anyone else who might want to go down the same path.
a.
First Time Paint Job
Moderators: Whiskerfish, Forum Moderators
-
Cakey
- Silver Member

- Posts: 583
- Joined: Sun Dec 30, 2012 5:58 am
- Location: Darwin Australia
First Time Paint Job
- Attachments
-
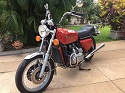
- Before photo of the bike and panels and my son laying claim to the bike.
- 11072012467.jpg (70.75 KiB) Viewed 826 times
1975 Gl1000
-
Cakey
- Silver Member
- Posts: 583
- Joined: Sun Dec 30, 2012 5:58 am
- Location: Darwin Australia
Re: First Time Paint Job
I did a reasonable amount of research but could not find exactly what I was after. Either the info whent above my head, to costly or to simple. I wanted a job that would last and look good.
I started to do my head in with trying to get the original colour and went against due to the expense or difficulty in getting the paint where I live.
Went down to the local auto paint store and they had some good advice. I went throught he Honda colour booklets and settled on a Direct Gloss paint which I am led to believe is used in a lot of auto repair business. It does not need a gloss coating afterwards and is quite durable.
I settle on a PPG paint called R4C Candy Ruby Red Direct Gloss.
Walked out the paint store with my supplied and $210 lighter.
I purchased the paint 500 ml
Apoxy primer 2 cans
Wet and Dry paper 400 grit x 4
Wet and Dry paper 600 grit x 4
Disposable paint strainers x 2
Plastic etch primer x 1
Chemical meaasuring jugs x 2
Acrylic thiner x 500ml
Paint Hardner x 200ml
- Attachments
-
- All the supplies
- WP_20130330_020.jpg (58.49 KiB) Viewed 824 times
1975 Gl1000
-
Cakey
- Silver Member
- Posts: 583
- Joined: Sun Dec 30, 2012 5:58 am
- Location: Darwin Australia
Re: First Time Paint Job
All right so now I had the goodies is was time to get the elbows working. The step by step I was given at the paint store is as follows.
1. Paint strip all metal components and see what is underneath.
2. Rub back any old paint on the plastic panels with 400 grit. This will smooth it out and get rid of any previous cracking or scratches. If possible to leave as much paint as possible on the panels to help better adhere the paint. Any places that I went through to the plastic or on the edges then cover in plastic etch primer.
3. Fill in any large scratches or dents with filler and rub back again with the 400 grit.
4. Coat any plastics which are showing with etch primer.
5. coat all services (both bare metal and plastic covers) with apoxy primer
6. Rub back with 600 grit wet.
7. Any spots showing through after rubbing to spray again with apoxy primer
8. Rub back with 600 grit.
9. Wash all panels with water to check in sunlight for correct rubbing back or poor areas
10. Apply apoxy primer and 600 grit wherever needed.
11. Wash again
12. Give back of all panels 3 coats with direct gloss colour
13. Allow to dry for 2 days
14. Rub any overspray with 600 grit wet
15. Coat top coat with 4 coats of direct gloss
16. Allow several weeks to cure
17. Rub with 1000 grit any rough bits from the 2 pack dust
17. Buff
- Attachments
-
- radiator fins
- WP_20130330_010.jpg (41.05 KiB) Viewed 822 times
-
- tank
- WP_20130330_013.jpg (37.18 KiB) Viewed 822 times
-
- tank
- WP_20130330_014.jpg (32.3 KiB) Viewed 822 times
-
- all panels prior
- WP_20130330_005.jpg (32.06 KiB) Viewed 822 times
1975 Gl1000
-
Cakey
- Silver Member
- Posts: 583
- Joined: Sun Dec 30, 2012 5:58 am
- Location: Darwin Australia
Re: First Time Paint Job
On with the paint stripping. I found that the backside of the metal parts were very easy and the previous paint just fell off. The topside of the parts where a different story. I started out using scratchy pads because I was worried about putting any deep scratches in with scraper but it ended up that the scraper was the only way to go. It took several coats and a couple of hours but it is definatley worth it to see the condition underneath. Mine were pretty good with the only dents being from the spott welding of the brackets underneath the top cover and a crack in the radiator fin.
- Attachments
-
- 1 coat
- WP_20130330_027.jpg (45.52 KiB) Viewed 822 times
-
- bottom comes off very easy with the scratchy pad
- WP_20130330_029.jpg (59.42 KiB) Viewed 822 times
-
- Top coat hard to get off. The primer layer underneath is like concrete
- WP_20130330_032.jpg (67.21 KiB) Viewed 822 times
-
- up to the third coat by this stage
- WP_20130330_035.jpg (79.71 KiB) Viewed 822 times
-
- And more with the scraper
- WP_20130330_034.jpg (81.07 KiB) Viewed 822 times
1975 Gl1000
-
Cakey
- Silver Member
- Posts: 583
- Joined: Sun Dec 30, 2012 5:58 am
- Location: Darwin Australia
Re: First Time Paint Job
Forgot to say don't forget to wear gloves and eye protection. The smallest drop of this paint stripper is dangerous and can do some serious damage!!!!!!!!!!!!
Allso forgot to mention that you can purchase a specialist paint stripper for plastic but it is expensive at about $35 au a spray can. It is not what I wanted to do so I didn't.
Allso forgot to mention that you can purchase a specialist paint stripper for plastic but it is expensive at about $35 au a spray can. It is not what I wanted to do so I didn't.
- Attachments
-
- Top of parts finished and ready for a bath
- WP_20130330_037.jpg (53.89 KiB) Viewed 820 times
-
- bottom of metal parts
- WP_20130330_039.jpg (34.94 KiB) Viewed 820 times
-
- bath time
- WP_20130330_041.jpg (54.23 KiB) Viewed 820 times
1975 Gl1000
-
Cakey
- Silver Member
- Posts: 583
- Joined: Sun Dec 30, 2012 5:58 am
- Location: Darwin Australia
Re: First Time Paint Job
After washing with water and wax and grease remover I took to all the parts with a heat gun so that I did not get any flash rusting and wanted to spray them the same day and drive off the moisture first.
- Attachments
-
- The parts waiting for a coat with apoxy primer out of the can
- WP_20130330_046.jpg (63.27 KiB) Viewed 819 times
-
- I found this one bronzed bit on the radiator fin
- WP_20130330_047.jpg (35.99 KiB) Viewed 819 times
-
- looked like this after primer
- WP_20130331_002.jpg (24.53 KiB) Viewed 819 times
-
- And these two dents from the spot welding underneath that only showed up after the primer was on
- WP_20130331_005.jpg (15.94 KiB) Viewed 819 times
1975 Gl1000
-
Cakey
- Silver Member
- Posts: 583
- Joined: Sun Dec 30, 2012 5:58 am
- Location: Darwin Australia
Re: First Time Paint Job
After the metal was done it was time to move onto the plastics. I wanted to double check what I had before starting. I had been advised that it is when you use a spray filler on plastics that there is a high likely hood of reactions with the paints. So I wanted to use panels that needed minimal amount of work and the 400 grit wet would do most of the work or get rid of the imperfections for me. After this then the epoxy primer would fill in anything very small.
I found several cracked panels and had to replace.
Also when sanding with the 400 grit I had to check and double check where decals and pin striping had been. I needed to remove all trace of them or else they would show through. I did not care if I went through to the plastic as I was going to plastic etch prime anyway.
On the plastics I found the edges are what wore down the quickest and I had to work lighter in those areas.
- Attachments
-
- cracked panels needed replacing.
- WP_20130331_008.jpg (30.17 KiB) Viewed 819 times
-
- Using the sink and the 400 grit wet to really get the imperfections out
- WP_20130331_014.jpg (67.8 KiB) Viewed 819 times
-
- I have rubbed through to the plastic in some spots to get rid of the imperfections
- WP_20130331_017.jpg (48.3 KiB) Viewed 819 times
-
- All of the panels ready for the next step
- WP_20130331_018.jpg (45.72 KiB) Viewed 819 times
1975 Gl1000
-
Cakey
- Silver Member
- Posts: 583
- Joined: Sun Dec 30, 2012 5:58 am
- Location: Darwin Australia
Re: First Time Paint Job
I used the 3m etch primer on all bits of plastic showing through.
- Attachments
-
- back of the panels were mainly exposed plastic to etch prime
- WP_20130331_024.jpg (58.77 KiB) Viewed 819 times
-
- plastic parts drying on the fence before painting
- WP_20130331_025.jpg (89.67 KiB) Viewed 819 times
1975 Gl1000
-
Cakey
- Silver Member
- Posts: 583
- Joined: Sun Dec 30, 2012 5:58 am
- Location: Darwin Australia
Re: First Time Paint Job
I had some left over body filler from my car in the shed and I need hardly anything for the couple of spots in the metal. I put it on let dry and rubbed back with 400 grit and then applied again and rubbed back with 400 grit and then primed again. I did this until I was happy and could not tell where they had been.
- Attachments
-
- couple of dents with body filler
- WP_20130331_021.jpg (32.11 KiB) Viewed 819 times
-
- lay a bit of filler on
- WP_20130331_022.jpg (36.48 KiB) Viewed 819 times
-
- rub it back
- WP_20130331_023.jpg (32.25 KiB) Viewed 819 times
1975 Gl1000
-
Cakey
- Silver Member
- Posts: 583
- Joined: Sun Dec 30, 2012 5:58 am
- Location: Darwin Australia
Re: First Time Paint Job
Allright so most of the hard work is done now and I double check that everything is well primed and ready for rubbing back with 600 grit wet.
Same as before except I am very gentle with the edges as they rub through easy to the plastic and I don't want to do that. Its ok if I do but I have to re etch prime and epoxy prime again and rub back.
After I have rubbed each panel with the 600 grit I check the panel reflection in the sunlight and by feel. I am look for any anomolies, rough spots or bits that are still bright and I have missed. I don't know enough about painting to know exactly what I am looking for but you get a feel for it as you go along.
I propably went over every panel at least three times and had to re etch prime and prime a couple of section that I was not happy with. I suppose the best thing to think of at this stage is whatever you don't do will show up in the end job, so now is the time to prep it right or to a stage that you are happy with.
- Attachments
-
- Rubbed back a couple of times and could still see some imperfections so went again until I got it right
- WP_20130331_029.jpg (11.21 KiB) Viewed 819 times
-
- everything lined up and ready for rubbing back with 600 grit
- WP_20130331_030.jpg (60.91 KiB) Viewed 819 times
-
- bike geting excited about its new look
- WP_20130331_031.jpg (59.88 KiB) Viewed 819 times
-
- This is the epoxy primer I used
- WP_20130331_033.jpg (25.36 KiB) Viewed 819 times
Last edited by Cakey on Mon Apr 15, 2013 3:26 am, edited 1 time in total.
1975 Gl1000
-
Cakey
- Silver Member
- Posts: 583
- Joined: Sun Dec 30, 2012 5:58 am
- Location: Darwin Australia
Re: First Time Paint Job
Gotta pick up the family and head home after work so will hopefully finish this tonight. All the best
1975 Gl1000
-
Recycled Roadkill

- Honored Life Member

- Posts: 4053
- Joined: Wed Sep 17, 2008 10:21 am
- Location: Garland, TX
- Contact:
Re: First Time Paint Job
You may be a runner for BOTM. I have no patience for painting. Great work!
Bob Gill
Four wheels move the body but two wheels move the soul.
It's never too late to have a happy childhood!
I've considered joining Insomniacs Anonymous, but I decided I'd sleep on it.
'96 Honda GL 1500A Rolling Couch (Not Naked)
'78 Honda GL 1000 Gentle Glide
'77 Honda GL 1000 Black Mamba (Sold)
Four wheels move the body but two wheels move the soul.
It's never too late to have a happy childhood!
I've considered joining Insomniacs Anonymous, but I decided I'd sleep on it.
'96 Honda GL 1500A Rolling Couch (Not Naked)
'78 Honda GL 1000 Gentle Glide
'77 Honda GL 1000 Black Mamba (Sold)
-
sunnbobb

- Facebook Admin

- Posts: 21272
- Joined: Thu Jan 10, 2008 4:09 pm
- My Album: http://www.ngwclub.com/gallery/v/wingmans/sunnbobb/
- Location: LaConner, WA
Re: First Time Paint Job
Thanks for sharing the photos and process. Looking forward to Chapter Two.
I found the end of the internet
---- Bradshaw Bikes custom polishing for your wing. Visit us on facebook!
1978 Learning Experience
1980 County Road Hauler "Brain Damage"
1978 Cafe Custom Gl1000 "Vyper"
1977 Bulldog Inspired "Vaincre"
1981 Street Fighter GL1100 "No Quarter"
1983 Supercharged Street Drag "Anubis" (in worx)
1983 gl1100 mint restoration "Kristen"
1985 Aspencade..pondering.
-
Cakey
- Silver Member
- Posts: 583
- Joined: Sun Dec 30, 2012 5:58 am
- Location: Darwin Australia
Re: First Time Paint Job
So I needed to get my spray area ready. There is no way in hell I was going to be allowed under the back verandah to spray so the lean to out the back was the front runner.
If I wanted a perfect paint job then I would have to hire a spray booth which was not in my plan. I had to expect that this paint would pick up dust particles no matter how fussy I was so I just got it as clean and dust free as possible.
I hosed the floor and roof of the lean to and wiped the roof afterwards. I also hosed down the back lawn area to keep any dust down. After spraying I would let it flas dry after the last coat and then move it inside too the spare room.
- Attachments
-
- Had to get my outdoor spray booth ready and clean
- image.jpg (58.84 KiB) Viewed 814 times
-
- Made myself as much room asks single to bring in my spray table
- image.jpg (54.92 KiB) Viewed 814 times
1975 Gl1000
-
Cakey
- Silver Member
- Posts: 583
- Joined: Sun Dec 30, 2012 5:58 am
- Location: Darwin Australia
Re: First Time Paint Job
I got a bit of advice on spray equipment and I went with a touch up gun. It's not like I am going to be doing big spray jobs and I would only be ordering small amounts of paint. 500 ml would do a whole frame and parts or all the panels. The touch up gun is gravity fed so uses on low pressure at 25-30 psi so my little compressor handles it easy.
I did not count my gun and water trap into the cost of the paint but cost me $70 and I am sure I will get a lot of use out of it. Water trap is essential to put on the line as well to keep the water out of your paint. A good chemical mask is needed to keep the fumes at bay pick up at your local hardware store.
I am glad I got a bit of advice on the gun because it is easy to clean, maintain and control the spray coming out.
- Attachments
-
- Spray gun and inline water trap
- image.jpg (32.75 KiB) Viewed 814 times
-
- Fumes mask
- image.jpg (50.49 KiB) Viewed 814 times
1975 Gl1000
-
- Similar Topics
- Replies
- Views
- Last post
-
- 57 Replies
- 4458 Views
-
Last post by ob1quixote
-
- 4 Replies
- 870 Views
-
Last post by fish
-
- 13 Replies
- 1374 Views
-
Last post by rcmatt007
-
- 5 Replies
- 632 Views
-
Last post by mwb4god
-
- 10 Replies
- 645 Views
-
Last post by rcmatt007