Page 2 of 3
Re: Front Engine Renewal Project, GL1100
Posted: Sat Mar 13, 2010 6:01 am
by octane
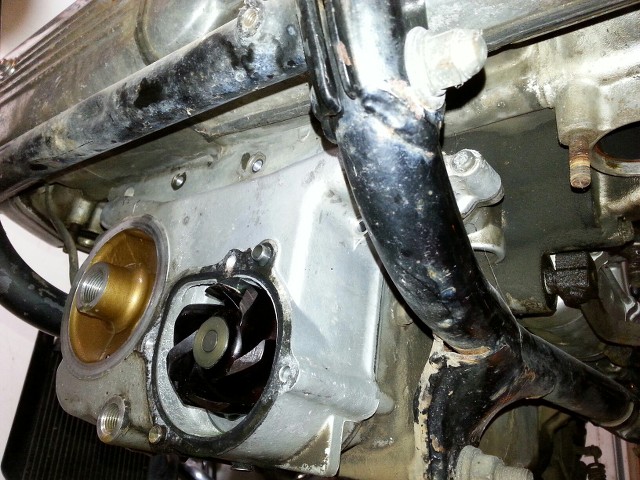
Regarding the "extra" O-ring;
here's what I came up with, by searching the parts book.

O-ring (red arrow) 13 x 2.5mm (for "Plug, Oil Tube". #12 on chart)
That must be it. Measurements fit, and right next to it
there's one of the other o-rings from the set; #50, yellow arrow.
The set was called 'engine front end gasket set' or something similar.
...though I have yet to find that "Plug, Oil Tube" on the engine.
Re: Front Engine Renewal Project, GL1100
Posted: Sat Mar 13, 2010 9:13 pm
by Roady
That's the only one I could come up with too. But, like you, I could not locate it on my '81 1100.
Someone mentioned somewhere ... that they thought it was for the '82-'83 neutral switch that resides under the trans cover.
Re: Front Engine Renewal Project
Posted: Wed Jun 05, 2013 11:35 am
by Lefty
Roady, your write up and finger pointin photos are amazing...if you haven't already received an award I'd atleast like to buy you a beer when I have the pleasure of meeting you sometime.
Re: Front Engine Renewal Project
Posted: Thu Jun 06, 2013 6:45 am
by Roady
Thanks, Lefty. I'll take you up on that offer when we meet.

Re: Front Engine Renewal Project
Posted: Sun Jul 21, 2013 9:07 am
by pistolpete61
Please check the oil pump blow up picture and you'll find the other oil pump sealing "O" ring and collar you're referring to in your picture. It's right next to the water pump seal in pic on the hondapartshouse.com website pic. For my 1981 GL1100 Interstate parts# 24 for the through collar and part# 28 for the "O" ring is the same pieces you see in the blow up of the cylinder block parts #27 for the identical through collar and the "O" ring part# 35 are used for the passages on back of transmission cover to seal oil passages to and from oil filter housing.
Re: Front Engine Renewal Project
Posted: Sun Jul 21, 2013 11:42 am
by Roady
Pete,
I'm not sure I follow what you're saying there. Could you please explain?
Re: Front Engine Renewal Project
Posted: Sun Jul 21, 2013 8:41 pm
by pistolpete61
Well the pic at the top here shows numbers that are all together different than the blow up pics on the hondapartshouse.com site for the cylinder block blow up. here it shows the "O" ring I was referring to in my earlier post is the yellow arrowed part #50, or as I mentioned #35. This "O" ring is Honda part#91333-KE5-003. At hondapartshouse.com in the cylinder block section it shows it as part#35, same Honda oem part# either way. Both blow ups look identical except the different #'s in pics. The collar in the upper pic in this article is Honda part #90703-371-000, or #41. At the other website I mentioned it's #27 in the pic. Either way it's the same part and Honda oem #'s. Then to clarify the same exact same parts you need to complete the job are at the website I mentioned under the oil pump blow up section. No clue why they only show one of the two needed here like top pic here and one in the oil pump pic section. At the hondapartshouse.com I was looking under Honda motorcycle, then to 1981, and finally to the GL1100I A. Go to oil pump and you'll see the other parts that match the other 2 in the cylinder block section above. Parts # 24 is the collar and #28 is the "O" ring. You need 2 of each of the, well at least the "O" rings, not so much the collars. to seal both oil passages holes from where the oil filter screws in to the front transmission cover through transmission cover and in to the cylinder block. If you get a complete "O" ring sealing gasket kit it may have everything, I don't know. Never bought one. So in the cylinder block and oil pump section it clearly shows the other "O" rings needed to do this job. It might be confusing, but if you look at the back of the transmission cover you'll clearly see where these two "O" rings go. one by the coolant passage hole at top that has the two holes, or right side as you're sitting on bike, part #50 like above pic. The other one is just offset to the water pump on the back of the transmission cover. I found all this out the hard way by buying individual parts separately from my local Honda dealer instead of being smart and just buying the kit provided on ebay. Live and learn right. Later on.........Pete
Re: Front Engine Renewal Project
Posted: Sun Jul 21, 2013 8:51 pm
by pistolpete61
I never found that #49 and 12 like in top pic either on my 81
Re: Front Engine Renewal Project
Posted: Thu Jan 23, 2014 1:42 am
by jondog9
Mr. Roady, sir, this write up is awesome!
I got as far as removing the original waterpump. It was toast.

You made life a lot easier for me, because I ran into the phillip head bolts and of course one of them had to be difficult. But the rest came out good with your trick about firmly seating the #3 phillips by giving it a rap with a hammer. And all the little details, like which o-rings and crush washers to look for, the hammer tabs on the bottom of the cover, all that made a reasonable job of it for me. Now to get gaskets and a pump and get it back together.
Cheers

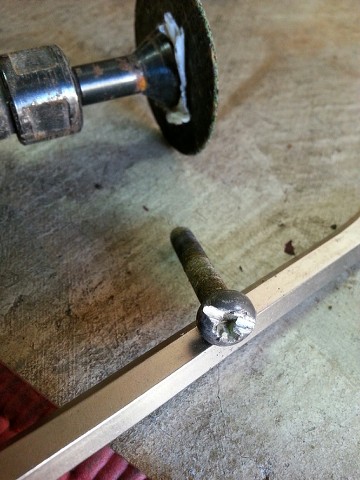
In the picture below, you can see how I hogged out the phillips head.
Check out the water pump weep hole.

That screw has been in there for a few years, it was covered in road grime.

Re: Front Engine Renewal Project
Posted: Thu Jan 23, 2014 8:15 am
by Roady
Good job! And another shall come back to life!

Re: Front Engine Renewal Project
Posted: Thu Jan 23, 2014 4:51 pm
by Lefty
Thanks all for this good and helpful thread. Without NGW I would be in the dark. Whoever wrote the Clymers manuals never owned a Goldwing imho.
Re: Front Engine Renewal Project
Posted: Thu Jan 23, 2014 6:11 pm
by Roady
Lefty, I think you're right. They probably just made a bad copy of the Haynes and changed whatever they wanted.

Re: Front Engine Renewal Project
Posted: Thu Jan 23, 2014 7:15 pm
by Fred Camper
jondog9 wrote:Mr. Roady, sir, this write up is awesome!
You made life a lot easier for me, because I ran into the phillip head bolts and of course one of them had to be difficult. But the rest came out good with your trick about firmly seating the #3 phillips by giving it a rap with a hammer.
In the picture below, you can see how I hogged out the phillips head.
That screw has been in there for a few years, it was covered in road grime.
The access to that screw is so bad it is the worst one all the time. Plus the female threads are open at the back, allowing road grime to get in from the back side too. I had to heat and try every trick and only the slot you also made got mine out.
Re: Front Engine Renewal Project
Posted: Fri Jan 24, 2014 11:15 am
by Whiskerfish
I have a small pair of vice grips and usually they do the job on that particular screw.
Re: Front Engine Renewal Project
Posted: Sat Jan 25, 2014 11:21 am
by Fred Camper
Whiskerfish wrote:I have a small pair of vice grips and usually they do the job on that particular screw.
Because of the access, the slot will only get you about one half of a rotation. After that, the small vice grip is the only real solution I found helpful. It fought coming out the entire way due to corrosion on most all threads.