Just Make Sure You Don't Pinch The Hot Wires Under The Coil Pack... Thats How I Killed Mine....octane wrote:So now the coils/wires are ready for installation
The NGW Project Bike. Body/frame/style
Moderator: Whiskerfish
- RebelRouser
- Webmaster (Retired)

- Posts: 7198
- Joined: Sat Sep 17, 2005 8:44 pm
- My Album: http://www.ngwclub.com/gallery/v/wingmans/rebelrouser/
- Location: The Dalles, Or.
- Contact:
Re: Pub
If You Didn't Build It, Customize It, And/Or Modify It, Then It Truly Isn't Yours. Rebel Rouser
- octane
- SUPER BIKER!!!!

- Posts: 3763
- Joined: Sat Jun 11, 2005 3:24 pm
- Location: Denmark
Thanks. I'll keep that in mind RR.
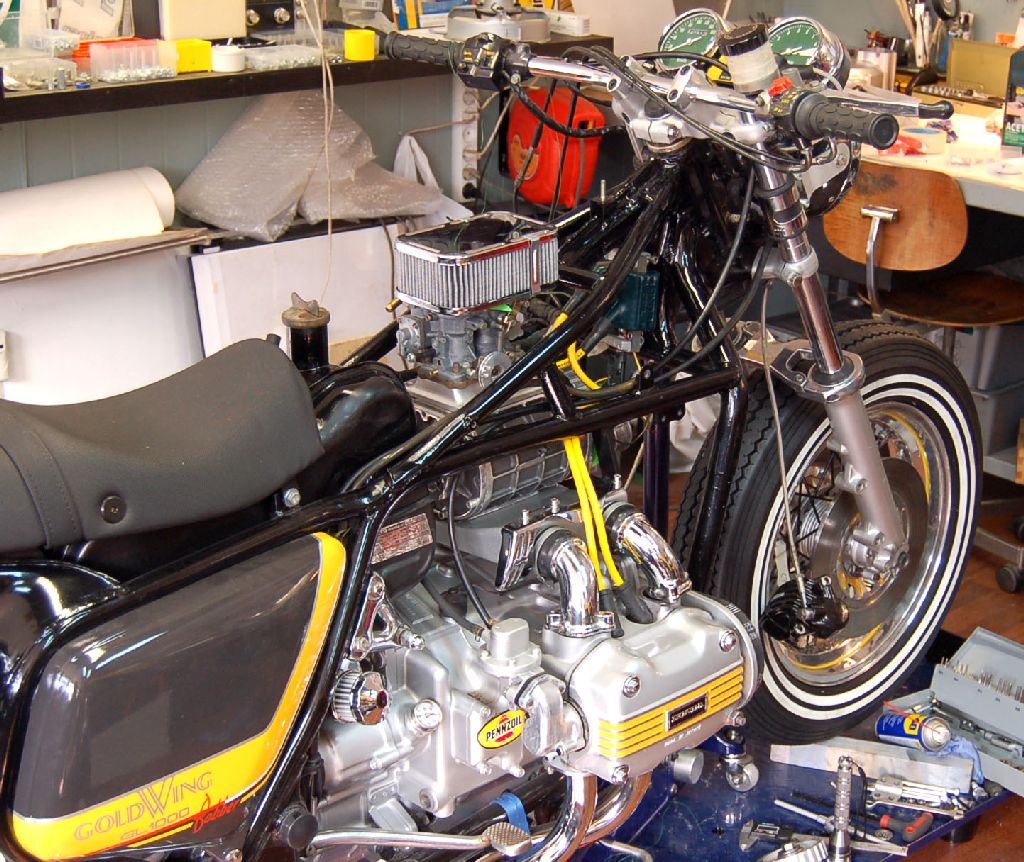
Fixed the 'basket'

(..the cut-out in the side is to make room for
the Weber's fuel intake.)

..wondering why I didn't do this job in the first place?!
Sloppy sloppy sloppy !
BTW. I was surprised to learn that
this basket-thingy/frame is still available,
(but quite expensive, at 410Euro / 530$ (!!!!)).
Fixed the 'basket'

(..the cut-out in the side is to make room for
the Weber's fuel intake.)

..wondering why I didn't do this job in the first place?!
Sloppy sloppy sloppy !
BTW. I was surprised to learn that
this basket-thingy/frame is still available,
(but quite expensive, at 410Euro / 530$ (!!!!)).
Last edited by octane on Mon Apr 02, 2007 3:52 pm, edited 1 time in total.
Da' Supercharged Bulldog
"A designer knows he has achieved perfection
not when there is nothing left to add
but when there is nothing left to take away"
Antoine de Saint-Exupery

"A designer knows he has achieved perfection
not when there is nothing left to add
but when there is nothing left to take away"
Antoine de Saint-Exupery
- RebelRouser
- Webmaster (Retired)

- Posts: 7198
- Joined: Sat Sep 17, 2005 8:44 pm
- My Album: http://www.ngwclub.com/gallery/v/wingmans/rebelrouser/
- Location: The Dalles, Or.
- Contact:
- octane
- SUPER BIKER!!!!

- Posts: 3763
- Joined: Sat Jun 11, 2005 3:24 pm
- Location: Denmark
- octane
- SUPER BIKER!!!!

- Posts: 3763
- Joined: Sat Jun 11, 2005 3:24 pm
- Location: Denmark
Finally got around to make a proper arrangement
to secure the Supercharger-drive pulley
to the crankshaft-pulley.
I'm not too keen on using roll-pins in this case
(too darn complicated to explain why)
so opted for making threads in the crank pulley,
make round cutouts in the flanged bushing
and screw in hardened allen bolts.
now this will secure both the flanged bushing to the Supercharger pulley
and the Supercharger pulley itself, to the crank


So now everything is ready,
all I have to do is to get it (and myself.-) together
and hopefully start in now during Easter.
.....exiiiiiiiiiiiiiiiiiiiiiiiiiiiiiiiiiiiiiiiited !
to secure the Supercharger-drive pulley
to the crankshaft-pulley.
I'm not too keen on using roll-pins in this case
(too darn complicated to explain why)
so opted for making threads in the crank pulley,
make round cutouts in the flanged bushing
and screw in hardened allen bolts.
now this will secure both the flanged bushing to the Supercharger pulley
and the Supercharger pulley itself, to the crank


So now everything is ready,
all I have to do is to get it (and myself.-) together
and hopefully start in now during Easter.
.....exiiiiiiiiiiiiiiiiiiiiiiiiiiiiiiiiiiiiiiiited !
Last edited by octane on Sun Apr 08, 2007 5:13 am, edited 2 times in total.
- Frenchy
- True Blue Steel Biker

- Posts: 2850
- Joined: Sat Jan 22, 2005 12:15 am
- My Album: http://www.ngwclub.com/gallery/v/wingmans/frenchy1
- Location: Prescott Valley, AZ
- Contact:
- octane
- SUPER BIKER!!!!

- Posts: 3763
- Joined: Sat Jun 11, 2005 3:24 pm
- Location: Denmark
Goodness!!!...this takes so much longer than I thought it would...PHEW.
It's all the small stuff. After test-mounting the blower
I realized that just about every single nut, bolt, bracket,
cables, pulley...everything... has to be modified somewhat.
It's like everything aaaaaaaaallmost fits right,
but absolutely nothing fits just right.
Like the pulley on the crank:
(shown here mounted inside-out)

clearly the right-hand cam-belt has been rubbing it,
so had to 'shave' off (steeped) almost one mm.:

and small stuff like the throttle and choker-cables;
had to be shortened and nipples moved.
Had to make them up by cutting up a 6mm steel-rod,
drill a 2mm hole and then a (almost) cone shaped 4mm hole

take measurements, cut down outer cable,
slide on the nipple

'brake up' the individual wires on the side of the 4mm. hole
and force them outwards:

very carefully solder it
(the trick is to avoid the solder to run 'backwards'
down into the cable, which will make it stiff
and unable to bend inside the throttle handle
when the handle is turned).
Then cut off excess wire and dress it with a small file;

Small stuff indeed, but time consuming.
...and there's lots of other issues like that.
Took a look at the wires around the starter relay
and the on battery box itself.
Looked dodgy. Ripped the whole thing off.
(Yet another; "why didn't I do this the first time around")

UARGGH: every time I leave the workshop
the bike is MORE disassembled than it was when I arrived.
Heck: I still enjoy it
.-)
It's all the small stuff. After test-mounting the blower
I realized that just about every single nut, bolt, bracket,
cables, pulley...everything... has to be modified somewhat.
It's like everything aaaaaaaaallmost fits right,
but absolutely nothing fits just right.
Like the pulley on the crank:
(shown here mounted inside-out)

clearly the right-hand cam-belt has been rubbing it,
so had to 'shave' off (steeped) almost one mm.:

and small stuff like the throttle and choker-cables;
had to be shortened and nipples moved.
Had to make them up by cutting up a 6mm steel-rod,
drill a 2mm hole and then a (almost) cone shaped 4mm hole

take measurements, cut down outer cable,
slide on the nipple

'brake up' the individual wires on the side of the 4mm. hole
and force them outwards:

very carefully solder it
(the trick is to avoid the solder to run 'backwards'
down into the cable, which will make it stiff
and unable to bend inside the throttle handle
when the handle is turned).
Then cut off excess wire and dress it with a small file;

Small stuff indeed, but time consuming.
...and there's lots of other issues like that.
Took a look at the wires around the starter relay
and the on battery box itself.
Looked dodgy. Ripped the whole thing off.
(Yet another; "why didn't I do this the first time around")

UARGGH: every time I leave the workshop
the bike is MORE disassembled than it was when I arrived.
Heck: I still enjoy it
.-)
- RebelRouser
- Webmaster (Retired)

- Posts: 7198
- Joined: Sat Sep 17, 2005 8:44 pm
- My Album: http://www.ngwclub.com/gallery/v/wingmans/rebelrouser/
- Location: The Dalles, Or.
- Contact:
-
modernbeat
- Tin Member

- Posts: 13
- Joined: Fri May 04, 2007 1:14 am
- Location: Houston
- octane
- SUPER BIKER!!!!

- Posts: 3763
- Joined: Sat Jun 11, 2005 3:24 pm
- Location: Denmark
Oi !!!
I really need to update this thread:
Did a ton of little silly things like:
I had moved the radiator forward to make way for the blower/fan
OOOOPS : couldn't screw the cap on...bummer!
Had to cut it:

...installed two 110 decibel horns inside the false-tank.
Hooked up via relays together with the high-beam and
an extra high-beam lamp.
Press the horn switch and ----> 2 x horn + 2 high-beam lights !
Very effective for 'telling' that moron sneaking his way out from a side-street in front of you...to NOT do that.
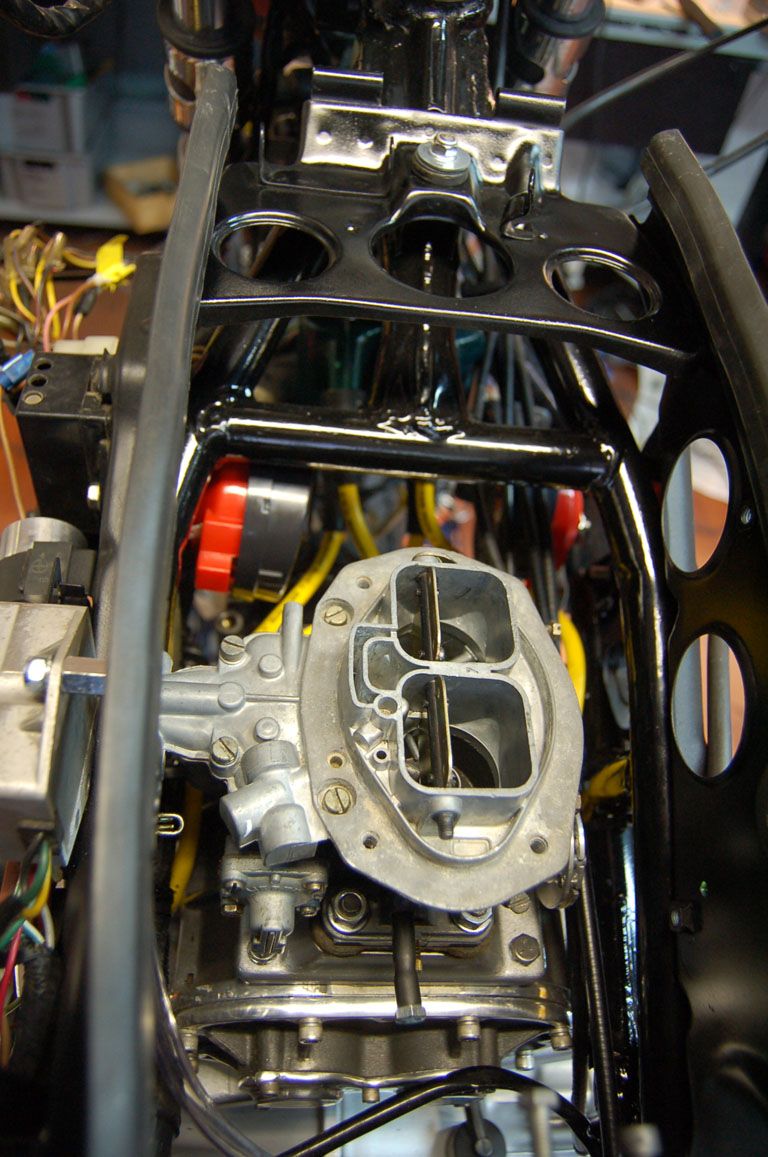
I recall some of you having been into old VW bugs.
I guess you'll recognize this EMPI air-filter.
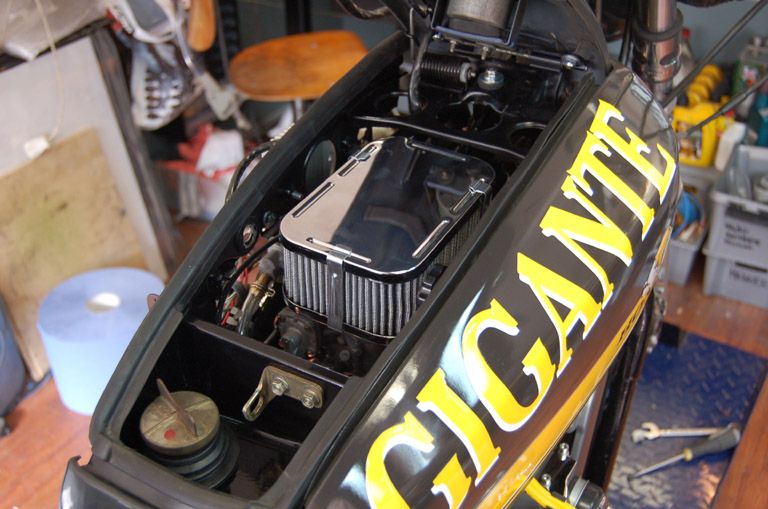
Oh yeah....those giant decals on the 'tank'.

I know it's overkill....but heck I'm having fun.
It's a reference to a car in an extremely popular film.
Anyway this whole thing is just a draft.
Come winter the bike will be taken to pieces and
be treated to a proper paint job.
Frankly; right now the bike is a
take-three-steps-back-and-it-looks-fine-bike.
You'd most probably be disappointed if you saw in 'live'.
Finally the day came when the beast was ready to fire up.
Ha ha ha hah hha hah what an incredible moment
and what an incredible sound
and what an incredible throttle-response
(turn up sound and click this image :)
I really need to update this thread:
Did a ton of little silly things like:
I had moved the radiator forward to make way for the blower/fan
OOOOPS : couldn't screw the cap on...bummer!
Had to cut it:

...installed two 110 decibel horns inside the false-tank.
Hooked up via relays together with the high-beam and
an extra high-beam lamp.
Press the horn switch and ----> 2 x horn + 2 high-beam lights !
Very effective for 'telling' that moron sneaking his way out from a side-street in front of you...to NOT do that.

I recall some of you having been into old VW bugs.
I guess you'll recognize this EMPI air-filter.

Oh yeah....those giant decals on the 'tank'.

I know it's overkill....but heck I'm having fun.
It's a reference to a car in an extremely popular film.
Anyway this whole thing is just a draft.
Come winter the bike will be taken to pieces and
be treated to a proper paint job.
Frankly; right now the bike is a
take-three-steps-back-and-it-looks-fine-bike.
You'd most probably be disappointed if you saw in 'live'.
Finally the day came when the beast was ready to fire up.
Ha ha ha hah hha hah what an incredible moment
and what an incredible sound
and what an incredible throttle-response
(turn up sound and click this image :)
- Frenchy
- True Blue Steel Biker

- Posts: 2850
- Joined: Sat Jan 22, 2005 12:15 am
- My Album: http://www.ngwclub.com/gallery/v/wingmans/frenchy1
- Location: Prescott Valley, AZ
- Contact:
Because you knew that your next how to, would be exactly that...octane wrote:and most pressing:
Expect to see a "How to install new clutch with engine in frame" thread very soon.
I've bought a Barnett Performance Clutch friction plate kit.
Now WHY didn't I do that while the engine was out ?
Awesome brother!!
Frenchy
- RebelRouser
- Webmaster (Retired)

- Posts: 7198
- Joined: Sat Sep 17, 2005 8:44 pm
- My Album: http://www.ngwclub.com/gallery/v/wingmans/rebelrouser/
- Location: The Dalles, Or.
- Contact:
-
halbritt
- Cast Iron Member

- Posts: 57
- Joined: Sat Mar 25, 2006 7:03 am
One would assume that soldered connectors would be ideal, but it turns out that they aren't. At least as far as I know, the aerospace industry uses mechanical connectors (crimped lugs) as soldered connections tend to break under vibration. I would think that the same holds true on a motorcycle.
Speaking of assumptions, I'm assuming that your speedo is in km/h (got it up to 140?) and you were in 3rd gear?
Speaking of assumptions, I'm assuming that your speedo is in km/h (got it up to 140?) and you were in 3rd gear?


