Long run today as I worked some distilled water through the coolant system. I figured I'd give it a little flush with the distilled before filling it with the blue stuff. Note to Self: Drill a small hole in the thermostat to enable bleeding the system a LOT easier. The thermostat on my 86 Aspencade had a small hole and I was shocked how easy it was to bleed. Didn't make the connection until today.
With it running for an extended period, all the oil and gunk got burned off the headers, both inside and out. By the end, no big smoke coming from the open exhaust, so that's a plus. It was also a good time to check for anything loose - and I sure found one! When installing the radiator, I managed to leave one of the hose clamps loose on the upper hose. Oops! Spotted it while checking the temperature at the thermostat housing.
I also took the opportunity to check out the clutch while the rear wheel was elevated. It shifted smoothly through the gears, although the real test will be when it is on the ground and in motion.
Below is a 20 second clip I took of it running near the end of the session. All in all, a good test run. The fan kicks on when it should, which I'd expected since testing the switch in boiling coolant earlier. It hit me all of a sudden while I was letting it idle that I had not soldered the stator wires back together, so I pulled out one of my chargers to keep the battery semi-happy.
'86 SE-i That Followed Me Home
Moderators: Brant, Sagebrush, Forum Moderators
-
3KidsinAustin

- Chrome Member

- Posts: 161
- Joined: Sat Feb 08, 2025 5:04 pm
Re: '86 SE-i That Followed Me Home
You do not have the required permissions to view the files attached to this post.
1985 Limited (SOLD) - Build Thread Here: https://goldwingdocs.com/forum/viewtopic.php?t=72752
1986 Aspencade (SOLD): viewtopic.php?p=829477#p829477
1986 SE-i (Current Project): viewtopic.php?p=831425#p831425
1984 Interstate (Future Project)
1986 Aspencade (SOLD): viewtopic.php?p=829477#p829477
1986 SE-i (Current Project): viewtopic.php?p=831425#p831425
1984 Interstate (Future Project)
-
3KidsinAustin
- Chrome Member
- Posts: 161
- Joined: Sat Feb 08, 2025 5:04 pm
My "Naked" SE-i
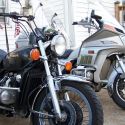
Lots of little things done today, culminating in a stripped down SE-i that will be ready for its inaugural test ride tomorrow. I had to snap a picture as I indeed plan to cruise up and down the street with the ECU tied down to the seat I borrowed from the 84.
During the extended runs yesterday for the coolant, I wasn't happy with the performance of the starter switch. Seemed really easy for it to cut out, so I removed and disassembled it to clean all the contacts. Public service note - all the little bits went flying when I opened it upside down. Oops! I've done it before and took pictures on the 85, so I was able to get the bits into all the right places.
Once I was happy with the starter switch and got it reinstalled, the last thing was to put the exhaust back on. I wasn't aware at the time, but it turns out you can either install the rear exhaust with the rear wheel off or the headers removed. One or the other, but something needs to move to make space for them to slip over the headers. Not wanting to screw with the rear wheel, I removed the headers, wrestled the mufflers into place, and reinstalled everything. Only to then remove the headers AGAIN to install the crash bars. Getting really good at torquing those bolts down!
Before installing the mufflers, I took some 0000 steel wool to the chrome and polished it all up. I've said before, but mother Honda did a really nice job plating all the parts on these bikes. The chrome is so thick and durable that it shows zero scratch marks from the 0000 steel wool and shines up really nice. In the picture, the left side is polished, right is not. The yellow and orange square on the top of the left pipe is a reflection of spray paint cans on the top shelf. Tomorrow will be the test ride - didn't want to tackle it today as I'm wore out from working all afternoon on the bike. If anything unfortunate were to happen on the ride, I want to be fresh and have the day to tackle it.
Before installing the mufflers, I took some 0000 steel wool to the chrome and polished it all up. I've said before, but mother Honda did a really nice job plating all the parts on these bikes. The chrome is so thick and durable that it shows zero scratch marks from the 0000 steel wool and shines up really nice. In the picture, the left side is polished, right is not. The yellow and orange square on the top of the left pipe is a reflection of spray paint cans on the top shelf. Tomorrow will be the test ride - didn't want to tackle it today as I'm wore out from working all afternoon on the bike. If anything unfortunate were to happen on the ride, I want to be fresh and have the day to tackle it.
You do not have the required permissions to view the files attached to this post.
1985 Limited (SOLD) - Build Thread Here: https://goldwingdocs.com/forum/viewtopic.php?t=72752
1986 Aspencade (SOLD): viewtopic.php?p=829477#p829477
1986 SE-i (Current Project): viewtopic.php?p=831425#p831425
1984 Interstate (Future Project)
1986 Aspencade (SOLD): viewtopic.php?p=829477#p829477
1986 SE-i (Current Project): viewtopic.php?p=831425#p831425
1984 Interstate (Future Project)
-
3KidsinAustin
- Chrome Member
- Posts: 161
- Joined: Sat Feb 08, 2025 5:04 pm
Getting Close
Spent a few hours today cleaning and reassembling the back again after installing the front fairing yesterday. Everything coming together nicely, although I'll need to investigate why the turn signals aren't working. Hazards are flashing, so at least the lights are wired up.
I have this mystery piece, hoping someone might be able to identify. After putting three of these together over the past twelve months, I've got at least a passing understanding of the parts and components. This is a new one. Metal, painted to match the pearl of the body.
Ideas? Starting to resemble a motorcycle, this is how I left it about an hour ago.
You do not have the required permissions to view the files attached to this post.
1985 Limited (SOLD) - Build Thread Here: https://goldwingdocs.com/forum/viewtopic.php?t=72752
1986 Aspencade (SOLD): viewtopic.php?p=829477#p829477
1986 SE-i (Current Project): viewtopic.php?p=831425#p831425
1984 Interstate (Future Project)
1986 Aspencade (SOLD): viewtopic.php?p=829477#p829477
1986 SE-i (Current Project): viewtopic.php?p=831425#p831425
1984 Interstate (Future Project)
-
ritalz
- Honored Life Member

- Posts: 4326
- Joined: Sat Jun 25, 2005 10:22 am
- Location: St Louis, MO
Re: '86 SE-i That Followed Me Home
Kinda looks like the body piece that fits between the fairing lowers. Or possibly on the rear to hold the saddlebags together.
Al
2003 Goldwing Daily Rider
1975 Goldwing 'Max'
1984 Goldwing New Bagger Project
1986 Goldwing Aspy 2nd daily rider
1976 Goldwing 'Grocery Getter' Sold
1985 Goldwing Interstate 'NCC-1985' sold
1981 Silverwing Sold
1982 Goldeing Project Sold
1981 Goldwing Parted Out
1983 Goldwing Project Sold
1973 CB500F Long Gone
1966 CL77 First Street Bike
http://www.ngwclub.com/gallery3/index.p ... ans/ritalz
-
ritalz
- Honored Life Member
- Posts: 4326
- Joined: Sat Jun 25, 2005 10:22 am
- Location: St Louis, MO
Re: '86 SE-i That Followed Me Home
On second thought I just looked at my 86 and it don't look the same as either mentioned part.
Al
2003 Goldwing Daily Rider
1975 Goldwing 'Max'
1984 Goldwing New Bagger Project
1986 Goldwing Aspy 2nd daily rider
1976 Goldwing 'Grocery Getter' Sold
1985 Goldwing Interstate 'NCC-1985' sold
1981 Silverwing Sold
1982 Goldeing Project Sold
1981 Goldwing Parted Out
1983 Goldwing Project Sold
1973 CB500F Long Gone
1966 CL77 First Street Bike
http://www.ngwclub.com/gallery3/index.p ... ans/ritalz
2003 Goldwing Daily Rider
1975 Goldwing 'Max'
1984 Goldwing New Bagger Project
1986 Goldwing Aspy 2nd daily rider
1976 Goldwing 'Grocery Getter' Sold
1985 Goldwing Interstate 'NCC-1985' sold
1981 Silverwing Sold
1982 Goldeing Project Sold
1981 Goldwing Parted Out
1983 Goldwing Project Sold
1973 CB500F Long Gone
1966 CL77 First Street Bike
http://www.ngwclub.com/gallery3/index.p ... ans/ritalz
-
3KidsinAustin
- Chrome Member
- Posts: 161
- Joined: Sat Feb 08, 2025 5:04 pm
Re: '86 SE-i That Followed Me Home
Both those are good ideas, but I have those parts. It honestly looks too nice to be homemade with its shaping, bends and paint. Maybe an aftermarket accessory cover or something?
You do not have the required permissions to view the files attached to this post.
1985 Limited (SOLD) - Build Thread Here: https://goldwingdocs.com/forum/viewtopic.php?t=72752
1986 Aspencade (SOLD): viewtopic.php?p=829477#p829477
1986 SE-i (Current Project): viewtopic.php?p=831425#p831425
1984 Interstate (Future Project)
1986 Aspencade (SOLD): viewtopic.php?p=829477#p829477
1986 SE-i (Current Project): viewtopic.php?p=831425#p831425
1984 Interstate (Future Project)
-
3KidsinAustin
- Chrome Member
- Posts: 161
- Joined: Sat Feb 08, 2025 5:04 pm
Re: '86 SE-i That Followed Me Home
Part identified. The middle piece of the extra lower bumper on the SEi. Whew!
1985 Limited (SOLD) - Build Thread Here: https://goldwingdocs.com/forum/viewtopic.php?t=72752
1986 Aspencade (SOLD): viewtopic.php?p=829477#p829477
1986 SE-i (Current Project): viewtopic.php?p=831425#p831425
1984 Interstate (Future Project)
1986 Aspencade (SOLD): viewtopic.php?p=829477#p829477
1986 SE-i (Current Project): viewtopic.php?p=831425#p831425
1984 Interstate (Future Project)
-
ritalz
- Honored Life Member
- Posts: 4326
- Joined: Sat Jun 25, 2005 10:22 am
- Location: St Louis, MO
Re: '86 SE-i That Followed Me Home
Glad you figured it out. Just didn't look like what I saw on my bike.
Al
2003 Goldwing Daily Rider
1975 Goldwing 'Max'
1984 Goldwing New Bagger Project
1986 Goldwing Aspy 2nd daily rider
1976 Goldwing 'Grocery Getter' Sold
1985 Goldwing Interstate 'NCC-1985' sold
1981 Silverwing Sold
1982 Goldeing Project Sold
1981 Goldwing Parted Out
1983 Goldwing Project Sold
1973 CB500F Long Gone
1966 CL77 First Street Bike
http://www.ngwclub.com/gallery3/index.p ... ans/ritalz
2003 Goldwing Daily Rider
1975 Goldwing 'Max'
1984 Goldwing New Bagger Project
1986 Goldwing Aspy 2nd daily rider
1976 Goldwing 'Grocery Getter' Sold
1985 Goldwing Interstate 'NCC-1985' sold
1981 Silverwing Sold
1982 Goldeing Project Sold
1981 Goldwing Parted Out
1983 Goldwing Project Sold
1973 CB500F Long Gone
1966 CL77 First Street Bike
http://www.ngwclub.com/gallery3/index.p ... ans/ritalz
-
3KidsinAustin
- Chrome Member
- Posts: 161
- Joined: Sat Feb 08, 2025 5:04 pm
Little Things
Getting really close now to completion, just tying up the little things. Of course, as the saying goes "the devil's in the details." Backed the bike out of the garage then drove it in to check if the speedo worked - nope. Fearing I might have to rebuild another sensor (see the 86 Aspy project), I disconnected the sensor from the drive housing and the helix-gear drive pin fell right out. After removing the front axle enough to get the hub out, the problem was quickly discovered. Bad nylon gear.
Fortunately, the frame I picked up was a roller and its hub was good, so I swapped the gears. (Thought I had a stuck piece in one of the hubs, turned out I was wrong)
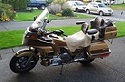
Speedo now working flawlessly on my trip around the neighborhood. Except I ran out of gas a short ways from home. Unbelievably, my wife and daughter were just driving past and were waving as I was trying to flag them down. Was finally successful and got a ride back for my gas can. Lucky boy today!
Separate issue as I was putting the last of the parts back on the bike. These aftermarket horns came in the box of parts. One has a mounting bracket, but I'm scratching my head on where they could mount. If anyone has a similar setup, I'd greatly appreciate tips on how to get them on the bike. Feels good getting the parts from scattered around the garage onto the bike!
Separate issue as I was putting the last of the parts back on the bike. These aftermarket horns came in the box of parts. One has a mounting bracket, but I'm scratching my head on where they could mount. If anyone has a similar setup, I'd greatly appreciate tips on how to get them on the bike. Feels good getting the parts from scattered around the garage onto the bike!
You do not have the required permissions to view the files attached to this post.
1985 Limited (SOLD) - Build Thread Here: https://goldwingdocs.com/forum/viewtopic.php?t=72752
1986 Aspencade (SOLD): viewtopic.php?p=829477#p829477
1986 SE-i (Current Project): viewtopic.php?p=831425#p831425
1984 Interstate (Future Project)
1986 Aspencade (SOLD): viewtopic.php?p=829477#p829477
1986 SE-i (Current Project): viewtopic.php?p=831425#p831425
1984 Interstate (Future Project)
-
Rednaxs60
- Gold Member

- Posts: 1122
- Joined: Mon Nov 30, 2015 11:14 pm
- Location: Victoria, BC, Canada
Re: '86 SE-i That Followed Me Home
The horns look to be similar in size to Fiamms Freeway blaster horns. Can be installed in the lower fairings. Will send picture later.
"When writing the Story of your life, don't let anyone else hold the pen."
Ernest
1985 GL1200 Limited Edition
2014 Can-Am Spyder RT LE
2021 Royal Enfield Himalayan (sold)
1995 GL1500 SE CDN Edition (sold)
2012 Suzuki DL1000 VStrom (sold)
Ontario 1985 GL1200 Limited Edition (sold)
2008 GL1800 (sold)
Ernest
1985 GL1200 Limited Edition
2014 Can-Am Spyder RT LE
2021 Royal Enfield Himalayan (sold)
1995 GL1500 SE CDN Edition (sold)
2012 Suzuki DL1000 VStrom (sold)
Ontario 1985 GL1200 Limited Edition (sold)
2008 GL1800 (sold)
-
Rednaxs60
- Gold Member
- Posts: 1122
- Joined: Mon Nov 30, 2015 11:14 pm
- Location: Victoria, BC, Canada
Re: '86 SE-i That Followed Me Home
Pictures for horn install in lower fairings, right one shown:
You do not have the required permissions to view the files attached to this post.
"When writing the Story of your life, don't let anyone else hold the pen."
Ernest
1985 GL1200 Limited Edition
2014 Can-Am Spyder RT LE
2021 Royal Enfield Himalayan (sold)
1995 GL1500 SE CDN Edition (sold)
2012 Suzuki DL1000 VStrom (sold)
Ontario 1985 GL1200 Limited Edition (sold)
2008 GL1800 (sold)
Ernest
1985 GL1200 Limited Edition
2014 Can-Am Spyder RT LE
2021 Royal Enfield Himalayan (sold)
1995 GL1500 SE CDN Edition (sold)
2012 Suzuki DL1000 VStrom (sold)
Ontario 1985 GL1200 Limited Edition (sold)
2008 GL1800 (sold)
-
3KidsinAustin
- Chrome Member
- Posts: 161
- Joined: Sat Feb 08, 2025 5:04 pm
Re: '86 SE-i That Followed Me Home
Thanks Ernest! I should have looked earlier for a model number. These are Stebel TM90 horns, high and low tone. I'll try out the mounting you showed. Looks like a tight fit with the fairing mounting bracket near that area. Will be a fun puzzle to solve!
You do not have the required permissions to view the files attached to this post.
1985 Limited (SOLD) - Build Thread Here: https://goldwingdocs.com/forum/viewtopic.php?t=72752
1986 Aspencade (SOLD): viewtopic.php?p=829477#p829477
1986 SE-i (Current Project): viewtopic.php?p=831425#p831425
1984 Interstate (Future Project)
1986 Aspencade (SOLD): viewtopic.php?p=829477#p829477
1986 SE-i (Current Project): viewtopic.php?p=831425#p831425
1984 Interstate (Future Project)
-
Paola Zago
- Titanium Member

- Posts: 303
- Joined: Fri Oct 11, 2019 3:03 am
- Location: Italia
Re: '86 SE-i That Followed Me Home
Hi everyone, I've been following your work and I'm fascinated by it. It all seems so simple. I'd have gone crazy with the electrical system alone! I don't think there are any private individuals in Italy who are capable of doing this kind of work in their own garage!
Paola (Italy)
Paola (Italy)
-
3KidsinAustin
- Chrome Member
- Posts: 161
- Joined: Sat Feb 08, 2025 5:04 pm
Re: '86 SE-i That Followed Me Home
Thanks for the kind words! You'd be surprised what can be accomplished on these bikes with simple tools and a great community knowledge base. Have the factory manuals in vital, especially for troubleshooting electrical issues.Paola Zago wrote: ↑Mon Aug 25, 2025 5:36 am Hi everyone, I've been following your work and I'm fascinated by it. It all seems so simple. I'd have gone crazy with the electrical system alone! I don't think there are any private individuals in Italy who are capable of doing this kind of work in their own garage!
Paola (Italy)
For the horns, I have them shoved into the small pockets near the cornering lights and will see if there is enough clearance to fit later today.
You do not have the required permissions to view the files attached to this post.
1985 Limited (SOLD) - Build Thread Here: https://goldwingdocs.com/forum/viewtopic.php?t=72752
1986 Aspencade (SOLD): viewtopic.php?p=829477#p829477
1986 SE-i (Current Project): viewtopic.php?p=831425#p831425
1984 Interstate (Future Project)
1986 Aspencade (SOLD): viewtopic.php?p=829477#p829477
1986 SE-i (Current Project): viewtopic.php?p=831425#p831425
1984 Interstate (Future Project)
-
3KidsinAustin
- Chrome Member
- Posts: 161
- Joined: Sat Feb 08, 2025 5:04 pm
Re: '86 SE-i That Followed Me Home
Quick Update: After bolting everything back on and tooling around the neighborhood, I was stopped behind a lawn truck and noticed a lot of exhaust blowing past me. Turned out my bike was the offender! Was close to home, so pulled it back into the garage and onto the work platform. Lots of emails back and forth with Rednaxs60, with the theory that the bike is running rich once it hits operating temperature. Tried to balance the left and right bank but couldn't get any action to level them out despite rotating the adjustment screw fully in and out. Found a small vacuum leak from the reed valve on the left bank, so pulled the air chamber - more work than removing a carb assembly, but not awful.
Upon removal, I was able to determine the throttle shaft for the right bank was stuck enough that the spring would not rotate it back into position when using the adjustment screw. Basically, it was a one-way adjustment - you could tighten it down, but not get it back if you wanted to loosen it. Pulled the throttle shaft and separated it from the adjustment part. Took my press to get it started moving, but about halfway down it began to loosen up and I removed it by hand. Some cleaning and a quick rub with 0000 steel wool and that portion works just as it should. Replaced the hoses that connected the reed valve and went through the other lines to assess condition. All looked good, so clamped everything up for now. Was getting the intake elbows ready for installation by replacing the small pieces of vacuum line that lead up to the pulse generators when I turned over #4 and saw the gunk inside. Looks like potentially an injector issue? The system holds fuel pressure REALLY well, so it doesn't seem to be leaking when powered off. When I got the bike, PO had done some disassembly of the fuel system on the right bank, but the left injectors hadn't been installed. Possibly something had leaked through the injector hole for awhile? Big opening, hopefully everything sorted and reinstalled tomorrow.
Upon removal, I was able to determine the throttle shaft for the right bank was stuck enough that the spring would not rotate it back into position when using the adjustment screw. Basically, it was a one-way adjustment - you could tighten it down, but not get it back if you wanted to loosen it. Pulled the throttle shaft and separated it from the adjustment part. Took my press to get it started moving, but about halfway down it began to loosen up and I removed it by hand. Some cleaning and a quick rub with 0000 steel wool and that portion works just as it should. Replaced the hoses that connected the reed valve and went through the other lines to assess condition. All looked good, so clamped everything up for now. Was getting the intake elbows ready for installation by replacing the small pieces of vacuum line that lead up to the pulse generators when I turned over #4 and saw the gunk inside. Looks like potentially an injector issue? The system holds fuel pressure REALLY well, so it doesn't seem to be leaking when powered off. When I got the bike, PO had done some disassembly of the fuel system on the right bank, but the left injectors hadn't been installed. Possibly something had leaked through the injector hole for awhile? Big opening, hopefully everything sorted and reinstalled tomorrow.
You do not have the required permissions to view the files attached to this post.
1985 Limited (SOLD) - Build Thread Here: https://goldwingdocs.com/forum/viewtopic.php?t=72752
1986 Aspencade (SOLD): viewtopic.php?p=829477#p829477
1986 SE-i (Current Project): viewtopic.php?p=831425#p831425
1984 Interstate (Future Project)
1986 Aspencade (SOLD): viewtopic.php?p=829477#p829477
1986 SE-i (Current Project): viewtopic.php?p=831425#p831425
1984 Interstate (Future Project)