Project Shed wreck
Moderators: sunnbobb, Neil, Forum Moderators
-
Fred Camper

- Vice President

- Posts: 7383
- Joined: Wed Aug 12, 2009 9:38 pm
- My Album: http://www.ngwclub.com/gallery/v/wingmans/Jeff+Bozeman/
- Location: Metro Detroit
- Contact:
Re: Project Shed wreck
Great build to follow. Very nice fabrication work. I too am anxiously waiting on your welder to finish.
Proud member of the NGW Cartel (Rochester MI)
1977 GL1000 BADDOG (April 2012 BOTM)
1976 LTD - '993 LTD...and so it begins'
You should remember that it's peace of mind you're after and not just fixing the machine. R.Pirsig
1977 GL1000 BADDOG (April 2012 BOTM)
1976 LTD - '993 LTD...and so it begins'
You should remember that it's peace of mind you're after and not just fixing the machine. R.Pirsig
-
Blubber

- Cast Iron Member

- Posts: 64
- Joined: Mon Oct 15, 2012 2:39 pm
- Location: IJmuiden, the Netherlands
Re: Project Shed wreck
Had a small update from my welder today: he just got back from a loooooong job offshore so no time to weld for my rear wheel.  ahh well.. cant really complain for the pricely sum of a few six packs
Meanwhile....
Re-used the original steering stem, modified it to fit in the lower tripple tree of the Suzuki B-King. Pressed it in real tight and used high strength glue to make sure it stays put. If i use just one nut on top of the upper bearing it will fit. I will use the tabbed ring to lock the nut AND the nut will be clamped down with the nut on top op the upper tripple tree.

Found time to fabricate a missing spacer for the front wheel:

Got the fattest tire that (safely) fitted the front rim:


Which means I need to mod the fender i use a bit more ... thats a job for later.

Also found cheap Honda alternative for the OKI MPS-200; these are the "long" N.E.C MC 5194 used on Honda's CX650C
and the CX500C. Mine started to drip.

And.... treated myself with a nice set of a radial clutch and brake pump

And... my new honda waterpump, replacement timing belts and replacement full gasket set arrived . (sorry no pics)
Now I need to find some time to put them to use.
And now... beer time
Meanwhile....
Re-used the original steering stem, modified it to fit in the lower tripple tree of the Suzuki B-King. Pressed it in real tight and used high strength glue to make sure it stays put. If i use just one nut on top of the upper bearing it will fit. I will use the tabbed ring to lock the nut AND the nut will be clamped down with the nut on top op the upper tripple tree.

Found time to fabricate a missing spacer for the front wheel:

Got the fattest tire that (safely) fitted the front rim:


Which means I need to mod the fender i use a bit more

Also found cheap Honda alternative for the OKI MPS-200; these are the "long" N.E.C MC 5194 used on Honda's CX650C
and the CX500C. Mine started to drip.

And.... treated myself with a nice set of a radial clutch and brake pump


And... my new honda waterpump, replacement timing belts and replacement full gasket set arrived
Now I need to find some time to put them to use.
And now... beer time
GL1100 '80 Shed wreck 
Intro: http://ngwclub.com/forum/viewtopic.php?f=15&t=44205
My thread: http://ngwclub.com/forum/viewtopic.php?f=16&t=48566
Intro: http://ngwclub.com/forum/viewtopic.php?f=15&t=44205
My thread: http://ngwclub.com/forum/viewtopic.php?f=16&t=48566
-
CYBORG
- Moderator

- Posts: 24980
- Joined: Mon Jan 14, 2008 12:52 pm
- Location: Muskegon mich
Re: Project Shed wreck
nows a good time to ck that your fork stops will work, or to fix them so they will
1978 custom GL1000
1977 custom with 1200 engine
1985 gl1200
1977 custom with 1200 engine
1985 gl1200
-
Blubber
- Cast Iron Member
- Posts: 64
- Joined: Mon Oct 15, 2012 2:39 pm
- Location: IJmuiden, the Netherlands
Re: Project Shed wreck
Don't worry....i had already checked them, current combo will not work.CYBORG wrote:nows a good time to ck that your fork stops will work, or to fix them so they will
I have a few options
It is on the do to list.
thanks for the tip
GL1100 '80 Shed wreck
Intro: http://ngwclub.com/forum/viewtopic.php?f=15&t=44205
My thread: http://ngwclub.com/forum/viewtopic.php?f=16&t=48566
Intro: http://ngwclub.com/forum/viewtopic.php?f=15&t=44205
My thread: http://ngwclub.com/forum/viewtopic.php?f=16&t=48566
-
Major_moto
- Cast Iron Member
- Posts: 67
- Joined: Tue Feb 23, 2010 10:14 am
- Location: Bloomfield Hills, MI
Re: Project Shed wreck
Nice work so far - this thing is gonna be sharp!
-
Easter

- SUPER BIKER!!!!

- Posts: 3006
- Joined: Thu Sep 13, 2012 11:33 am
- Location: South of Houston 100 miles
Re: Project Shed wreck
I really could use that wheel! I am in the midst of a '75 project using a 93 CB 1000 front end (http://www.ngwclub.com/forum/viewtopic.php?f=30&t=46091) with a wheel much like that. I ended up having the stock rear wheel powder coated to match and I am happy with the results but your wheel would be perfect. Oh well, its going to look great on your bike.
Bikes at present:
83 XL 600r with a 2004 XR650L engine
And a slightly worse for the wear BMW GS adventure bike awaiting repair
83 GL in process
83 XL 600r with a 2004 XR650L engine
And a slightly worse for the wear BMW GS adventure bike awaiting repair
83 GL in process
-
Blubber
- Cast Iron Member
- Posts: 64
- Joined: Mon Oct 15, 2012 2:39 pm
- Location: IJmuiden, the Netherlands
Re: Project Shed wreck
I know that thread, i refer to it to my wife as the "the box wing".Easter wrote:I really could use that wheel! I am in the midst of a '75 project using a 93 CB 1000 front end (http://www.ngwclub.com/forum/viewtopic.php?f=30&t=46091) with a wheel much like that. I ended up having the stock rear wheel powder coated to match and I am happy with the results but your wheel would be perfect. Oh well, its going to look great on your bike.
I buy projects like that all the time. I love those big motorcycle puzzles
I could drive this one home for a change. i know what you are going through... it was all worth it when it starts!
When I look at the actual hours i've put in the wheel; i think its roughly 20 of which mostly machining, some measuring and e-bay/ craigslist hunting. A fully equipped shop should be able to it under 8 hours incl welding.
I removed the original hub at home, machined the old hub at work, modified the St1100 wheel at a befriended bike shop. made the sparer at work, made the drawing for it at work
My extra hours vs the shop are cleaning up the swarf 10 times , remeasuring and setting it up for machining about 12 times, thinking what tools to use and making sure no one else uses the machines. I had several sessions of no more than a hour max. My only cost up till now is the "new" st1100 - €75 incl shipping.
If outsourced I think this rear wheel would cost me about approx €500... extra.
I am not doing it to safe money... i am doing it because i think i pull it off myself
honestly.. if I needed to outsource it... it wouldnt have happened.- costwise.
GL1100 '80 Shed wreck
Intro: http://ngwclub.com/forum/viewtopic.php?f=15&t=44205
My thread: http://ngwclub.com/forum/viewtopic.php?f=16&t=48566
Intro: http://ngwclub.com/forum/viewtopic.php?f=15&t=44205
My thread: http://ngwclub.com/forum/viewtopic.php?f=16&t=48566
-
EHE
- Billet Alum. Member

- Posts: 261
- Joined: Wed Jan 19, 2011 2:49 pm
- Location: the Netherlands
- Contact:
Re: Project Shed wreck
great to see that there are more dutchmen into modifying old GL's !
Great build
how are you gonna align your wider backwheel? in the middle and widen the swingarm, or do you place it out of the center to make it fit?
Great build
how are you gonna align your wider backwheel? in the middle and widen the swingarm, or do you place it out of the center to make it fit?
-
Easter
- SUPER BIKER!!!!
- Posts: 3006
- Joined: Thu Sep 13, 2012 11:33 am
- Location: South of Houston 100 miles
Re: Project Shed wreck
Well, I have to say both of you Dutchmen know your way around the machine shop!
Bikes at present:
83 XL 600r with a 2004 XR650L engine
And a slightly worse for the wear BMW GS adventure bike awaiting repair
83 GL in process
83 XL 600r with a 2004 XR650L engine
And a slightly worse for the wear BMW GS adventure bike awaiting repair
83 GL in process
-
Kriss
- Titanium Member

- Posts: 441
- Joined: Fri Nov 18, 2011 6:00 pm
- Location: England
 Sooooo nice
-
Blubber
- Cast Iron Member
- Posts: 64
- Joined: Mon Oct 15, 2012 2:39 pm
- Location: IJmuiden, the Netherlands
Re: Project Shed wreck
Thanks.EHE wrote:great to see that there are more dutchmen into modifying old GL's !
Great build
how are you gonna align your wider backwheel? in the middle and widen the swingarm, or do you place it out of the center to make it fit?
The wider back wheel isn't that much wider. It's there to match the front, not to go bigger.
The rear tire is a Yokohama 160/70/17, ive measured it when mounted and pressurised....it is 160mm wide
But.. it is almost in line. For clearance reasons the rear wheel is offset 2-3 mm to the left.
Before i started modifing the hub, I measured the distance between the heart of the rim to the collar on the drive side (36mm from memory) . I made the adapter/ spacer to that size. The old hub sat at the same distance from the collar to the heart of the rim. I then put the rear tire on before welding to check for clearance issues.
I had to move/ enlarge the indent on the right side off the swingarm 1cm closer to the drive. Now the tire clears perfectly (5mm) when centered. When centered the clearance with the fueltank wasn't that good. Even with the tank fully spacered out to the right I couldnt get it better than 2-3mm.
Keeping in mind that the tire will be changed some time and tires can be wider than anticipated I decided to offset the rear wheel. I did look into modding the tank. The tanks is way to good and clean to perform surgery on it
When my welder is finished I will post a pic to show the end result of the wheel and the offset. I dont think many people will notice it. As for cornering... i have driven bikes with 2.5cm offset, no problems cornering. You do notice a different wear patern on the rear wheel.
Last edited by Blubber on Fri Sep 13, 2013 3:47 pm, edited 1 time in total.
GL1100 '80 Shed wreck
Intro: http://ngwclub.com/forum/viewtopic.php?f=15&t=44205
My thread: http://ngwclub.com/forum/viewtopic.php?f=16&t=48566
Intro: http://ngwclub.com/forum/viewtopic.php?f=15&t=44205
My thread: http://ngwclub.com/forum/viewtopic.php?f=16&t=48566
-
Blubber
- Cast Iron Member
- Posts: 64
- Joined: Mon Oct 15, 2012 2:39 pm
- Location: IJmuiden, the Netherlands
Re: Project Shed wreck
Hello guys,
Yesterday i finally got my wheel back from the welder. One tip......Never ever say "no rush" to a welder
It only took 2 months Getting the wheel back welded was nice.
The project did get side tracked because of... well.... life as we all know .
.
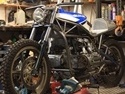
Some pics for the viewers
Immidately had some rubber mounted so it can stand on its wheel. (some day )


Yesterday i finally got my wheel back from the welder. One tip......Never ever say "no rush" to a welder
It only took 2 months
The project did get side tracked because of... well.... life as we all know
Some pics for the viewers
Immidately had some rubber mounted so it can stand on its wheel. (some day


GL1100 '80 Shed wreck
Intro: http://ngwclub.com/forum/viewtopic.php?f=15&t=44205
My thread: http://ngwclub.com/forum/viewtopic.php?f=16&t=48566
Intro: http://ngwclub.com/forum/viewtopic.php?f=15&t=44205
My thread: http://ngwclub.com/forum/viewtopic.php?f=16&t=48566
-
Blubber
- Cast Iron Member
- Posts: 64
- Joined: Mon Oct 15, 2012 2:39 pm
- Location: IJmuiden, the Netherlands
Re: Project Shed wreck
I found some time to get the wheel in.
All is good


Some measurements


My conclusion:
The wheel is almost perfectly centered! with everthing torqued down
Always nice when a plan comes together
All is good


Some measurements


My conclusion:
The wheel is almost perfectly centered! with everthing torqued down
Always nice when a plan comes together
Last edited by Blubber on Fri Sep 13, 2013 3:42 pm, edited 1 time in total.
GL1100 '80 Shed wreck
Intro: http://ngwclub.com/forum/viewtopic.php?f=15&t=44205
My thread: http://ngwclub.com/forum/viewtopic.php?f=16&t=48566
Intro: http://ngwclub.com/forum/viewtopic.php?f=15&t=44205
My thread: http://ngwclub.com/forum/viewtopic.php?f=16&t=48566
-
Blubber
- Cast Iron Member
- Posts: 64
- Joined: Mon Oct 15, 2012 2:39 pm
- Location: IJmuiden, the Netherlands
Re: Project Shed wreck
Next step....
Trial fitting the seats + rear fender....
After a grinder action it looks very possible.
The seat height is not correct yet (to high) , there are gaps because of that but when i put some time it it will work.
I ran out off cutting discs but i am happy.


This is how far i got. I did remove the shock mounts as a prep to the softail shocks i will be using
Next weeks finding tinkering time is impossible because of work. So.... until we meet again
Trial fitting the seats + rear fender....
After a grinder action it looks very possible.
The seat height is not correct yet (to high) , there are gaps because of that but when i put some time it
I ran out off cutting discs but i am happy.


This is how far i got. I did remove the shock mounts as a prep to the softail shocks i will be using
Next weeks finding tinkering time is impossible because of work. So.... until we meet again
GL1100 '80 Shed wreck
Intro: http://ngwclub.com/forum/viewtopic.php?f=15&t=44205
My thread: http://ngwclub.com/forum/viewtopic.php?f=16&t=48566
Intro: http://ngwclub.com/forum/viewtopic.php?f=15&t=44205
My thread: http://ngwclub.com/forum/viewtopic.php?f=16&t=48566
-
jimmyz3286

- Silver Member

- Posts: 629
- Joined: Sat May 11, 2013 9:04 pm
- Location: Mount Vernon, Wa
Re: Project Shed wreck
More detail on the rear fender. What is it from and can we get a pic or two of it?
"The rain collected pools of images at my feet and they asked the direction to the ocean."
1982 GL1100 Silverback
2004 Roadstar For Sale
1981 CX500 café project for Anakin
1982 GL1100 Silverback
2004 Roadstar For Sale
1981 CX500 café project for Anakin
