Yet another 1976 Supercharger project
Moderators: sunnbobb, Neil, Forum Moderators
-
BigDub
- Billet Alum. Member

- Posts: 260
- Joined: Fri Dec 03, 2010 2:43 am
- Location: Sacramento, CA
Re: Yet another 1976 Supercharger project
STELLAR START BRAH!!!!!
1984 VF1100 Flat Black Saber
1981 GL1100 Flat Black Bagged aka my pickup
1976 MR175 farm/trail bike
1975 GL1000 Antares Red
1981 GL1100 Flat Black Bagged aka my pickup
1976 MR175 farm/trail bike
1975 GL1000 Antares Red
-
Fred Camper

- Vice President

- Posts: 7509
- Joined: Wed Aug 12, 2009 9:38 pm
- My Album: http://www.ngwclub.com/gallery/v/wingmans/Jeff+Bozeman/
- Location: Metro Detroit
- Contact:
Re: Yet another 1976 Supercharger project
Impressive thread for sure. Great work.
Proud member of the NGW Cartel (Rochester MI)
1977 GL1000 BADDOG (April 2012 BOTM)
1976 LTD - '993 LTD...and so it begins'
You should remember that it's peace of mind you're after and not just fixing the machine. R.Pirsig
1977 GL1000 BADDOG (April 2012 BOTM)
1976 LTD - '993 LTD...and so it begins'
You should remember that it's peace of mind you're after and not just fixing the machine. R.Pirsig
-
sunnbobb

- Facebook Admin

- Posts: 21330
- Joined: Thu Jan 10, 2008 4:09 pm
- My Album: http://www.ngwclub.com/gallery/v/wingmans/sunnbobb/
- Location: LaConner, WA
Re: Yet another 1976 Supercharger project
Super enjoying watching this one.
I found the end of the internet
---- Bradshaw Bikes custom polishing for your wing. Visit us on facebook!
1978 Learning Experience
1980 County Road Hauler "Brain Damage"
1978 Cafe Custom Gl1000 "Vyper"
1977 Bulldog Inspired "Vaincre"
1981 Street Fighter GL1100 "No Quarter"
1983 Supercharged Street Drag "Anubis" (in worx)
1983 gl1100 mint restoration "Kristen"
1985 Aspencade..pondering.
-
Qui-gon
- Silver Member

- Posts: 687
- Joined: Sat Feb 19, 2011 7:03 pm
- Location: Lantana, Fl.
Re: Yet another 1976 Supercharger project
Thanks for all the encouraging comments.
No pictures from yesterday as I spent it (mostly) repairing the battered, bent and bruised Kerker 4 into 1 pipe. The PO had added great strips of stainless over the scrapes which had to come off. I have never seen such a badly scraped pipe. Even the part under the frame was scored as if the bike had been ridden without wheels. Peeling off the "sacrificial strips" revealed a series of holes riding in close formation! Two if the individual pipes were hanging loose from the 4 into 1 part due to the electric pigeon crap welding! So it was a case of weld a bit grind a lot. repeat until done and definitely no photos (to protect the guilty). Bottom line, the pipe is sound and without holes, except where they should be and coated in exhaust paint. Also re-welded the forward engine bracket to match the frame mods above......pictures of that to follow!
No pictures from yesterday as I spent it (mostly) repairing the battered, bent and bruised Kerker 4 into 1 pipe. The PO had added great strips of stainless over the scrapes which had to come off. I have never seen such a badly scraped pipe. Even the part under the frame was scored as if the bike had been ridden without wheels. Peeling off the "sacrificial strips" revealed a series of holes riding in close formation! Two if the individual pipes were hanging loose from the 4 into 1 part due to the electric pigeon crap welding! So it was a case of weld a bit grind a lot. repeat until done and definitely no photos (to protect the guilty). Bottom line, the pipe is sound and without holes, except where they should be and coated in exhaust paint. Also re-welded the forward engine bracket to match the frame mods above......pictures of that to follow!
1975 GL1000 Sold!
1976 GL1000 "GL1's evil twin" Supercharged cafe racer. Build thread Here
1977 GL1000 Black sorta resto project!
Now in Florida working for a living Ugh!.....projects on hold mostly!

1976 GL1000 "GL1's evil twin" Supercharged cafe racer. Build thread Here
1977 GL1000 Black sorta resto project!
Now in Florida working for a living Ugh!.....projects on hold mostly!
-
BigDub
- Billet Alum. Member
- Posts: 260
- Joined: Fri Dec 03, 2010 2:43 am
- Location: Sacramento, CA
Re: Yet another 1976 Supercharger project
I WANNA SUPER-CHARGE ONE!!!! where to shop? how to choose the type of carbs? what options? I love this build.
Excuse me i think i have to take a restroom break and get rid of this tent i'm pitchin'.
Excuse me i think i have to take a restroom break and get rid of this tent i'm pitchin'.
1984 VF1100 Flat Black Saber
1981 GL1100 Flat Black Bagged aka my pickup
1976 MR175 farm/trail bike
1975 GL1000 Antares Red
1981 GL1100 Flat Black Bagged aka my pickup
1976 MR175 farm/trail bike
1975 GL1000 Antares Red
-
Qui-gon
- Silver Member
- Posts: 687
- Joined: Sat Feb 19, 2011 7:03 pm
- Location: Lantana, Fl.
Re: Yet another 1976 Supercharger project
BigDub wrote:I WANNA SUPER-CHARGE ONE!!!! where to shop? how to choose the type of carbs? what options? I love this build.
Excuse me i think i have to take a restroom break and get rid of this tent i'm pitchin'.
Ebay! Not very often though. There are few others with good info. Check out octane's section for a well documented build. Randakk's site also has some useful information albeit for a more modern setup. There was a kit in the 80s for these bikes but the company no longer exists in the same form. Mine is based on that kit or rather the remnants of it. I got the manifold, blower, carb and carb adaptor plate. The essential components. The rest, cooling, drive, etc., I had to figure out. It could all end in tears but I have had it running. Just how good and reliable it is remains to be seen!
1975 GL1000 Sold!
1976 GL1000 "GL1's evil twin" Supercharged cafe racer. Build thread Here
1977 GL1000 Black sorta resto project!
Now in Florida working for a living Ugh!.....projects on hold mostly!
1976 GL1000 "GL1's evil twin" Supercharged cafe racer. Build thread Here
1977 GL1000 Black sorta resto project!
Now in Florida working for a living Ugh!.....projects on hold mostly!
-
Major_moto
- Cast Iron Member

- Posts: 67
- Joined: Tue Feb 23, 2010 10:14 am
- Location: Bloomfield Hills, MI
Re: Yet another 1976 Supercharger project
I an looking to forward to seeing everything together. This is gonna be quite a machine.
-
FirstYearDeek

- True Blue Steel Biker

- Posts: 2543
- Joined: Sun Aug 10, 2008 4:41 pm
- Location: Terre Haute, Indiana
Re: Yet another 1976 Supercharger project
Holly BALLS that's a clean build! How did I miss this one? What a fantastic job.
-Deek
-Deek
"Eat, drink and be merry. For tomorrow we die."
1975 GL 1000 (First Year) under the knife; soon to be a cafe' inspired "Boss" of a freedom machine.
1975 GL 1000 (First Year) under the knife; soon to be a cafe' inspired "Boss" of a freedom machine.
-
Qui-gon
- Silver Member
- Posts: 687
- Joined: Sat Feb 19, 2011 7:03 pm
- Location: Lantana, Fl.
Re: Yet another 1976 Supercharger project
Time for an update!
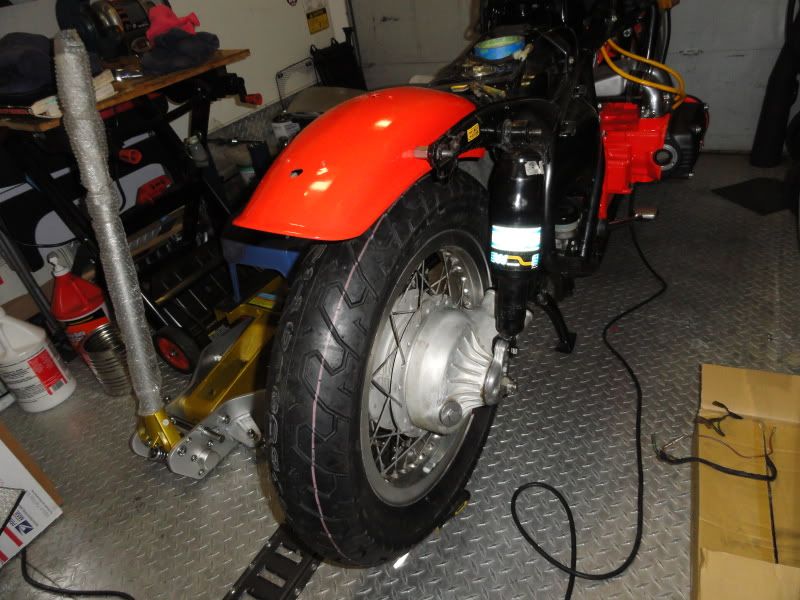
Got the cut down rear fender painted and fitted the set of unused S&W airshocks to see how it looks:
The modified front engine bracket is now painted and fitted:
Wiring time! Decided the ditch the reserve lighting setup. Going led anyway so it wouldn't work properly. Quick and nasty test try:
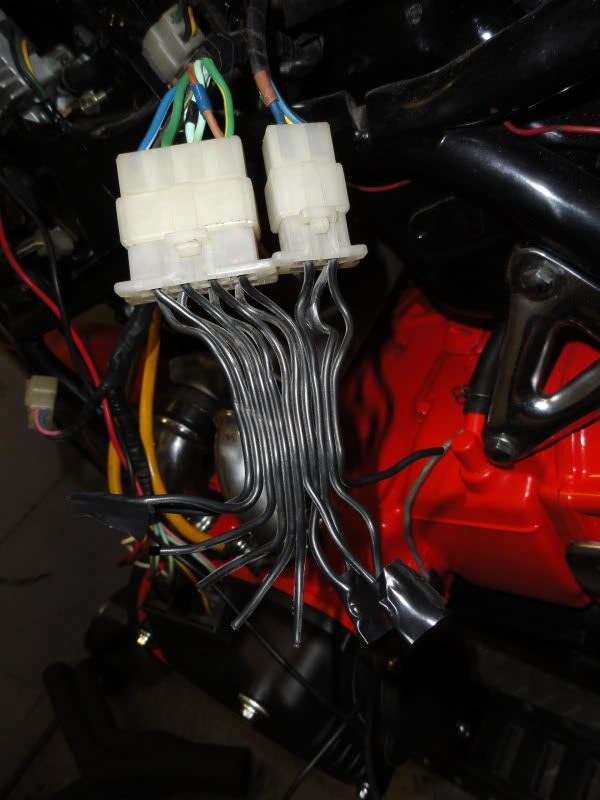
It works so solder and heatshrink on the joints and removed all the unused wire tails:

Here is a view of the left hand shed side....No 7v regulator, no resistors, no reserve lighting unit, no fuel gauge connection and only 1 diode left (no ballast resistor either):
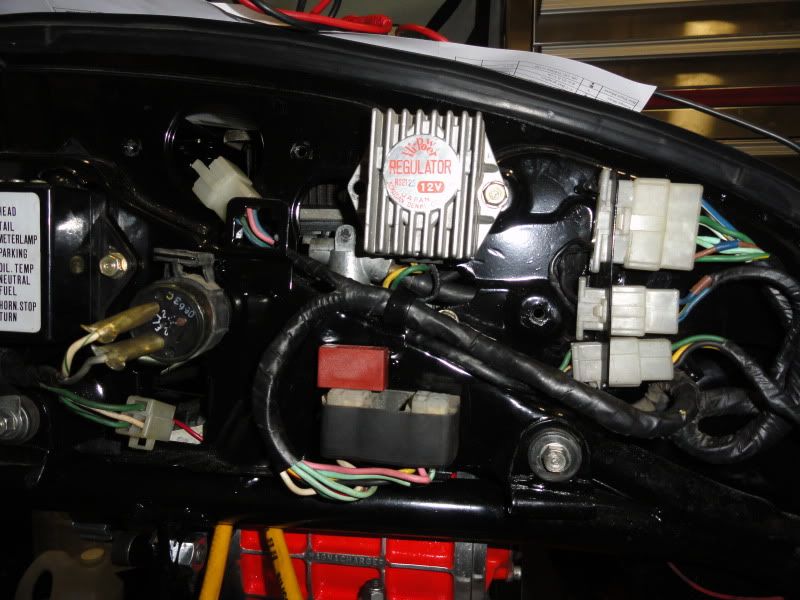
I also have the Acewell gauge connected up and some of the functions working. Fuel gauge works as do all the indicator lamps. Just the speed sensor and the temp gauge sender to sort then another pruning job. Pics to follow.
Got the cut down rear fender painted and fitted the set of unused S&W airshocks to see how it looks:
The modified front engine bracket is now painted and fitted:
Wiring time! Decided the ditch the reserve lighting setup. Going led anyway so it wouldn't work properly. Quick and nasty test try:
It works so solder and heatshrink on the joints and removed all the unused wire tails:
Here is a view of the left hand shed side....No 7v regulator, no resistors, no reserve lighting unit, no fuel gauge connection and only 1 diode left (no ballast resistor either):
I also have the Acewell gauge connected up and some of the functions working. Fuel gauge works as do all the indicator lamps. Just the speed sensor and the temp gauge sender to sort then another pruning job. Pics to follow.
1975 GL1000 Sold!
1976 GL1000 "GL1's evil twin" Supercharged cafe racer. Build thread Here
1977 GL1000 Black sorta resto project!
Now in Florida working for a living Ugh!.....projects on hold mostly!
1976 GL1000 "GL1's evil twin" Supercharged cafe racer. Build thread Here
1977 GL1000 Black sorta resto project!
Now in Florida working for a living Ugh!.....projects on hold mostly!
-
Qui-gon
- Silver Member
- Posts: 687
- Joined: Sat Feb 19, 2011 7:03 pm
- Location: Lantana, Fl.
Re: Yet another 1976 Supercharger project
Mini update.
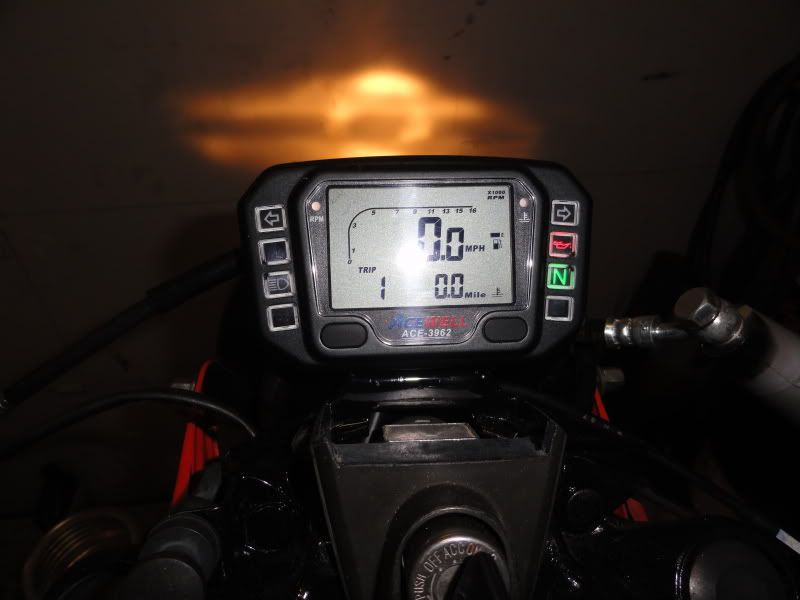
Did some work on the fuel sender to match it with the Acewell gauge. The results are really good. The gauge is designed to work with 100, 300 and 550 ohm senders with empty being the max resistance in each case. The sender I used was the grottyest I could find just in case I trashed it. The resistance of this one measured 110 ohms. With careful calibration I ended up with a range of 8.4 to 99.8 ohms which matches the bar graph gauge from full to empty stop to stop on the sender:
Neatened up all the Acewell wiring and the headlamp still fits. Gauge looks functional rather than pretty:
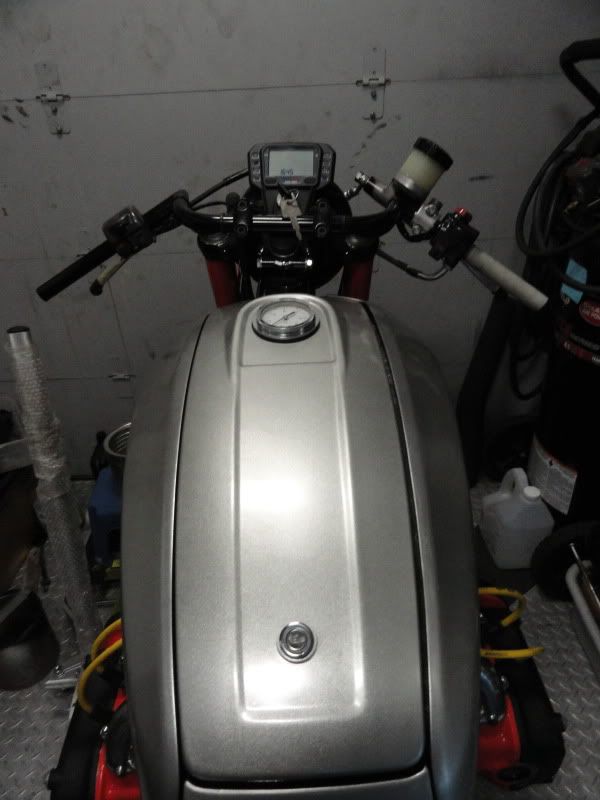
Put the pipe back on , oil in, plugs in and decided to spin the engine. Oil light goes out quickly so that is good news. Mounted the boost gauge and tank covers. Still not sure about the colour. It looks better than the photo suggests:
More later
Did some work on the fuel sender to match it with the Acewell gauge. The results are really good. The gauge is designed to work with 100, 300 and 550 ohm senders with empty being the max resistance in each case. The sender I used was the grottyest I could find just in case I trashed it. The resistance of this one measured 110 ohms. With careful calibration I ended up with a range of 8.4 to 99.8 ohms which matches the bar graph gauge from full to empty stop to stop on the sender:
Neatened up all the Acewell wiring and the headlamp still fits. Gauge looks functional rather than pretty:
Put the pipe back on , oil in, plugs in and decided to spin the engine. Oil light goes out quickly so that is good news. Mounted the boost gauge and tank covers. Still not sure about the colour. It looks better than the photo suggests:
More later
1975 GL1000 Sold!
1976 GL1000 "GL1's evil twin" Supercharged cafe racer. Build thread Here
1977 GL1000 Black sorta resto project!
Now in Florida working for a living Ugh!.....projects on hold mostly!
1976 GL1000 "GL1's evil twin" Supercharged cafe racer. Build thread Here
1977 GL1000 Black sorta resto project!
Now in Florida working for a living Ugh!.....projects on hold mostly!
-
Qui-gon
- Silver Member
- Posts: 687
- Joined: Sat Feb 19, 2011 7:03 pm
- Location: Lantana, Fl.
Re: Yet another 1976 Supercharger project
A couple of small updates...............
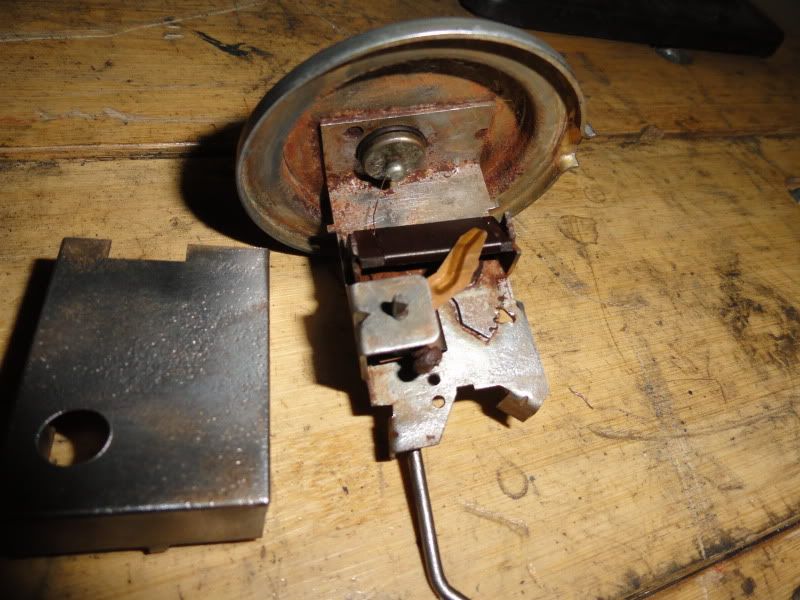
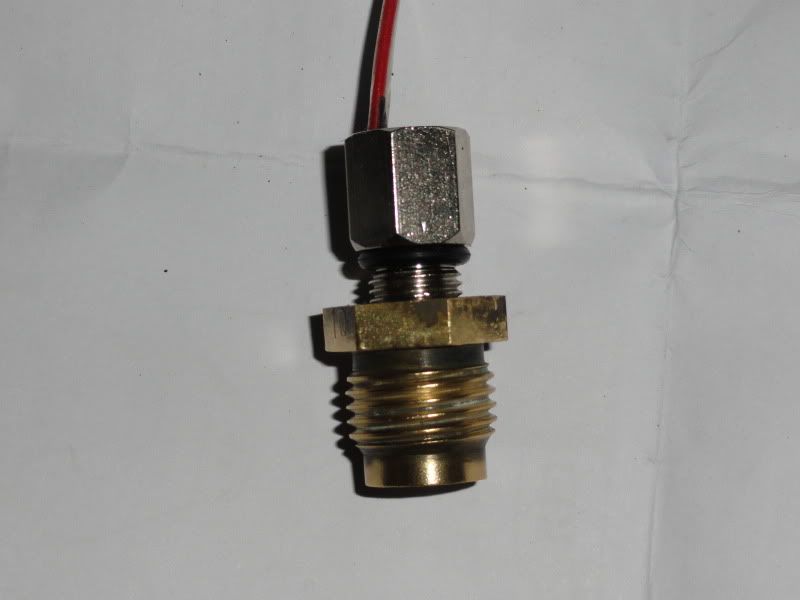
The temperature sensor as supplied with the Acewell gauge is a much smaller item than the original part. Metric threaded 10mm x 1.0mm pitch. In the land of the non-metric I am not sure why the importer takes these instead of the npt threaded variety. Gauge was a bargain so can't complain to much. Luckily the original sender (16mm threads) makes an ideal basis for an adaptor. 2 days to get the tap! and not much chance of a 9mm drill in these parts. A 'T' sized drill (whatever that is?) is 17 thou oversize and the closest to the tapping drill size. Top and tail the old sensor, drill out to 'T' size, tap the resulting hole 10mm x 1.0mm and countersink the entrance to take a standard metric 'o' ring. The result looks like this:

Add sensor and an 8mm x 1.9mm 'o' ring:
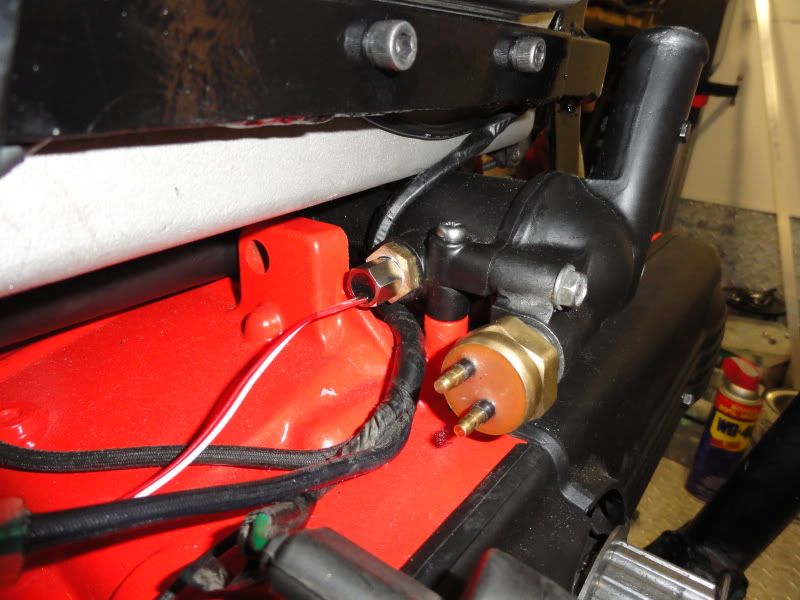
Seal the threads add an original sensor 'o' ring and install in the normal place:
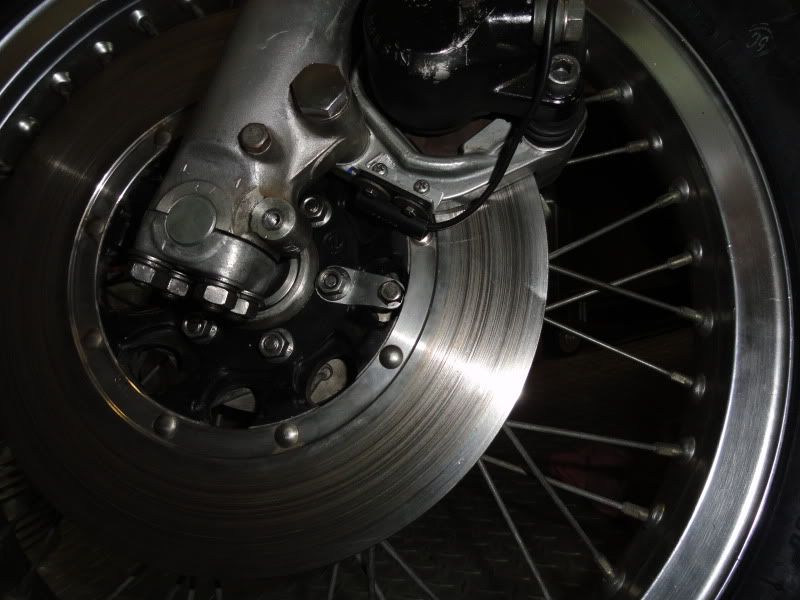
Last part of the Acewell installation was the speedo magnetic pickup and magnet. The sensor is bolted to a aluminium bracket at the bottom of the left hand caliper holder. The reed switch sensor is aligned along the caliper holder close to the disc and can be adjusted. The magnet is on a doglegged aluminium bracket bolted to the disc securing bolts. Both these aluminium brackets were fabricated from standard stock:
Now the water jacket is done tomorrow could be start it day!
The temperature sensor as supplied with the Acewell gauge is a much smaller item than the original part. Metric threaded 10mm x 1.0mm pitch. In the land of the non-metric I am not sure why the importer takes these instead of the npt threaded variety. Gauge was a bargain so can't complain to much. Luckily the original sender (16mm threads) makes an ideal basis for an adaptor. 2 days to get the tap! and not much chance of a 9mm drill in these parts. A 'T' sized drill (whatever that is?) is 17 thou oversize and the closest to the tapping drill size. Top and tail the old sensor, drill out to 'T' size, tap the resulting hole 10mm x 1.0mm and countersink the entrance to take a standard metric 'o' ring. The result looks like this:
Add sensor and an 8mm x 1.9mm 'o' ring:
Seal the threads add an original sensor 'o' ring and install in the normal place:
Last part of the Acewell installation was the speedo magnetic pickup and magnet. The sensor is bolted to a aluminium bracket at the bottom of the left hand caliper holder. The reed switch sensor is aligned along the caliper holder close to the disc and can be adjusted. The magnet is on a doglegged aluminium bracket bolted to the disc securing bolts. Both these aluminium brackets were fabricated from standard stock:
Now the water jacket is done tomorrow could be start it day!
1975 GL1000 Sold!
1976 GL1000 "GL1's evil twin" Supercharged cafe racer. Build thread Here
1977 GL1000 Black sorta resto project!
Now in Florida working for a living Ugh!.....projects on hold mostly!
1976 GL1000 "GL1's evil twin" Supercharged cafe racer. Build thread Here
1977 GL1000 Black sorta resto project!
Now in Florida working for a living Ugh!.....projects on hold mostly!
-
cyclesavers210
- Brass Member

- Posts: 34
- Joined: Fri Sep 10, 2010 3:07 pm
- Location: Findlay Oh.
Re: Yet another 1976 Supercharger project
Hello, Your bike is coming along very nicely! I have the blue and silver supercharged wing on this site. Any chance you know what idle jets are in your carb? If not please dont take the time to remove them just to tell me but I was hoping maybe you knew. I guess maybe we should see how well it runs before I ask that question. Im sure as well as your quality on this build has been thus far your bike will start and run great. Good luck!
-
Qui-gon
- Silver Member
- Posts: 687
- Joined: Sat Feb 19, 2011 7:03 pm
- Location: Lantana, Fl.
Re: Yet another 1976 Supercharger project
Been watching your thread with interest. I wasn't sure you had the same carburettor as I am using? The carburettor in this build, I think, was supplied as part of the supercharger kit in the early 80s. It is a Weber 32/36 DFV which is a mirror image of the DGV and is not very common on the internet although internally it is identical. I made a note of all the jets in it when I first got it. I have no idea if they are right or not or even if the previous owners of it put them back correctly. The video clip at the start of this thread shows the engine running with these settings but as you can see the bike wasn't up to a test run then!cyclesavers210 wrote:Hello, Your bike is coming along very nicely! I have the blue and silver supercharged wing on this site. Any chance you know what idle jets are in your carb? If not please dont take the time to remove them just to tell me but I was hoping maybe you knew. I guess maybe we should see how well it runs before I ask that question. Im sure as well as your quality on this build has been thus far your bike will start and run great. Good luck!
Either octane or Randakk are probably the best bet for information as they both have or had de-bugged versions of what we have.
The settings I have are:
primary air compensation jet 180
secondary air compensation jet 130
primary main jet 140
secondary main jet 140
primary emulsion tube F6
secondary emulsion tube F6
primary idle jet 50
secondary idle jet 45
You can find a parts schematic for the DGV here:
http://www.carburetion.com/diags/3236DGVDiaginfo.asp
That page also has the standard specifications for the carb at the bottom.
Hope that helps. Good luck with the build
1975 GL1000 Sold!
1976 GL1000 "GL1's evil twin" Supercharged cafe racer. Build thread Here
1977 GL1000 Black sorta resto project!
Now in Florida working for a living Ugh!.....projects on hold mostly!
1976 GL1000 "GL1's evil twin" Supercharged cafe racer. Build thread Here
1977 GL1000 Black sorta resto project!
Now in Florida working for a living Ugh!.....projects on hold mostly!
-
macmusick

- Titanium Member

- Posts: 435
- Joined: Tue May 31, 2011 9:11 am
- Location: Durango CO
Re: Yet another 1976 Supercharger project
Wow
Mr. Peabody from Durango
1982 GL1100 Standard "The Wayback Machine" original condition.
1980 GL110 Aspy going nekkid.
1982 GL1100 Standard "The Wayback Machine" original condition.
1980 GL110 Aspy going nekkid.
-
Qui-gon
- Silver Member
- Posts: 687
- Joined: Sat Feb 19, 2011 7:03 pm
- Location: Lantana, Fl.
Re: Yet another 1976 Supercharger project
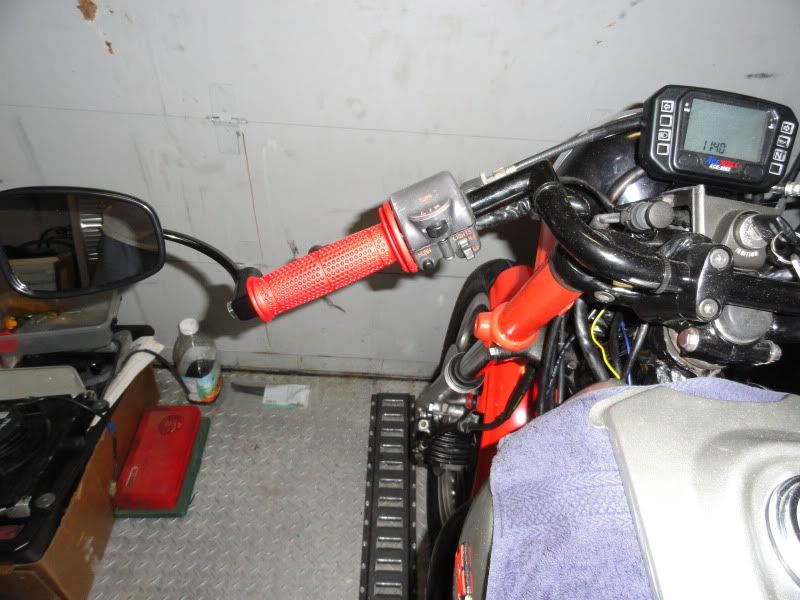
Slow day today. Didn't get it running, oh well maybe tomorrow
Got the colour coordinated grips on along with the bar end mirrors:
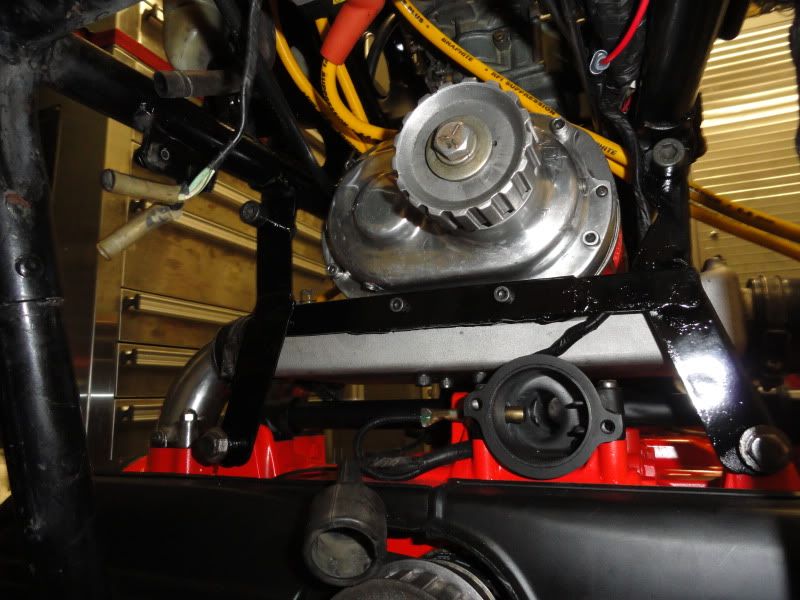
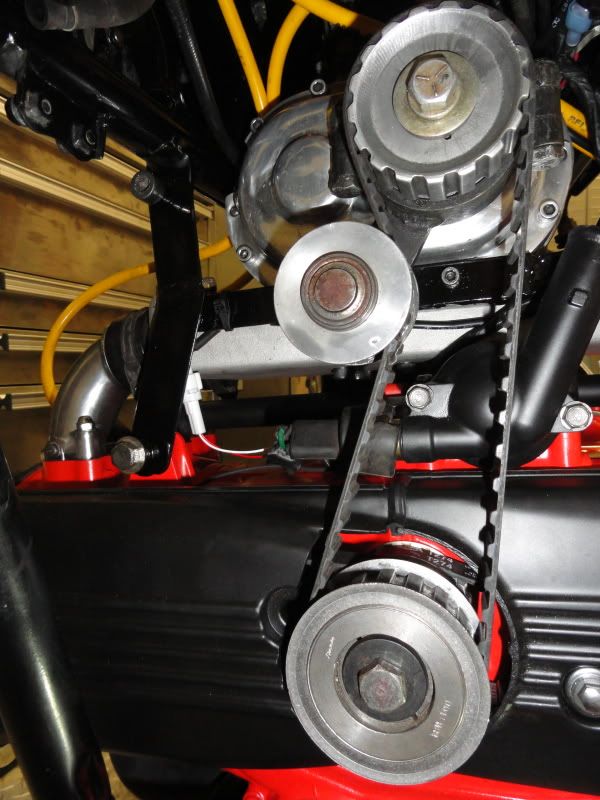
Blower drive on:
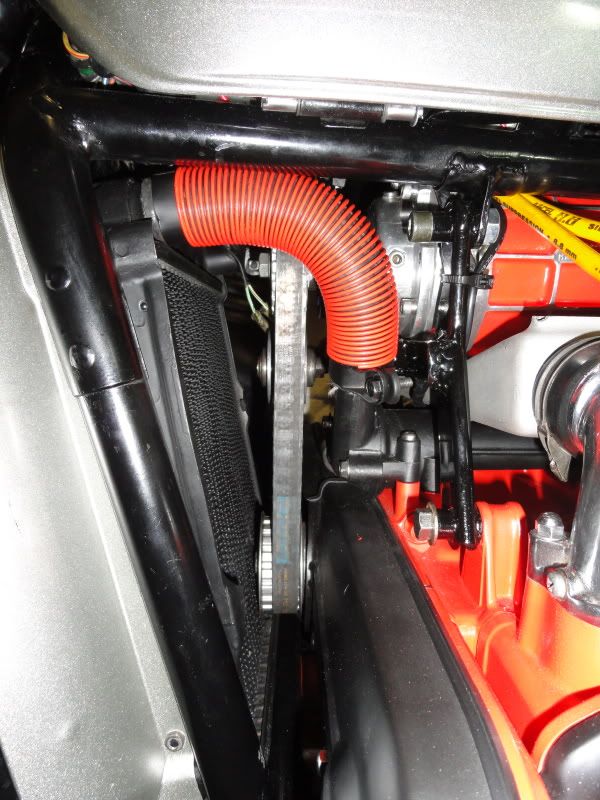
Radiator back on, fan and fuel pump wiring sorted. Think the springs look better in the red orange?
Blower drive from the side:
2 views from the front....left hand side:
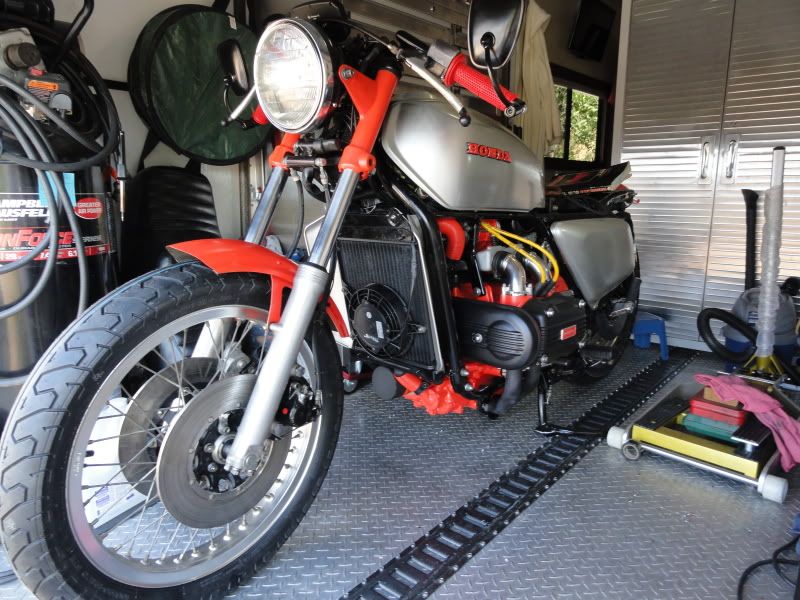
and the right hand side:
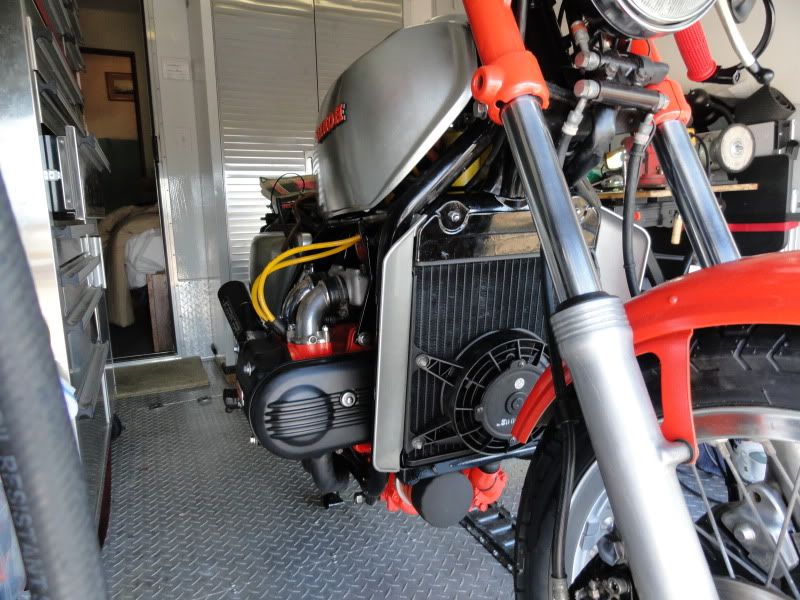
The LED lights arrived today but the seat won't arrive until monday or tuesday. More to follow.
Got the colour coordinated grips on along with the bar end mirrors:
Blower drive on:
Radiator back on, fan and fuel pump wiring sorted. Think the springs look better in the red orange?
Blower drive from the side:
2 views from the front....left hand side:
and the right hand side:
The LED lights arrived today but the seat won't arrive until monday or tuesday. More to follow.
1975 GL1000 Sold!
1976 GL1000 "GL1's evil twin" Supercharged cafe racer. Build thread Here
1977 GL1000 Black sorta resto project!
Now in Florida working for a living Ugh!.....projects on hold mostly!
1976 GL1000 "GL1's evil twin" Supercharged cafe racer. Build thread Here
1977 GL1000 Black sorta resto project!
Now in Florida working for a living Ugh!.....projects on hold mostly!