My stock seat was not in bad shape, yeah, it had a torn part on the right front and a half-inch tear on the lower left side ... not too bad overall. But, seams were starting to come apart a bit and it was really too low and not set back enough for my 38-inch inseam.
Before
[attachment=21]0stockseat.jpg[/attachment]
After
[attachment=0]seatright.jpg[/attachment]
A new Corbin is definitely not in my current toy budget and there's no sugar mama so I decided to take care of it on the last two days of my vacation.
Off to Hancock Fabrics to make my biggest investment in this project. Nice, marine grade, pliable Naugahyde type fabric was selling for $12 a yard. I need about a yard. But hey, what's that on the bargain table? It's heavy, rough-textured vinyl for $6!? I'll go with that! Wish I knew then what I know now. Total bill with upholstery needles, thread and foam pad: $16.45.
The seat was off because I pulled the carbs last week so I removed the chrome trim and pulled all the staples. Off with what's left of the clear plastic cover and into the shop.
A fine-tooth hacksaw blade took care of the passenger backrest in a snap. This was the best tool for this trimming job. I wanted a lower curve on the rear part but there's a hump in the pan for the passenger backrest. I cut it down to about a quarter-inch of that hump and then smoothed the rest into it.
[attachment=20]1rearcutdown.jpg[/attachment]
Then I cut off the forward backrest so I could move it toward the rear. I trimmed the outside edges of the seat to blend into the rear. The lower portion of the backrest was then trimmed back about two inches and the upper part was glued on with contact cement. In the pic you can see the marks on the upper part where I'll cut it to blend in.
[attachment=19]2backrestglued.jpg[/attachment]
I slipped a one inch pad of dense foam between the seat pan and old foam because I always felt that it wasn't tall enough for me and was much too soft. Some of the exposed, newly cut parts have been "painted" with contact cement as I was afraid that, with use, the foam would break down quickly. The contact cement dries and is not tacky after about an hour when applied to the foam.
[attachment=18]3cuttingdone.jpg[/attachment]
The last step here was to wrap the whole thing in clear plastic "Saran" wrap.
Into the sewing room, which is actually the dining room where I setup the wife's machine.
Define the pattern by marking and cutting thin paper to the exact "sewn" size of the pieces. Try to avoid too may seams meeting in the same place, I failed on this one and paid for it later. If too many corners come together the machine won't go through them and you end up doing a lot of hand stitching. That ain't fun. Pin and tape the pattern pieces to the seat. This helps to see if you'll have bad wrinkles that will be hard to pull out. I should have seen it coming on that backrest.
[attachment=17]4frontpatterns.jpg[/attachment]
To get symmetrical pieces, I would trace it, fold it in half and tape it on the window. No light table so this filled the bill. Then decide on the best lines, mark and cut. Fit the paper back on the seat to make sure you done good. Don't like it, do it again. For the two sides of the front, I made one pattern and marked one side for right and the other for left.
[attachment=15]6lighttable.jpg[/attachment]
With all the pattern pieces looking good when taped and pinned to the seat, move on to cutting out the pieces. Lay the vinyl, face-down, on the floor (or a huge table you won't mind scratching) and arrange the pattern pieces. Allow for extra material on all edges, I added 1-1/4 inch to the outside of all my edges. Sewn seams really only need about 3/4 inch but it would help to have 2 inches at the bottom where you'll be pulling it over and stapling.
Tape the pattern, face down, to the back of the vinyl. You're looking at the back of the pattern pieces now. In the pic, I've already drawn the right side piece and am getting ready to do the left. See, it says "Right" on the pattern. That's because the left side is face down. Not too confusing is it? After carefully sketching around the pattern, remove the tape and complete the lines. What we've just drawn are "sew" lines. Now, measure out, all the way around and mark the cut lines. These should be even on all pieces because you will be putting the vinyl face-to-face and will need to rely on the edges to get your seams straight.
[attachment=16]5markvinyl.jpg[/attachment]
Align the pieces and put a pin through the corners of your sew lines. Then you'll know exactly how the two pieces fit together.
[attachment=14]7pincorners.jpg[/attachment]
Hold the two face-to-face pieces firmly and slide them into the machine. Put the foot down and start sewing. Most sewing machines can easily handle the pliable vinyl that you get at most fabric stores. This stuff I got was a bit too thick and stiff so I fought with it and the machine for far too long. I'm not much of a hand with sewing and have only done one other upholstery job in my life. That was a VW in the mid-70's so I really don't remember much of that. But I got through it, learned a lot and know that next time it will be better.
[attachment=13]8sewing.jpg[/attachment]
Back to the project. I moved the cover into the yard so the vinyl would heat up and be easier to work with.
Trim off all of the excess seam material to within about a quarter inch of the stitching. Hand sew any corners that didn't quite come together. See where the 3 seams meet at both ends of the scissors? Those corners were a royal pain in the pattootie. Hand stitching helped pull them in but they ended up very lumpy. Avoid this kind of seam battle at all costs. Catch it in the pattern stage before you get here.
[attachment=12]8trimexcess.jpg[/attachment]
I laid the cover in the sun for an hour to warm it up and make the next phase easier. The grill wasn't on but it probably would have helped with this stuff.
[attachment=11]9warming.jpg[/attachment]
The backrest was the worst part of this job. I saw it coming when I was making the pattern, when I was test fitting and it was hard to sew and had too many small pieces. I should have hacked it off and trashed it while I had the chance.
Again, next time.
On with the stretching, stapling, stretching, stapling, stretching, un-stapling, re-stretching, cramping and more stretching and stapling.
You need a decent staple gun, the one I have is just about the least powerful one that will pull off this job. The staples to use are 1/4 inch. I also had a hair dryer handy to spot-heat trouble spots. This helped some with this material but would make a big difference when working with some of the more pliable vinyls. Be careful that you don't overheat, it will come apart on you.
[attachment=9]10tools.jpg[/attachment]
Shown here is the stretching sequence that I used. Pull it over firm at the first mark and put in 3 or four closely spaced staples. Then directly opposite of that at 2, pull like the dickens and put in 3 or 4. Then pull like crazy at the front edge, #3 and put in 3 on each side of the mounting tab. Closely spaced. Here's where I had to pull out 1, 2 and 3 and start over. It was crooked.
[attachment=10]10astretch.jpg[/attachment]
Anyway, you see the pattern. Just anchor and then stretch. Work the rest of the sides by angling toward the front. Then do the rear seat.
I am disappointed with the backrest, the wrinkles just won't come out of it. The cover doesn't fit the foam right. I added a small aluminum bar at the base in the front to pull it in some. It's attached through the seat and into the pan but even that didn't smooth it out. Ah, well, K-Sara, Sara, whatever will be will be.
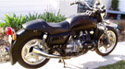
[attachment=8]11mountedrear.jpg[/attachment]
[attachment=7]12mountedfront.jpg[/attachment]
[attachment=6]13mountedside.jpg[/attachment]
Below is a comparison of the foam before and after cutting.
[attachment=4]comparetop.jpg[/attachment]
[attachment=5]compareside.jpg[/attachment]
Now, I've got to fix those carbs so I can try this out.
Overall I'm pleased with the results and happy that I did it.
.
If you find yourself "Blocked" please contact me via the link below
https://ngwclub.com/forum/app.php/contactadmin
https://ngwclub.com/forum/app.php/contactadmin
Stock Seat becomes Custom, GL1100
Moderators: Whiskerfish, Forum Moderators
-
Roady

- Member Relations &_Graphics

- Posts: 11957
- Joined: Wed Jun 20, 2007 2:35 pm
- Location: Port St. John, FL
Stock Seat becomes Custom, GL1100
You do not have the required permissions to view the files attached to this post.
Last edited by Roady on Tue Dec 29, 2009 9:14 pm, edited 7 times in total.
-
Whiskerfish
- President

- Posts: 38178
- Joined: Thu Feb 16, 2006 9:34 pm
- My Album: http://www.ngwclub.com/gallery/v/wingmans/whiskerfish/
- Location: Norfolk Va
Nicely done!! Maybe a tab sewn on at the base of your backreast (to the inside of the material) with a string to the bottom of the pan would help ?? Kind of like a button on a couch.
"Agreement is not a requirement for Respect" CDR Michael Smith USN (Ret) 2017
"The book is wrong, this whole Conclusion is Fallacious" River Tam
"Yea I do dance awkwardly, and I am having more fun than you" Taylor Swift
2008 GL1800 IIIA "TH3DOG"
1984 GL1200 Standard
1975/6/7/8/9 Arthur Fulmer Dressed Road bike
1975 Naked Noisy and Nasty in town bike
Psst. oh and by the way CHANGE YOUR BELTS!!!!
-
stuka151

- Silver Member

- Posts: 985
- Joined: Fri May 16, 2008 1:38 pm
- Location: St. Croix Falls, WI


-
JBz

- SUPER BIKER!!!!

- Posts: 3070
- Joined: Wed Jan 31, 2007 8:11 pm
- Location: dayton nv
you might just go ahead and take it off and put a layer of dacron batting in it to fill it out. I just took a semester of upholstery at night school. sewing is not as easy as it looks after working with metal all these years. jb
jbz........... Thinkin about sh-t too hard and You wont get anything done
-
Roady
- Member Relations &_Graphics
- Posts: 11957
- Joined: Wed Jun 20, 2007 2:35 pm
- Location: Port St. John, FL
Thanks for the great ideas, guys.
I was pretty disappointed with that backrest, the rest of the covering is pretty good, but I was kinda down.
Now, with your ideas, I think there IS a solution. But it will most likely kill the budget. This will probably put me in a $5 to $7 overrun! OMG!
I need to get some Dacron batting and some upholstery buttons. I'll pull up the passenger section (last part I did) and stuff the backrest with Dacron. Then a couple of buttons in front attached to a couple in the rear (or maybe a piece of masonite inside in the rear?) to pull it together.
More pics to come.
I was pretty disappointed with that backrest, the rest of the covering is pretty good, but I was kinda down.
Now, with your ideas, I think there IS a solution. But it will most likely kill the budget.
I need to get some Dacron batting and some upholstery buttons. I'll pull up the passenger section (last part I did) and stuff the backrest with Dacron. Then a couple of buttons in front attached to a couple in the rear (or maybe a piece of masonite inside in the rear?) to pull it together.
More pics to come.
-
Roady
- Member Relations &_Graphics
- Posts: 11957
- Joined: Wed Jun 20, 2007 2:35 pm
- Location: Port St. John, FL
Alright, I got right on it and the seat is now finished for the season. I may revisit this later and apply my new learnings but for now it will do.
I pulled the skin off, stuffed in some fiberfill, restretched the cover and then popped in some buttons on the backrest.
One little touch, a tribute to the old seat that wasn't highlighted in my original post ... I salvaged the rear "HONDA" and used it. I wish the lettering was still gold but I'm not going to try to repaint it.
And the cost overrun? I had to buy a pack of 5" needles and 8 buttons, $6.23. Total cost of my "custom" seat, $22.68.
.
You do not have the required permissions to view the files attached to this post.
-
Cookie

- Honored Life Member

- Posts: 15821
- Joined: Thu Oct 25, 2007 11:37 pm
- RIP: 1950-2011
- Location: San Mateo, CA
-
Whiskerfish
- President
- Posts: 38178
- Joined: Thu Feb 16, 2006 9:34 pm
- My Album: http://www.ngwclub.com/gallery/v/wingmans/whiskerfish/
- Location: Norfolk Va
Looks better 
"Agreement is not a requirement for Respect" CDR Michael Smith USN (Ret) 2017
"The book is wrong, this whole Conclusion is Fallacious" River Tam
"Yea I do dance awkwardly, and I am having more fun than you" Taylor Swift
2008 GL1800 IIIA "TH3DOG"
1984 GL1200 Standard
1975/6/7/8/9 Arthur Fulmer Dressed Road bike
1975 Naked Noisy and Nasty in town bike
Psst. oh and by the way CHANGE YOUR BELTS!!!!
"The book is wrong, this whole Conclusion is Fallacious" River Tam
"Yea I do dance awkwardly, and I am having more fun than you" Taylor Swift
2008 GL1800 IIIA "TH3DOG"
1984 GL1200 Standard
1975/6/7/8/9 Arthur Fulmer Dressed Road bike
1975 Naked Noisy and Nasty in town bike
Psst. oh and by the way CHANGE YOUR BELTS!!!!
-
Roady
- Member Relations &_Graphics
- Posts: 11957
- Joined: Wed Jun 20, 2007 2:35 pm
- Location: Port St. John, FL
-
Roady
- Member Relations &_Graphics
- Posts: 11957
- Joined: Wed Jun 20, 2007 2:35 pm
- Location: Port St. John, FL
-
rogue1000

- SUPER BIKER!!!!
- Posts: 3723
- Joined: Mon Jan 12, 2009 3:28 pm
- Location: SLO, Ca.
I think that seat looks pretty good Steve. I'm with Cookie, wear it out before you try again. I'm looking at doing more or less the same thing, but losing the driver backrest so I can scoot around better. Right now I have to slide back over the backrest to shift, so I'm also going to add a 1" pad (maybe gel?). I'm also going to try and reuse the covering..we'll see how batchy it looks...good thread, thanks..BC
Brian Crow
1977 gl1000, with California sidecar
"KBO"!! Keep bungling on! Winston Churchill
"Bound is boatless man"
1977 gl1000, with California sidecar
"KBO"!! Keep bungling on! Winston Churchill
"Bound is boatless man"
-
Roady
- Member Relations &_Graphics
- Posts: 11957
- Joined: Wed Jun 20, 2007 2:35 pm
- Location: Port St. John, FL
Re: Stock Seat becomes Custom, GL1100
(Ran across this and felt like updating it.)
In 2012 I broke down and recut the foam. Decided to have it recovered in leather by a local professional Saddler.
[attachment=0]winniesaddle.jpg[/attachment]
.
In 2012 I broke down and recut the foam. Decided to have it recovered in leather by a local professional Saddler.
[attachment=0]winniesaddle.jpg[/attachment]
.
You do not have the required permissions to view the files attached to this post.
-
sunnbobb

- Facebook Admin

- Posts: 21337
- Joined: Thu Jan 10, 2008 4:09 pm
- My Album: http://www.ngwclub.com/gallery/v/wingmans/sunnbobb/
- Location: LaConner, WA
Re: Stock Seat becomes Custom, GL1100
Very nice! like!
I found the end of the internet
---- Bradshaw Bikes custom polishing for your wing. Visit us on facebook!
1978 Learning Experience
1980 County Road Hauler "Brain Damage"
1978 Cafe Custom Gl1000 "Vyper"
1977 Bulldog Inspired "Vaincre"
1981 Street Fighter GL1100 "No Quarter"
1983 Supercharged Street Drag "Anubis" (in worx)
1983 gl1100 mint restoration "Kristen"
1985 Aspencade..pondering.
-
jvacustoms

- Titanium Member

- Posts: 332
- Joined: Thu Jul 14, 2011 9:41 am
- My Album: http://www.ngwclub.com/gallery/v/wingmans/jvacustoms/
- Location: Rockmart, GA
- Contact:
Re: Stock Seat becomes Custom, GL1100
How is the ride with that much foam removed from the seat ? Notice any difference in comfort?
1984 Gl1200 Goldwing Bagger (~*~Phoenix~*~) - Rests in Pieces Awaiting a grand rebirth
1976 Gl1000 Yellow - Might just be Phoenix new shell for rebirth.
I was here but now I'm gone, I left some rubber to turn you on !
James Ammons
U.S. Army Combat Veteran
OIF3 & OIF4
1976 Gl1000 Yellow - Might just be Phoenix new shell for rebirth.
I was here but now I'm gone, I left some rubber to turn you on !
James Ammons
U.S. Army Combat Veteran
OIF3 & OIF4