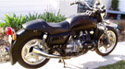

Here is what I started with.

I ground out the welds holding the right "mount".

Put the assembly in a vice and cut the right "tube"

I then drove the mount into the tube.

Once I had it positioned, I did the same on the left side.

I mixed up a batch of JB Weld...

...and using a putty knife, goobered the epoxy into both ends of the tube, cleaned up the mess, and taped off the ends while it cured.

This is what I accomplished on day one. As JB Weld takes 15 hours to cure, I went on to other things while it cured.
Earlier, when I dry fitted the pieces prior to potting them, I determined the correct length for the spacers and set them aside. Getting back to them while the JB Weld cured, I rough cut them to within an eight of an inch of their finished dimensions. As the mating ends are not parallel, I used a table top disc sander to finish it to the desired length maintaining relative angles of the ends.
Here's the finished spacer with the wasted piece.