Soldering How-to
Moderators: Whiskerfish, Forum Moderators
- stuka151
- Silver Member
- Posts: 985
- Joined: Fri May 16, 2008 1:38 pm
- Location: St. Croix Falls, WI
Soldering How-to
The privilege of vintage Wing ownership is an earned one. Previously owned bikes come with years of abuse and jury-rigged repairs by previous owners. Many of us have run into wiring harnesses built from blue crimp connectors, hot wired cooling fans and fuses bypassed with paperclips. It was pointed out that a post was needed to demonstrate the proper techniques of creating a good solid soldered repair.
Soldering is the act of joining to pieces of metal (in our case wires) using a a molten metal filler without melting the base metals. There are a few tools that are necessary (and a few that just make things a little easier) for making electrical solder joints. The first is a heat source.
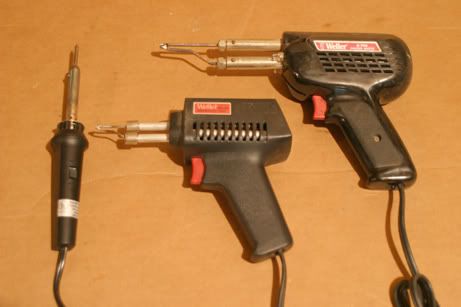
My preferred tool is the soldering iron or gun. When soldering it is important to is be able to control the amount of heat you use. Soldering irons come in a variety of heat ranges. Small electrical components can be damaged if too much heat is applied so often times a 10-15 watt soldering iron (far left) is used. For larger solder joints the smaller iron won't be able to supply enough heat to draw the solder through the wire. For these larger jobs soldering guns like the 30 watt (center) and 325 watt (right) pictured below are useful. For most motorcycle wiring jobs the medium sized irons are the best choice.
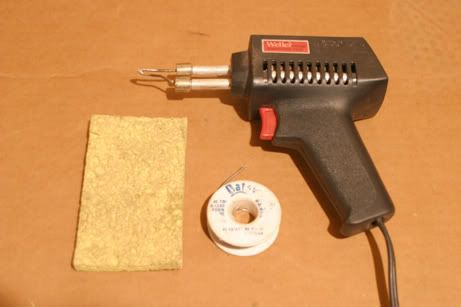
When making electrical repairs, always use a rosin core solder; a 40 tin/ 60 lead solder is quite common and a good choice. I also keep an old damp sponge handy for cleaning the iron.
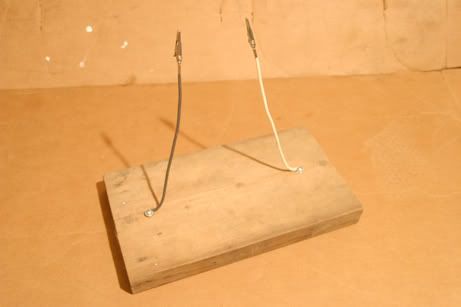
It is always helpful to have an extra set of hands to hold the piece that you are working on. To make things a little easier, I crimped some small alligator clips to a couple of pieces of 10 awg solid building wire. The wire is then wrapped around a couple of screws and affixed to a scrap of wood. This serves a second purpose as the alligator clips and wire act as a heat sink, drawing excess heat away that could damage small components.
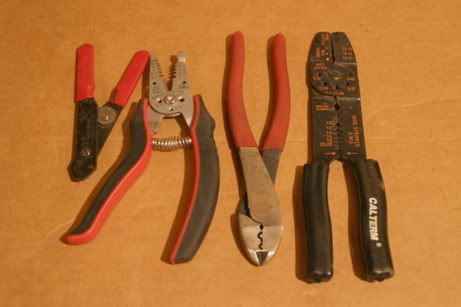
...and when those crimp-on connectors are necessary a good quality set of crimpers ensures a more reliable and attractive connection. The crimpers pictured below (second from the right) are the best set I have owned and were purchased from my local home improvement store. They produce a crimp that is tight and much closer in quality to a factory crimp.
When using crimp on connectors use them only where a connection that can be unplugged is required. Permanent splices should be soldered and properly insulated.
High quality crimp-on connectors produce a mechanical seal preventing the introduction of moisture into a connection. However with the garden variety type connector like are found in most auto parts stores or home improvement centers do not create this same mechanical seal. I have found that in this case, tinning the wire helps produce a seal at the ends of the wire strands and a longer lasting connection as the solder does not oxidize as readily as the bare copper. Tinning the wire means coating it with solder, this helps prevent oxidation at the crimp and the solder coated wires will not be as likely to break or come out of the crimped connection.
Begin by stripping a small amount of insulation from the end of the wire, enough to be securely crimped in the connector without excess bare wire exposed beyond the connector's insulation. If the wire looks dull or oxidized, carefully clean it with sand paper or emery cloth.
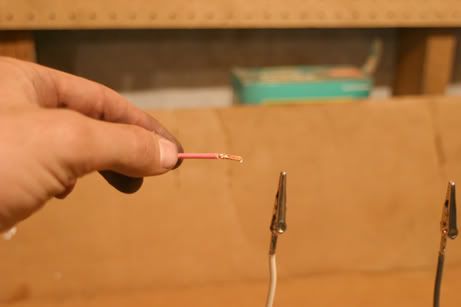
Neatly twist the end of the wire keeping any stray bits from sticking out.
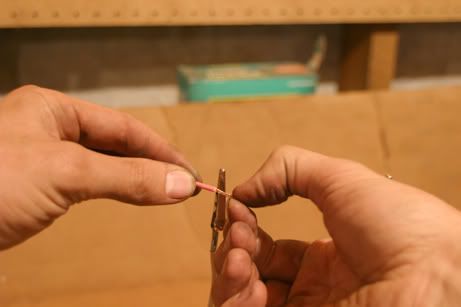
Heat the gun and apply a small amount of solder to the tip.
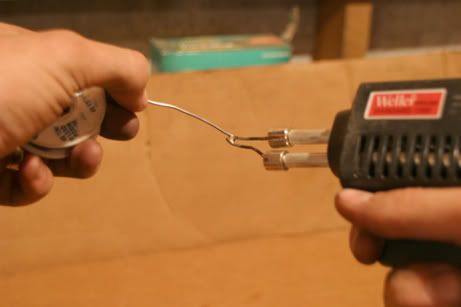
Next, touch the solder to the tip of the soldering gun and drip a small amount of solder onto the wire.
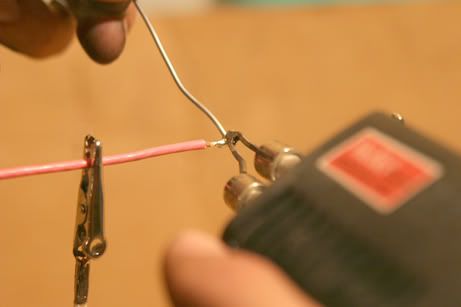
Remember to keep the gun clean while working. Contaminants will prevent the gun from heating the solder properly and can be introduced into your work producing a poor solder joint.
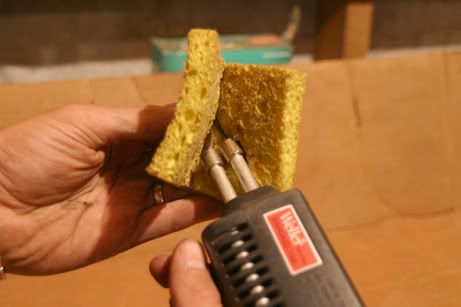
Now use the tip of the gun to spread the solder over the exposed wire. If your gun is sized optimally, you should be able to draw the solder through stranded wire. Perform this step carefully applying only the heat necessary as too much can melt insulation and cause other damage.
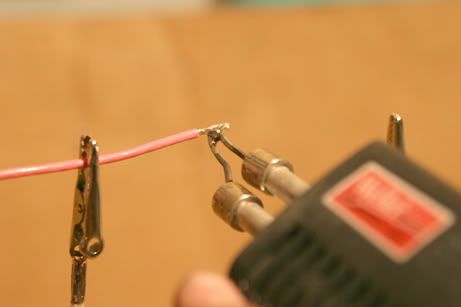
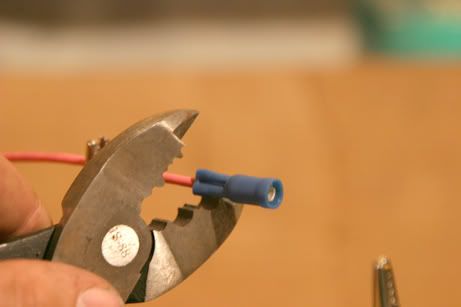
The crimpers I use have a small lobe which can be aligned with the seam in your connector to depress the metal inwards.
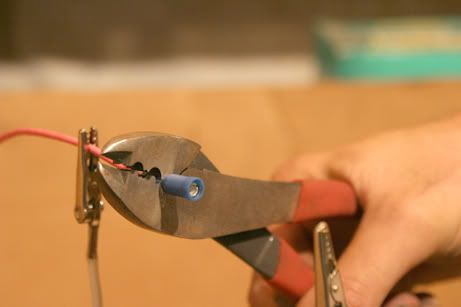
The open portion of the crimpers (the section without the lobe) can then be used to compress the crimp to create a solid connection.
The process for creating a splice is much the same. I first place a piece of heat shrink tubing, long enough to cover the whole solder joint, over one wire and slide it far enough down that the heat from soldering will not cause it to begin shrinking. Heat shrink tubing can be shrunk with anything from a Bic lighter to a torch as long as you are careful to keep the flame far enough away. When I have it handy, I like to use my heat gun, because it less likely to burn the heat shrink tubing.
I then pre-twist the wires together before applying solder in the same method.
A good solder joint should be clean and shiny silver in appearance.
An excellent alternative method for producing a splice when additional wire makes it possible can be found here:
http://www.aeroelectric.com/articles/PM ... leeve.html
Some other useful links when working on your Wing's wiring are:
How to use a multimeter
Thanks to mooseheadm5 for locating this one.
Ron Francis Wiring
A great source for automotive type connectors.
Vintage Connections Professional Electrical Connector Kits
If you have any other useful electrical links, please PM me and I will add them to this list.
Soldering is the act of joining to pieces of metal (in our case wires) using a a molten metal filler without melting the base metals. There are a few tools that are necessary (and a few that just make things a little easier) for making electrical solder joints. The first is a heat source.
My preferred tool is the soldering iron or gun. When soldering it is important to is be able to control the amount of heat you use. Soldering irons come in a variety of heat ranges. Small electrical components can be damaged if too much heat is applied so often times a 10-15 watt soldering iron (far left) is used. For larger solder joints the smaller iron won't be able to supply enough heat to draw the solder through the wire. For these larger jobs soldering guns like the 30 watt (center) and 325 watt (right) pictured below are useful. For most motorcycle wiring jobs the medium sized irons are the best choice.
When making electrical repairs, always use a rosin core solder; a 40 tin/ 60 lead solder is quite common and a good choice. I also keep an old damp sponge handy for cleaning the iron.
It is always helpful to have an extra set of hands to hold the piece that you are working on. To make things a little easier, I crimped some small alligator clips to a couple of pieces of 10 awg solid building wire. The wire is then wrapped around a couple of screws and affixed to a scrap of wood. This serves a second purpose as the alligator clips and wire act as a heat sink, drawing excess heat away that could damage small components.
...and when those crimp-on connectors are necessary a good quality set of crimpers ensures a more reliable and attractive connection. The crimpers pictured below (second from the right) are the best set I have owned and were purchased from my local home improvement store. They produce a crimp that is tight and much closer in quality to a factory crimp.
When using crimp on connectors use them only where a connection that can be unplugged is required. Permanent splices should be soldered and properly insulated.
High quality crimp-on connectors produce a mechanical seal preventing the introduction of moisture into a connection. However with the garden variety type connector like are found in most auto parts stores or home improvement centers do not create this same mechanical seal. I have found that in this case, tinning the wire helps produce a seal at the ends of the wire strands and a longer lasting connection as the solder does not oxidize as readily as the bare copper. Tinning the wire means coating it with solder, this helps prevent oxidation at the crimp and the solder coated wires will not be as likely to break or come out of the crimped connection.
Begin by stripping a small amount of insulation from the end of the wire, enough to be securely crimped in the connector without excess bare wire exposed beyond the connector's insulation. If the wire looks dull or oxidized, carefully clean it with sand paper or emery cloth.
Neatly twist the end of the wire keeping any stray bits from sticking out.
Heat the gun and apply a small amount of solder to the tip.
Next, touch the solder to the tip of the soldering gun and drip a small amount of solder onto the wire.
Remember to keep the gun clean while working. Contaminants will prevent the gun from heating the solder properly and can be introduced into your work producing a poor solder joint.
Now use the tip of the gun to spread the solder over the exposed wire. If your gun is sized optimally, you should be able to draw the solder through stranded wire. Perform this step carefully applying only the heat necessary as too much can melt insulation and cause other damage.
The crimpers I use have a small lobe which can be aligned with the seam in your connector to depress the metal inwards.
The open portion of the crimpers (the section without the lobe) can then be used to compress the crimp to create a solid connection.
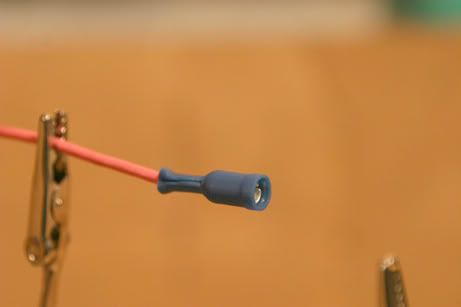
The process for creating a splice is much the same. I first place a piece of heat shrink tubing, long enough to cover the whole solder joint, over one wire and slide it far enough down that the heat from soldering will not cause it to begin shrinking. Heat shrink tubing can be shrunk with anything from a Bic lighter to a torch as long as you are careful to keep the flame far enough away. When I have it handy, I like to use my heat gun, because it less likely to burn the heat shrink tubing.
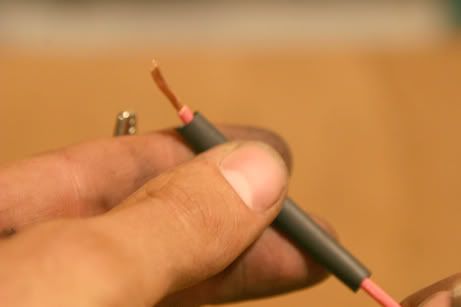
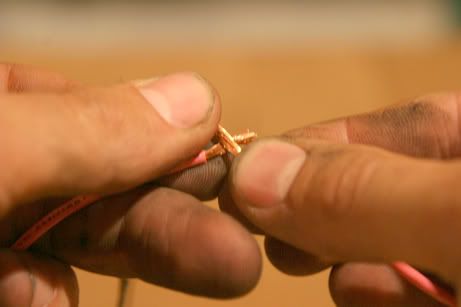
I then pre-twist the wires together before applying solder in the same method.
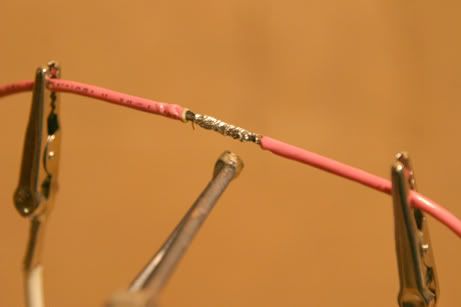
A good solder joint should be clean and shiny silver in appearance.
An excellent alternative method for producing a splice when additional wire makes it possible can be found here:
http://www.aeroelectric.com/articles/PM ... leeve.html
Some other useful links when working on your Wing's wiring are:
How to use a multimeter
Thanks to mooseheadm5 for locating this one.
Ron Francis Wiring
A great source for automotive type connectors.
Vintage Connections Professional Electrical Connector Kits
If you have any other useful electrical links, please PM me and I will add them to this list.
Last edited by stuka151 on Thu Nov 26, 2009 11:47 am, edited 6 times in total.
- sunnbobb
- Facebook Admin
- Posts: 21296
- Joined: Thu Jan 10, 2008 4:09 pm
- My Album: http://www.ngwclub.com/gallery/v/wingmans/sunnbobb/
- Location: LaConner, WA
Nice, well done tutorial. Thanks! The pictures are great.
I found the end of the internet
---- Bradshaw Bikes custom polishing for your wing. Visit us on facebook!
1978 Learning Experience
1980 County Road Hauler "Brain Damage"
1978 Cafe Custom Gl1000 "Vyper"
1977 Bulldog Inspired "Vaincre"
1981 Street Fighter GL1100 "No Quarter"
1983 Supercharged Street Drag "Anubis" (in worx)
1983 gl1100 mint restoration "Kristen"
1985 Aspencade..pondering.
- Roady
- Member Relations &_Graphics
- Posts: 11957
- Joined: Wed Jun 20, 2007 2:35 pm
- Location: Port St. John, FL
-
- Honored Life Member
- Posts: 4650
- Joined: Wed Jun 28, 2006 2:52 pm
- Location: up by the Canadian border in WA state
I've been looking around sporadically at Goodwill & Salvation Army for a used hair dryer... aren't they usually hot enough on 'high' to activate heat shrink?
sorta bulldogged custom 1978 GL1000 - "geekster"
full Vetter dress 1979 GL1000 - "Barge" (currently down)
1986 1200 Aspencade - "Heart of Gold" - daily rider
1990 1500 Aspencade - It's ALIVE! but very, very naked. not in a good way.
1978 for $100 - project in worx
1978 from a previous member here - taking up space
my original '79 bought in '91 - replacing engine (eventually, maybe someday)
H2G2=42
A competent and self-confident person is incapable of jealousy in anything. Jealousy is invariably a symptom of neurotic insecurity. ~ Robert A. Heinlein
The good thing about science is that it's true whether or not you believe in it. ~ Neil deGrasse Tyson
- stuka151
- Silver Member
- Posts: 985
- Joined: Fri May 16, 2008 1:38 pm
- Location: St. Croix Falls, WI
Hmmm, haven't tried it but probably. I just usually have the heatgun out in the shop and when I'm doing a lot of work it's fast. I'll check tonight and add my results to the post.heraldhamster wrote:I've been looking around sporadically at Goodwill & Salvation Army for a used hair dryer... aren't they usually hot enough on 'high' to activate heat shrink?
-
- Honored Life Member
- Posts: 4650
- Joined: Wed Jun 28, 2006 2:52 pm
- Location: up by the Canadian border in WA state
btw, thanks for the very informational post. great work.
sorta bulldogged custom 1978 GL1000 - "geekster"
full Vetter dress 1979 GL1000 - "Barge" (currently down)
1986 1200 Aspencade - "Heart of Gold" - daily rider
1990 1500 Aspencade - It's ALIVE! but very, very naked. not in a good way.
1978 for $100 - project in worx
1978 from a previous member here - taking up space
my original '79 bought in '91 - replacing engine (eventually, maybe someday)
H2G2=42
A competent and self-confident person is incapable of jealousy in anything. Jealousy is invariably a symptom of neurotic insecurity. ~ Robert A. Heinlein
The good thing about science is that it's true whether or not you believe in it. ~ Neil deGrasse Tyson
full Vetter dress 1979 GL1000 - "Barge" (currently down)
1986 1200 Aspencade - "Heart of Gold" - daily rider
1990 1500 Aspencade - It's ALIVE! but very, very naked. not in a good way.
1978 for $100 - project in worx
1978 from a previous member here - taking up space
my original '79 bought in '91 - replacing engine (eventually, maybe someday)
H2G2=42
A competent and self-confident person is incapable of jealousy in anything. Jealousy is invariably a symptom of neurotic insecurity. ~ Robert A. Heinlein
The good thing about science is that it's true whether or not you believe in it. ~ Neil deGrasse Tyson
- stuka151
- Silver Member
- Posts: 985
- Joined: Fri May 16, 2008 1:38 pm
- Location: St. Croix Falls, WI
Well, I tried the hair drier and it is a lot slower. If I had more than one or two joints to insulate I probably use a lighter first.heraldhamster wrote:I've been looking around sporadically at Goodwill & Salvation Army for a used hair dryer... aren't they usually hot enough on 'high' to activate heat shrink?
- rcmatt007
- Treasurer
- Posts: 31402
- Joined: Fri Oct 21, 2005 12:48 pm
- My Album: http://www.ngwclub.com/gallery/v/wingmans/rcmatt007/
- Location: New River Valley, Virginia
you can always tell a true-blue biker by his dirty fingernails
great tutorial!
great tutorial!
-Rodger-
all it takes for evil to prosper is the want of a few good men to do nothing-Edmund Burke
The question is not how much time do you have, it is what you do with the time that you have Gandalf
"One of the greatest dignities of humankind is that each successive generation is invested in the welfare of each new generation." Fred Rodgers
"it takes 10,000 hours to become an expert" ancient saying
78 constantly modified/customized since 1978, BOTM June 2015 de-evolving this very moment viewtopic.php?f=30&t=65511
76 Ltd "cookies bike" ALMOST DONE
79 project, finished, FOR SALE
'86 1200 (Beth's)(FOR SALE) with motorvation sidecar (sidecar sold) , July 2017 BOTM
'17 HD Road king and 08 HD Heritage softail (Beth's) (FOR SALE). I guess you can say we have MBS
- stuka151
- Silver Member
- Posts: 985
- Joined: Fri May 16, 2008 1:38 pm
- Location: St. Croix Falls, WI
- rcmatt007
- Treasurer
- Posts: 31402
- Joined: Fri Oct 21, 2005 12:48 pm
- My Album: http://www.ngwclub.com/gallery/v/wingmans/rcmatt007/
- Location: New River Valley, Virginia
that was your wife's dirty fingernails?????
-Rodger-
all it takes for evil to prosper is the want of a few good men to do nothing-Edmund Burke
The question is not how much time do you have, it is what you do with the time that you have Gandalf
"One of the greatest dignities of humankind is that each successive generation is invested in the welfare of each new generation." Fred Rodgers
"it takes 10,000 hours to become an expert" ancient saying
78 constantly modified/customized since 1978, BOTM June 2015 de-evolving this very moment viewtopic.php?f=30&t=65511
76 Ltd "cookies bike" ALMOST DONE
79 project, finished, FOR SALE
'86 1200 (Beth's)(FOR SALE) with motorvation sidecar (sidecar sold) , July 2017 BOTM
'17 HD Road king and 08 HD Heritage softail (Beth's) (FOR SALE). I guess you can say we have MBS
all it takes for evil to prosper is the want of a few good men to do nothing-Edmund Burke
The question is not how much time do you have, it is what you do with the time that you have Gandalf
"One of the greatest dignities of humankind is that each successive generation is invested in the welfare of each new generation." Fred Rodgers
"it takes 10,000 hours to become an expert" ancient saying
78 constantly modified/customized since 1978, BOTM June 2015 de-evolving this very moment viewtopic.php?f=30&t=65511
76 Ltd "cookies bike" ALMOST DONE
79 project, finished, FOR SALE
'86 1200 (Beth's)(FOR SALE) with motorvation sidecar (sidecar sold) , July 2017 BOTM
'17 HD Road king and 08 HD Heritage softail (Beth's) (FOR SALE). I guess you can say we have MBS
- stuka151
- Silver Member
- Posts: 985
- Joined: Fri May 16, 2008 1:38 pm
- Location: St. Croix Falls, WI
- Mike-C
- True Blue Steel Biker
- Posts: 2829
- Joined: Sat Aug 30, 2008 10:26 pm
- Location: North Lancaster, Ontario, Canada
Good Evening Wingsters;
I like the comments about the 'blue splices'. My '84 ex-Aspencade was a similar nightmare. The Aspy equipment was already removed when I bought the beast and the redundant wires were a mess of rough cut loose ends and blue splices. I spent many hours with my Fluke DVM, soldering iron and yards of heat shrink tubing to sanitize things. I must have removed 5 pounds of wire.
Regards;
Mike
'84 Wing-Lite
Mike Coleman
North Lancaster, Ontario
Canada
North Lancaster, Ontario
Canada
-
- Honored Life Member
- Posts: 4650
- Joined: Wed Jun 28, 2006 2:52 pm
- Location: up by the Canadian border in WA state
oh, yeah. I wish I had photo'ed the innards of mattayou's sidecar when I picked it up for him in Seattle... maybe not five pounds of wire, but a football sized rat's nest of elec. tape, crimps, splices and 20 feet too much wire. that ALL got cleaned up before I left home.
sorta bulldogged custom 1978 GL1000 - "geekster"
full Vetter dress 1979 GL1000 - "Barge" (currently down)
1986 1200 Aspencade - "Heart of Gold" - daily rider
1990 1500 Aspencade - It's ALIVE! but very, very naked. not in a good way.
1978 for $100 - project in worx
1978 from a previous member here - taking up space
my original '79 bought in '91 - replacing engine (eventually, maybe someday)
H2G2=42
A competent and self-confident person is incapable of jealousy in anything. Jealousy is invariably a symptom of neurotic insecurity. ~ Robert A. Heinlein
The good thing about science is that it's true whether or not you believe in it. ~ Neil deGrasse Tyson
full Vetter dress 1979 GL1000 - "Barge" (currently down)
1986 1200 Aspencade - "Heart of Gold" - daily rider
1990 1500 Aspencade - It's ALIVE! but very, very naked. not in a good way.
1978 for $100 - project in worx
1978 from a previous member here - taking up space
my original '79 bought in '91 - replacing engine (eventually, maybe someday)
H2G2=42
A competent and self-confident person is incapable of jealousy in anything. Jealousy is invariably a symptom of neurotic insecurity. ~ Robert A. Heinlein
The good thing about science is that it's true whether or not you believe in it. ~ Neil deGrasse Tyson
-
- Billet Alum. Member
- Posts: 210
- Joined: Sun Aug 09, 2009 8:07 pm
- Location: Georgetown, TX
Re: Soldering How-to
Thank you for taking the time to document you thoughts on soldering.stuka151 wrote: It was pointed out that a post was needed to demonstrate the proper techniques of creating a good solid soldered repair.
..... Prior to using crimp connectors the end of the wire should be tinned. Tinning the wire means coating it with solder, this helps prevent oxidation at the crimp and the solder coated wires will not be as likely to break or come out of the crimped connection.
[/b]
In the interest of accuracy and reliability, I must take exception with the above statement that a crimped connection should have the wire tinned prior to crimping. In fact, just the opposite is true. With good quality crimpers, a gas tight connection will be made on either insulated or non-insulated connectors. In fact, when tinning the wire a wicking action takes place and the solder is drawn up the wire a short distance (less if heat sinks are used) turning the stranded effectively into a solid core wire at the end. The point where the solid part of the wire returns to strands becomes a potential fracture point for that connection.
A superior quality connector can be attached to a wire through the use of a good quality set of crimpers, preferably, a ratcheting type like those offered in in your link to http://www.vintageconnections.com/ .
In the aviation world (Boeing, Piper, Cessna) soldering irons are not allowed anywhere near a terminal connection. When crimping a soldered wire to a connector, a gas tight connection is less likely to be achieved and corrosion will likely occur more rapidly.
Although not mentioned in your article, there is also a school of thought that soldering the whole connection is the proper way of attaching a wire to a connector and this, for all the same reasons, is not the appropriate way to attach a connector.
The documented example on how to splice two wires together is good, but I would like to submit a link to a method that is used in the aviation world where constant vibration for thousands of hours is experienced.
http://www.aeroelectric.com/articles/PM ... leeve.html
Thanks for the idea on the alligator clips tip to help as additional hands. Inexpensive, simple and effective, good idea.
My source for the the above statements come from Robert Nuckolls who is highly regarded Engineer in the aviation field.
Here is another link for those interested in a short read on wire terminal connectors. http://www.matronics.com/aeroelectric/a ... rminal.pdf
Mike Nellis
CMRA #23 EX, Suzuki GSXR 1K
1976 Honda GL1000
1968 Honda CL350 K0 (sold)
1970 Honda CB450 K3
2001 Yamaha Raptor 660
2000 Yamaha YZ426F
2007 Triumph Tiger 1050
RV-6 Experimental Aircraft (fuselage)
CMRA #23 EX, Suzuki GSXR 1K
1976 Honda GL1000
1968 Honda CL350 K0 (sold)
1970 Honda CB450 K3
2001 Yamaha Raptor 660
2000 Yamaha YZ426F
2007 Triumph Tiger 1050
RV-6 Experimental Aircraft (fuselage)