.
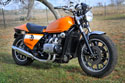
My New Old Bike - 1982 Gl 1100I Rebuild
Moderators: Brant, Sagebrush, Forum Moderators
-
robin1731

- Membership Admin

- Posts: 21731
- Joined: Mon May 29, 2006 8:31 am
- Location: Decatur, Indiana
Re: My New Old Bike - 1982 Gl 1100I Rebuild
If you need any more work done that you don't want to do Decatur is only 20 miles away. 
.
.
1976 Goldwing Super Sport
1985 Honda Elite
1976 KZ900 Dragbike
1992 ZX7 Dragbike (KZ900 style motor w/NOS)
and a rotation of various purchases
Randakk approved Carb Rebuilder
1985 Honda Elite
1976 KZ900 Dragbike
1992 ZX7 Dragbike (KZ900 style motor w/NOS)
and a rotation of various purchases
Randakk approved Carb Rebuilder
-
Easter
- SUPER BIKER!!!!

- Posts: 3000
- Joined: Thu Sep 13, 2012 11:33 am
- Location: South of Houston 100 miles
Re: My New Old Bike - 1982 Gl 1100I Rebuild
Another option would be to JB weld a short allen head bolt into the hole as a permanent plug then use a sufficiently short bolt for the actual starter bolt.
Bikes at present:
83 XL 600r with a 2004 XR650L engine
And a slightly worse for the wear BMW GS adventure bike awaiting repair
83 GL in process
83 XL 600r with a 2004 XR650L engine
And a slightly worse for the wear BMW GS adventure bike awaiting repair
83 GL in process
-
bigburlybug

- Cast Iron Member

- Posts: 75
- Joined: Sun May 22, 2016 11:12 pm
- Location: Fort Wayne, In
Re: My New Old Bike - 1982 Gl 1100I Rebuild
Thanks for the Tip Sagebrush. By the end of all this, some cleaning will probably have to be done.Sagebrush wrote:You might be able to get away with just wrapping your bolt with Teflon plumbers tape. You might be able to flush any debris by spraying the area liberally with WD-40 then remove the inspection plate and oil screen on the other side of the engine and clean out the bottom of the block through that access.
That is pretty close. I'm going to muddle through for a little while longer. I have a feeling once its back together (a while from now), I'll need some help trouble shootingrobin1731 wrote:If you need any more work done that you don't want to do Decatur is only 20 miles away.
I've realized that this summer project has turned into a winter project
I JB welded a bolt into the hole and started tapping the bolt. I'm just about far enough but need to drill a bit deeper and not break the tap.
I pressure washed the gas tank after more electro-etching. It looks WAAAAAY better!!
Also used an air compressor to blow out the brake pistons (I used the main brake line connection, not the bleeder valve). The first one flew out with a nice pop and some force. I used a brake pad the next time around for the rest of pistons. Once both were touching the brake pad, I pulled the pad and put in a thinner pieced of rubber to blow it out more. Then used vice grips to softly wiggle them the rest of the way. One piston was super stuck so it got some Liquid wrench and a time out before another try.
So that's where I'm at, thanks for reading.
If you even dream of beating me, you better wake up and apologize! 
Muhammad Ali
Bikes - 1982 Gl1100 I
Muhammad Ali
Bikes - 1982 Gl1100 I
-
robin1731
- Membership Admin
- Posts: 21731
- Joined: Mon May 29, 2006 8:31 am
- Location: Decatur, Indiana
Re: My New Old Bike - 1982 Gl 1100I Rebuild
"One piston was super stuck so it got some Liquid wrench and a time out before another try. "
Not really a good idea. The piston rubs against a rubber seal. The liquid wrench, or any other penetrant, can make the rubber swell. Making the piston harder to remove. Best way to get stubborn pistons out is with a grease gun. IMO
.
Not really a good idea. The piston rubs against a rubber seal. The liquid wrench, or any other penetrant, can make the rubber swell. Making the piston harder to remove. Best way to get stubborn pistons out is with a grease gun. IMO
.
1976 Goldwing Super Sport
1985 Honda Elite
1976 KZ900 Dragbike
1992 ZX7 Dragbike (KZ900 style motor w/NOS)
and a rotation of various purchases
Randakk approved Carb Rebuilder
1985 Honda Elite
1976 KZ900 Dragbike
1992 ZX7 Dragbike (KZ900 style motor w/NOS)
and a rotation of various purchases
Randakk approved Carb Rebuilder
-
bigburlybug
- Cast Iron Member
- Posts: 75
- Joined: Sun May 22, 2016 11:12 pm
- Location: Fort Wayne, In
Re: My New Old Bike - 1982 Gl 1100I Rebuild
Huh, bad move on my part then lol. Thanks for the info. I plan on getting the motor running before buying anything else so maybe the rubber will un-swell? If it doesn't grease and cleaning it will be.robin1731 wrote:"One piston was super stuck so it got some Liquid wrench and a time out before another try. "
Not really a good idea. The piston rubs against a rubber seal. The liquid wrench, or any other penetrant, can make the rubber swell. Making the piston harder to remove. Best way to get stubborn pistons out is with a grease gun. IMO
.
If you even dream of beating me, you better wake up and apologize!
Muhammad Ali
Bikes - 1982 Gl1100 I
Muhammad Ali
Bikes - 1982 Gl1100 I
-
toolbox

- Titanium Member

- Posts: 489
- Joined: Sun Feb 28, 2016 1:54 am
- Location: Montana
Re: My New Old Bike - 1982 Gl 1100I Rebuild
So, is one piston still stuck then?bigburlybug wrote:Huh, bad move on my part then lol. Thanks for the info. I plan on getting the motor running before buying anything else so maybe the rubber will un-swell? If it doesn't grease and cleaning it will be.robin1731 wrote:"One piston was super stuck so it got some Liquid wrench and a time out before another try. "
Not really a good idea. The piston rubs against a rubber seal. The liquid wrench, or any other penetrant, can make the rubber swell. Making the piston harder to remove. Best way to get stubborn pistons out is with a grease gun. IMO
.
-
bigburlybug
- Cast Iron Member
- Posts: 75
- Joined: Sun May 22, 2016 11:12 pm
- Location: Fort Wayne, In
Re: My New Old Bike - 1982 Gl 1100I Rebuild
It's simultaneously stuck and un-stucktoolbox wrote: So, is one piston still stuck then?
If you even dream of beating me, you better wake up and apologize!
Muhammad Ali
Bikes - 1982 Gl1100 I
Muhammad Ali
Bikes - 1982 Gl1100 I
-
Easter
- SUPER BIKER!!!!
- Posts: 3000
- Joined: Thu Sep 13, 2012 11:33 am
- Location: South of Houston 100 miles
Re: My New Old Bike - 1982 Gl 1100I Rebuild
The cat in the box, eh?
Bikes at present:
83 XL 600r with a 2004 XR650L engine
And a slightly worse for the wear BMW GS adventure bike awaiting repair
83 GL in process
83 XL 600r with a 2004 XR650L engine
And a slightly worse for the wear BMW GS adventure bike awaiting repair
83 GL in process
-
Easter
- SUPER BIKER!!!!
- Posts: 3000
- Joined: Thu Sep 13, 2012 11:33 am
- Location: South of Houston 100 miles
Re: My New Old Bike - 1982 Gl 1100I Rebuild
Computer (and its operator) have been acting screwy lately so I appologize for the duplicate post.
p.s. if you don't get the reference to the cat, ask your grade school science student.
p.s. if you don't get the reference to the cat, ask your grade school science student.
Bikes at present:
83 XL 600r with a 2004 XR650L engine
And a slightly worse for the wear BMW GS adventure bike awaiting repair
83 GL in process
83 XL 600r with a 2004 XR650L engine
And a slightly worse for the wear BMW GS adventure bike awaiting repair
83 GL in process
-
bigburlybug
- Cast Iron Member
- Posts: 75
- Joined: Sun May 22, 2016 11:12 pm
- Location: Fort Wayne, In
Re: My New Old Bike - 1982 Gl 1100I Rebuild
Glad you got it EasterEaster wrote:Computer (and its operator) have been acting screwy lately so I appologize for the duplicate post.
p.s. if you don't get the reference to the cat, ask your grade school science student.
I couldn't find the fitting I used last time so the brake piston is still indeterminate. I had an early meeting so didn't look for it too long. Tomorrow for sure
If you even dream of beating me, you better wake up and apologize!
Muhammad Ali
Bikes - 1982 Gl1100 I
Muhammad Ali
Bikes - 1982 Gl1100 I
-
bigburlybug
- Cast Iron Member
- Posts: 75
- Joined: Sun May 22, 2016 11:12 pm
- Location: Fort Wayne, In
Re: My New Old Bike - 1982 Gl 1100I Rebuild
So after deciding to build a custom fitting to get the maximum air pressure, I tried getting the piston out. It immediately switched to the "stuck" state.

(That's at 120 PSI, notice how the back piston is still not extended)
The fitting worked great after some cross threading, but 120 PSI wasn't enough to get it out . So I moved on to the grease gun.

Again using the main brake line connection.
Anyways, a couple of pumps later (Man that was easy! ) the last piston came free!


So overall, five pistons came free using air, but the sixth required the fifth to be in place to use the grease so I only have to clean two pistons and one caliper of grease. Not too shabby. Might have to buy some new pistons though, some look a little rough. I'll see after cleaning them up a bit.
I had some tapping issues for the starter but got it figured out. I've been typing about this way too long but tomorrow should be the last time I work on the starter bolt hole issue. The hole is drilled and tapped, the replacement bolt is tapped, JB welded, and in the hole. Tomorrow I'll grind down the bolt head a bit and put on the starter. Then the put back together process can begin!!! I only have the whole bike to rebuild
(That's at 120 PSI, notice how the back piston is still not extended)
The fitting worked great after some cross threading, but 120 PSI wasn't enough to get it out
Again using the main brake line connection.
So, in this case at least, Easter was right. The PO said someone came and tried out the brakes but weren't the right size so gave them back. Maybe they gave back a different set. The calipers seem to fit correctly though.robin1731 wrote:You were right the first time. I always put the grease gun on the bleed screw. Remove the screw first and put Teflon tape on the threads. Then put it in till it bottoms out and back it out just a tad. You will need to plug the brake line hole. Easy to do if it uses a banjo bolt. But even if it is a line like on a front caliper for a 1000 just use an old line, screw the fitting in and pinch off the line. Then pump the grease in the bleed screw.Easter wrote:I added two more stuck calipers to my resume this weekend and as I was hooking up the grease gun I realized I told you to connect to the bleeder hole and put a bolt in the hole for the brake line. This is wrong for grease, but maybe correct for air. Attach the grease gun hose or fitting to the brake line hole and leave the bleeder tight in its hole. And it is messy!
I am no welder either but it is a skill I envy and plan to practice when (if) I ever get to retire.
Would work either way.
.
Anyways, a couple of pumps later (Man that was easy!
So overall, five pistons came free using air, but the sixth required the fifth to be in place to use the grease so I only have to clean two pistons and one caliper of grease. Not too shabby. Might have to buy some new pistons though, some look a little rough. I'll see after cleaning them up a bit.
I had some tapping issues for the starter but got it figured out. I've been typing about this way too long
Last edited by bigburlybug on Fri Mar 10, 2017 10:50 pm, edited 1 time in total.
If you even dream of beating me, you better wake up and apologize!
Muhammad Ali
Bikes - 1982 Gl1100 I
Muhammad Ali
Bikes - 1982 Gl1100 I
-
bigburlybug
- Cast Iron Member
- Posts: 75
- Joined: Sun May 22, 2016 11:12 pm
- Location: Fort Wayne, In
Re: My New Old Bike - 1982 Gl 1100I Rebuild
I'm not going too far out of town this weekend for once so decided to put the starter on! 24 hours for the JB to cure came and went so it was time to put this behind me. The bolt head was a bit too far out so I ground it down a bit to get this.

That's a lot of mistakes,a half inch hole, some words, and a bolt with JB weld on the threads. It might hold oil.
I put the starter on and, can you believe it, the hole on the bolt lined up perfectly! With a little wiggle and jiggle, the starter went right in. 
So I was feeling happy and strong, which I needed for this next part. Somehow I had to get the engine off of the table its been sitting on for the past two months and into the bike.

So I brought over my friend Jack (he's rather inanimate), stretched a bit, and hoisted that 230 lb chunk of metal off of the table. (Really, it was more like falling with style onto the car jack lol)
I scooted it over to the bike and started putting in the support bolts. It took about two hours, lots of tiny taps with a hammer due to the constricted spaces, and a couple of frustration breaks . The starter is on the engine and the engine is in the bike! It was a good day.
That's a lot of mistakes,a half inch hole, some
I put the starter on and, can you believe it, the hole on the bolt lined up perfectly!
So I was feeling happy and strong, which I needed for this next part. Somehow I had to get the engine off of the table its been sitting on for the past two months and into the bike.
So I brought over my friend Jack (he's rather inanimate), stretched a bit, and hoisted that 230 lb chunk of metal off of the table.
I scooted it over to the bike and started putting in the support bolts. It took about two hours, lots of tiny taps with a hammer due to the constricted spaces, and a couple of frustration breaks
If you even dream of beating me, you better wake up and apologize!
Muhammad Ali
Bikes - 1982 Gl1100 I
Muhammad Ali
Bikes - 1982 Gl1100 I
-
Old Fogey
- Honored Life Member

- Posts: 7704
- Joined: Mon Aug 27, 2007 11:31 pm
- Location: Glasgow, Scotland
- Contact:
Re: My New Old Bike - 1982 Gl 1100I Rebuild
For some reason I had not read your thread. Just read all 7 pages. Oh boy, you've been through the mill with that one!
Time for blatant plug. New stainless steel brake pistons. Some of the guys on here will vouch for the quality.
http://www.wingovations.com/stainless-s ... 4588600239
Time for blatant plug. New stainless steel brake pistons. Some of the guys on here will vouch for the quality.
http://www.wingovations.com/stainless-s ... 4588600239
"Impossible Is Just a Level of Difficulty!..."
If I'd wanted you to understand, I would have explained it better! (Johann Cruyff)
I’d give my right arm to be ambidextrous!
If I'd wanted you to understand, I would have explained it better! (Johann Cruyff)
I’d give my right arm to be ambidextrous!
-
bigburlybug
- Cast Iron Member
- Posts: 75
- Joined: Sun May 22, 2016 11:12 pm
- Location: Fort Wayne, In
Re: My New Old Bike - 1982 Gl 1100I Rebuild
Thanks for reading Old FogeyOld Fogey wrote:For some reason I had not read your thread. Just read all 7 pages. Oh boy, you've been through the mill with that one!
Time for blatant plug. New stainless steel brake pistons. Some of the guys on here will vouch for the quality.
http://www.wingovations.com/stainless-s ... 4588600239
If you even dream of beating me, you better wake up and apologize!
Muhammad Ali
Bikes - 1982 Gl1100 I
Muhammad Ali
Bikes - 1982 Gl1100 I
-
bigburlybug
- Cast Iron Member
- Posts: 75
- Joined: Sun May 22, 2016 11:12 pm
- Location: Fort Wayne, In
Re: My New Old Bike - 1982 Gl 1100I Rebuild
Hello there! Its been a while but here we are once again. Last you read was that I was working on the gas tank, had the break pistons apart, was about to push to clean the carburetors in one week, and optimistic about getting the bike to run on its own, if not the road, before the weather got cold. Well it snowed here in Indiana so here's where I'm at.
The person that was going to weld the gas tank for free backed out due to some silly concern about residual gas blowing up or something lol . I understood his concern but since I've had water in it for two weeks during electrolization, I didn't think it was an issue. The welder guy recommended soldering it and so I did. I think it turned out alright but still haven't tested it. I'll have a picture for it later.
The break pistons are still apart. The pistons look a bit scratched up so probably get some new ones of those when I start rebuilding them. I haven't bought a re-build kit since I want to make sure I can get the engine running before dumping money into it being my first re-build and all . In order for the bike to run, the carbs need to be clean which brings us too......

Carbs all together and 97% complete
The last two were relatively dirty which, coupled with not working on it often, caused me to take forever to get them done. Here's some dirty pics.

Idle Jet before cleaning

Idle Jet after Cleaning

Main Jet before cleaning. Sorry, no after pictures and I'm NOT taking it apart ...............yet.

Float bowl before cleaning

Float bowl after cleaning
I'm sure you guys have cleaned worse faster but I took my time making sure all of those little channels were clean. I used PLENTY of brake cleaner and lots of pumping with my foot for air pressure. I'm relatively confident that on all jets but one that they are spic and span. The rest of the internals I think are functionally clean. Needless to say having the bike running by itself, if not on the road, before the cold weather hits did not happen.
I could use your help to finish putting the carbs together. When I was taking apart the throttle and choke linkages, I referenced this picture

and taped the washers onto a piece of paper above the matching number. Apparently I did not do this well enough because I'm not sure where these two spacers / washers go.

One spacer / washer was taped above the #1 and the other spacer above #4. Do you know what these are called or where they go? Once they go on, I can proceed to bench sync the carbs and put them back on the bike. I'm not quite sure where that old spring goes either, I'm kind of thinking its extra.
That's my update, thanks for reading.
The person that was going to weld the gas tank for free backed out due to some silly concern about residual gas blowing up or something
The break pistons are still apart. The pistons look a bit scratched up so probably get some new ones of those when I start rebuilding them. I haven't bought a re-build kit since I want to make sure I can get the engine running before dumping money into it being my first re-build and all
Carbs all together and 97% complete
The last two were relatively dirty which, coupled with not working on it often, caused me to take forever to get them done. Here's some dirty pics.
Idle Jet before cleaning
Idle Jet after Cleaning
Main Jet before cleaning. Sorry, no after pictures and I'm NOT taking it apart ...............yet.
Float bowl before cleaning
Float bowl after cleaning
I'm sure you guys have cleaned worse faster but I took my time making sure all of those little channels were clean. I used PLENTY of brake cleaner and lots of pumping with my foot for air pressure. I'm relatively confident that on all jets but one that they are spic and span. The rest of the internals I think are functionally clean. Needless to say having the bike running by itself, if not on the road, before the cold weather hits did not happen.
I could use your help to finish putting the carbs together. When I was taking apart the throttle and choke linkages, I referenced this picture
and taped the washers onto a piece of paper above the matching number. Apparently I did not do this well enough
One spacer / washer was taped above the #1 and the other spacer above #4. Do you know what these are called or where they go? Once they go on, I can proceed to bench sync the carbs and put them back on the bike.
That's my update, thanks for reading.
Last edited by bigburlybug on Fri Mar 10, 2017 10:54 pm, edited 1 time in total.
If you even dream of beating me, you better wake up and apologize!
Muhammad Ali
Bikes - 1982 Gl1100 I
Muhammad Ali
Bikes - 1982 Gl1100 I
-
- Similar Topics
- Replies
- Views
- Last post