If you find yourself "Blocked" please contact me via the link below
https://ngwclub.com/forum/app.php/contactadmin
https://ngwclub.com/forum/app.php/contactadmin
1980 GL110i - Gamera
Moderators: sunnbobb, Neil, Forum Moderators
-
507Derek
- Brass Member

- Posts: 23
- Joined: Thu Apr 02, 2020 7:15 pm
- Location: Iowa
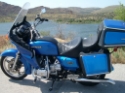
1980 GL110i - Gamera
This is my 1980 Honda Goldwing Insterstate the day I bought it.
I bought it with the intention of stripping it down and riding the snot out of it. I wanted an older bike with bags and always liked the flat 4 of the Goldwing. I did a bunch of research and found a few guys that had built something similar to what I had in mind. Found this one for about $1000. It had quite a few issues when I looked at it. The previous owner did a single carb swap on it but didn't install it right so it ran kind of funky. The rear brake was seized. Exhaust leaked. It had a lot of wiring issues (i'll cover those later). But, looking for a project, I didn't really care. Bought it, took it home and got to work.
Stripped off a lot of the extra stuff I didn't want, replaced the big king/queen seat with an aftermarket one I had from a Road King and did some maintenance. Adjusted the valves, fixed the rear brake, LOF change, flushed all fluids, and trimmed the windshield.
It still wasn't running the best so I replaced the fuel filter, cleaned the gas cap, and found the PO connected the choke cable to the single carb which was making it do some funky things. Removed that and it ran much better! I removed the brake light and turned the turn signals into my running/brake lights, new front tire, and painted the windshield....
You do not have the required permissions to view the files attached to this post.
-
507Derek
- Brass Member
- Posts: 23
- Joined: Thu Apr 02, 2020 7:15 pm
- Location: Iowa
Re: 1980 GL110i - Gamera
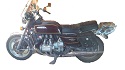
This is how I rode it for the rest of the year. It was a lot of fun and I got some compliments on it when I stopped to get gas.
This spring I got to work on it's next stage. My goal was to create a bike that would be comfortable, quick, good in the twisties, and have bags so I could take it on some long trips. I love camping and would like to ride this all over, camping across the country.
Got it all stripped down to this point and ordered parts.
I had gone back and forth on getting rid of the fairing or not, and I'm glad I did. It was a lot of extra weight that I didn't need on the front of the bike, including a 3 pound counter weight?! All the electronics were removed so I could rework the harness. The fuel tank was removed. I cut off part of the upper "backbone" and welded in a single back bone so I could mount a traditional style tank. I rebuilt and lowered the front forks using progressive springs. I got rid of the air suspension up front by getting some fork caps made for a Sportster. I replaced the rear air shocks with 11 inch Progressive 412's. I installed a J&P front headlight, TC Bros tracker handlebars, new throttle and grips. I bought a gas tank from a 1980 Suzuki gs1000 that was very close to the same size as the faux tank. I've always wanted to have a sticker "paint" job so I did that on the bag lids. Set it on the ground and pushed it outside to see if my vision was coming together. It looked even better than I thought it could.
Next up was to do the exhaust. The old mufflers were so rusty that they fell off as soon as I unbolted them. Got a couple pipes bent up at an exhaust shop and welded them on. And I removed the center stand.
All that is left is to finish up the wiring! Stay tuned....
You do not have the required permissions to view the files attached to this post.
-
rcmatt007
- Treasurer

- Posts: 31628
- Joined: Fri Oct 21, 2005 12:48 pm
- My Album: http://www.ngwclub.com/gallery/v/wingmans/rcmatt007/
- Location: New River Valley, Virginia
Re: 1980 GL110i - Gamera
-Rodger-
all it takes for evil to prosper is the want of a few good men to do nothing-Edmund Burke
The question is not how much time do you have, it is what you do with the time that you have Gandalf
"One of the greatest dignities of humankind is that each successive generation is invested in the welfare of each new generation." Fred Rodgers
"it takes 10,000 hours to become an expert" ancient saying
78 constantly modified/customized since 1978, BOTM June 2015 de-evolving this very moment viewtopic.php?f=30&t=65511
76 Ltd "cookies bike" ALMOST DONE
79 project, finished, FOR SALE
'86 1200 (Beth's)(FOR SALE) with motorvation sidecar (sidecar sold) , July 2017 BOTM
'17 HD Road king and 08 HD Heritage softail (Beth's) (FOR SALE). I guess you can say we have MBS
-
Rat

- Photo Gallery Admin

- Posts: 16071
- Joined: Fri Oct 21, 2005 9:59 pm
- My Album: https://www.ngwclub.com/gallery/v/wingmans/rat/
- RIP: cookie, KyPM, Roady
- Location: Toronto .... Canada
Re: 1980 GL110i - Gamera
Very nice .... keep us posted
Gord
Gord
"I'd rather Ride than Shine"
'13 Honda NC700sa … An old guy's bike, a bit boring … a bit shiney …
‘14 KLR650 ... gone
‘84 GL1200i ‘R2B6' (Rat to Be 6, the last, adopted by twowings)
My Original 'RAT' was a hybrid '82 CB900/1100F
'13 Honda NC700sa … An old guy's bike, a bit boring … a bit shiney …
‘14 KLR650 ... gone
‘84 GL1200i ‘R2B6' (Rat to Be 6, the last, adopted by twowings)
My Original 'RAT' was a hybrid '82 CB900/1100F
-
5speed

- Honored Life Member

- Posts: 5324
- Joined: Sat Jul 11, 2015 2:37 pm
- Location: Nova Scotia Canada
Re: 1980 GL110i - Gamera
looking good.
1982 1100 standard. (sold)
1986 Yamaha FJ1200
2000 Yamaha Roadstar
1976 GoldWing. running but not on the road
1978 Goldwing. future cafe project.
2019 Can-Am ryker (boss's new ride)
2002 Shadow American Classic(sold)
1983 Shadow 500. (sold)
1986 Yamaha FJ1200
2000 Yamaha Roadstar
1976 GoldWing. running but not on the road
1978 Goldwing. future cafe project.
2019 Can-Am ryker (boss's new ride)
2002 Shadow American Classic(sold)
1983 Shadow 500. (sold)
-
gltriker
- Honored Life Member
- Posts: 5400
- Joined: Fri Sep 24, 2010 9:11 pm
Re: 1980 GL110i - Gamera
-
Steven UK
- Chrome Member

- Posts: 137
- Joined: Sat Apr 18, 2020 11:22 am
- Location: Jackson MN
Re: 1980 GL110i - Gamera
Looks good, I would like to go deeper into mine... but just want to ride it this year... watching the progress.
GL1100 1981 (A bike that is determined not to be ridden...!)
-
sparkyrasmus
- Titanium Member

- Posts: 484
- Joined: Sun Jun 08, 2008 7:52 am
- Location: Marshall, MN, USA
Re: 1980 GL110i - Gamera
Goldwings don't accelerate, they gain inertia.
1978 GL1000 - almost stock SOLD
1979 GL1000 - Winter project/parts bike - custom "Busted" STILL BUSTED
1983 GL1100 Standard- raised from the dead and back to organ donor status
And the newest acquisition, 1979 Yamaha XS 650F to be a sidecar tug.
1978 GL1000 - almost stock SOLD
1979 GL1000 - Winter project/parts bike - custom "Busted" STILL BUSTED
1983 GL1100 Standard- raised from the dead and back to organ donor status
And the newest acquisition, 1979 Yamaha XS 650F to be a sidecar tug.
-
Trophyvictor
- Brass Member
- Posts: 31
- Joined: Mon May 11, 2020 11:16 pm
Re: 1980 GL110i - Gamera
Your post is in my favorites list! Will be following!! I want a video of sound...
Congrats
Congrats
-
Goboy
- Billet Alum. Member

- Posts: 222
- Joined: Sun Apr 24, 2016 10:49 pm
- My Album: https://www.ngwclub.com/forum/viewtopic ... 30&t=60678
- Location: Hinton Alberta
Re: 1980 GL110i - Gamera
Good work Derek, How is you seat attached, did you have to modify much. I am interested in doing a solo Harley as as well.
Any pic's.
Any pic's.
You're too small to ride a hog Billy!
Mike
1978 GL1000
Previous bikes: 05 Yamaha FJR 1300, 79 Suzuki GS 1000, 75 Yamaha XS 650, 73 Kawasaki S2 350
Mike
1978 GL1000
Previous bikes: 05 Yamaha FJR 1300, 79 Suzuki GS 1000, 75 Yamaha XS 650, 73 Kawasaki S2 350
-
507Derek
- Brass Member
- Posts: 23
- Joined: Thu Apr 02, 2020 7:15 pm
- Location: Iowa
WIRING!!!
Onto the wiring. This was by far the most difficult and time consuming part of the entire build. I have quite a bit of background in automotive electronics so it wasn't too terrible. My goals with the wiring was to get rid of any extra wires I wouldn't need for things I removed; dash, dummy lights, handlebar switches, etc. I wanted an automotive style turn key ignition. And, I wanted to move multiple parts to make it look better.
This is what I had to start with.... All of the electronics were removed, including the harness. I removed all of the harness wrap and found a lot of "fixes" the previous owner attempted. And some he didn't.
He replaced the main fuse with a piece of wire.. The single carb conversion was wired with home electrical wire... The stator connectors were fried and he attempted to fix this bad ground wire... He attached the spark plug wires with electrical tape, and the harness wires for the coil were barely on there...
You do not have the required permissions to view the files attached to this post.
-
507Derek
- Brass Member
- Posts: 23
- Joined: Thu Apr 02, 2020 7:15 pm
- Location: Iowa
WIRING 2
I went through the harness wire by wire. Scratching my head trying to figure out what was needed and what wasn't. What needed to be jumped and what could be removed. I drew the harness out a few different times until I thought I had it right. I was moving the locations of some of the components so I mounted everything to the bike and ran the harness where I wanted it. Then I went through and shortened or lengthened the wires that needed to be changed.
New location of the coil, spark units, regulator/rectifier, and ignition. I replaced both connectors for the stator because of how bad they looked. New location of battery, starter coil, and new fuse block. I replaced the main fuse with a 30A maxi fuse and holder. And I replaced the old tube style fuses with mini fuses. Here is a pic of the speedo and headlight I'm using. This was right before I went through and shortened, lengthened, or added any wires.
New location of the coil, spark units, regulator/rectifier, and ignition. I replaced both connectors for the stator because of how bad they looked. New location of battery, starter coil, and new fuse block. I replaced the main fuse with a 30A maxi fuse and holder. And I replaced the old tube style fuses with mini fuses. Here is a pic of the speedo and headlight I'm using. This was right before I went through and shortened, lengthened, or added any wires.
You do not have the required permissions to view the files attached to this post.
-
507Derek
- Brass Member
- Posts: 23
- Joined: Thu Apr 02, 2020 7:15 pm
- Location: Iowa
Wiring 3
I made sure the bike started and everything worked before I took the harness off again and wrapped it. Here it is, all done! Finally.
I have one fuse for the headlight, one for the taillight, and one for the speedo/carb. Plus the main fuse. The speedo uses a hall effect type sensor that I mounted on the rear wheel. Still need to calibrate and test it, the weather in Iowa hasn't been very good.
Here is the pile of leftover wiring.... I cut out quite a bit of stuff! Here is the pile of parts that was either removed or replaced! I might have to weight it all before I get rid of it. I'm definitely curious how much weight I took off this thing. Still waiting to give it a good test ride. I've ridden it around the block but that's it. I'll post some better pics of it once I get it out on the road...
Here is the pile of leftover wiring.... I cut out quite a bit of stuff! Here is the pile of parts that was either removed or replaced! I might have to weight it all before I get rid of it. I'm definitely curious how much weight I took off this thing. Still waiting to give it a good test ride. I've ridden it around the block but that's it. I'll post some better pics of it once I get it out on the road...
You do not have the required permissions to view the files attached to this post.
-
507Derek
- Brass Member
- Posts: 23
- Joined: Thu Apr 02, 2020 7:15 pm
- Location: Iowa
Re: 1980 GL110i - Gamera
It didn't have an airbox when I got it. The PO did a single carb conversion with a really crappy homemade jobby for an air filter. I replaced that quickly with a nice one that I was able to screw right onto the top of the carb.sparkyrasmus wrote:
-
507Derek
- Brass Member
- Posts: 23
- Joined: Thu Apr 02, 2020 7:15 pm
- Location: Iowa
Re: 1980 GL110i - Gamera
Here it is when I started it to see if everything worked before finishing up the harness. Idle was high but it's a taste. I'll get a better one once I start riding. Probably going to put baffles in at some point. She angry....Trophyvictor wrote:Your post is in my favorites list! Will be following!! I want a video of sound...
Congrats
You do not have the required permissions to view the files attached to this post.