Second time around: '75 GL1000 Project

A forum for stories, pics and updates of your resto's. Be it a barn find, Grampas hand me down or a bike being brought back to it's former glory.If you are restoring it, show us your stuff!

Moderators: Brant, Sagebrush, Forum Moderators

Post Reply
datsunfreak
Chrome Member
Chrome Member
Posts: 159
Joined: Mon Jul 04, 2011 1:00 am
My Album: https://datsun510.com/index.php?/galler ... 0-project/
Location: Fort Worth, TX

Second time around: '75 GL1000 Project

#1

Post by datsunfreak »

I bought my first GL1000 back in 2011, did a few things, racked up some miles, had a lot of fun, but sold it in 2016 to a friend who still rides it often...

https://ngwclub.com/forum/viewtopic.php?f=30&t=35549

I had been crusing craigslist for another bike for the past 6 months or so, but nothing really jumped out at me. Then I saw a crappy ad, with one decent photo, and very little description...

Image

They were asking $1200, but I felt that may have been a tad optimistic due to the current condition (more on that later), but I saved it just in case he came down a bit on the price. Well, after a month or so, he dropped the price to $800 so I made a call and arranged a time to go look at it.

Turns out the gentleman (Ed) who was selling it had bought it brand new from a dealer here in Fort Worth. He even still had the original Texas title for it, dated January 14th 1976. We went over everything on it and noticed some pretty serious issues, so I was able to talk him into selling it for $600 on the promise I would not part it out, but that I would fix it and enjoy it.

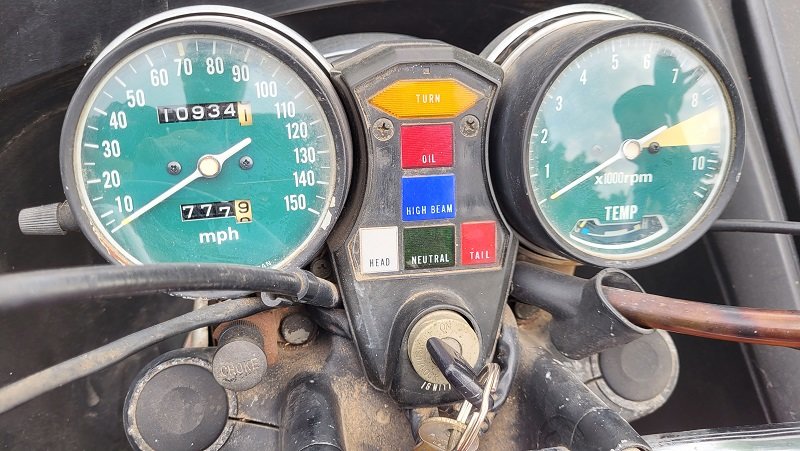
The good? Paint condition and mileage...

Image

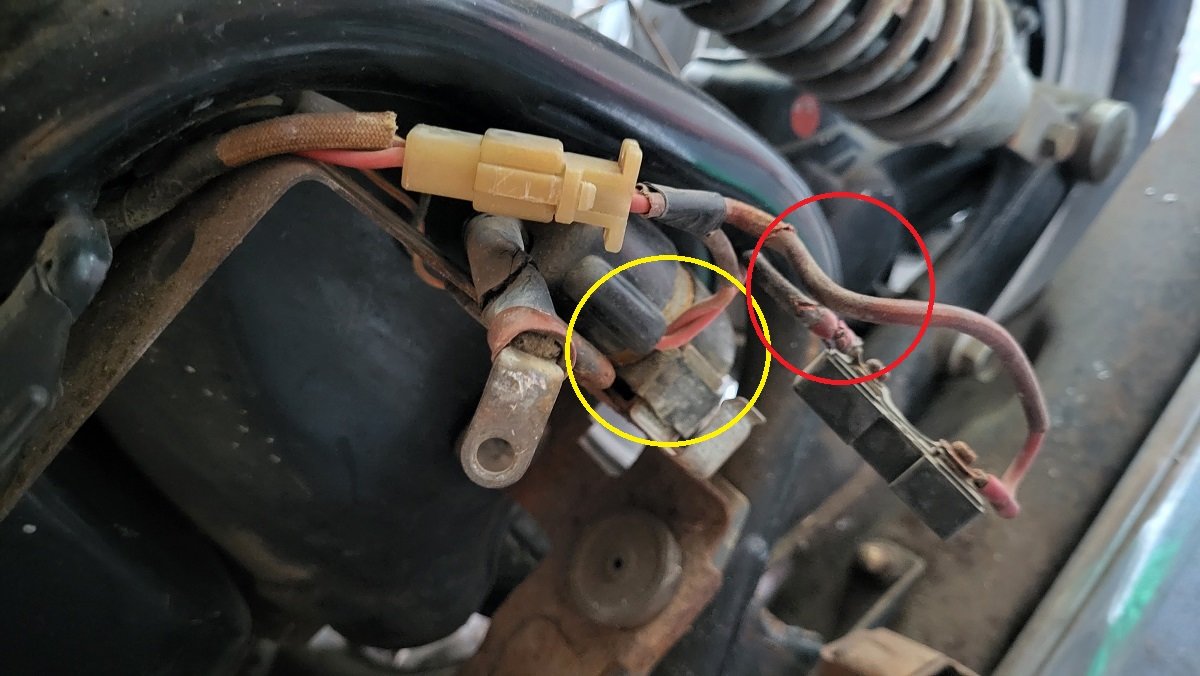
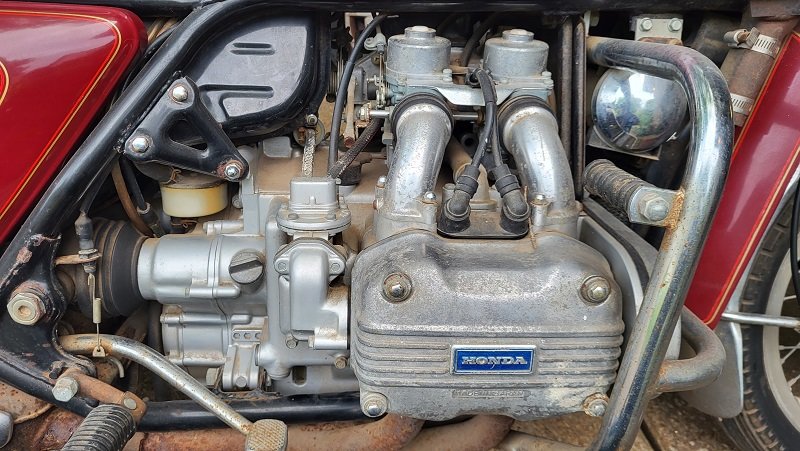
The bad? Ed hasn't ridden this bike since 1999. He just parked it in the garage one day, put a cover on it, and never rode it again. So there are lots of decroded hoses, and dust/dirt everywhere. Wiring looks decent (or at least, serviceable)...

Image

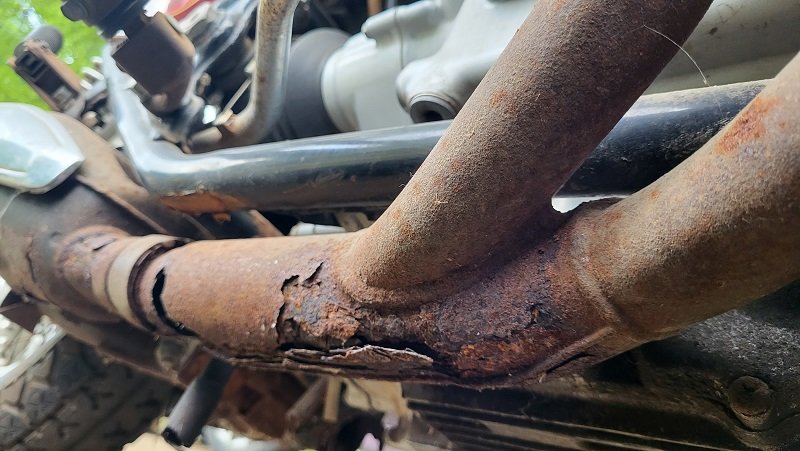
The ugly? Two major problems I see already. I am used to rusted out mufflers, that seems to be a given on these. But this is the first time I've ever seen rust holes in the headers... :shock:

Image

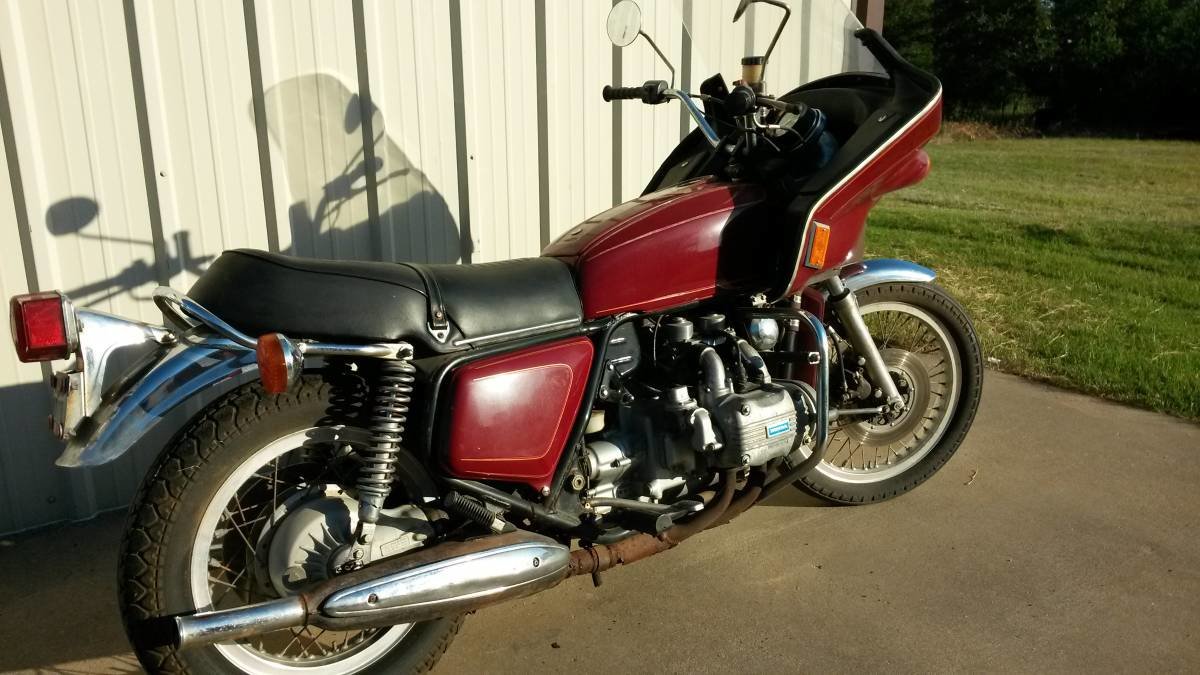
The other major ugly thing was that fairing. That had to go, immediately. :lol:

Image

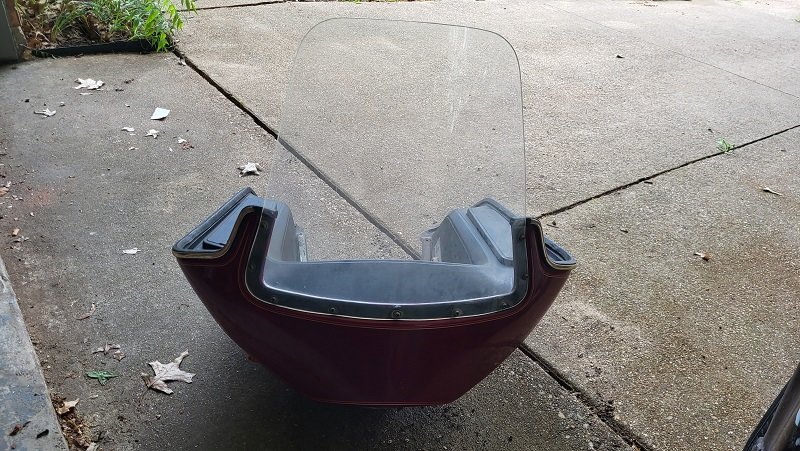
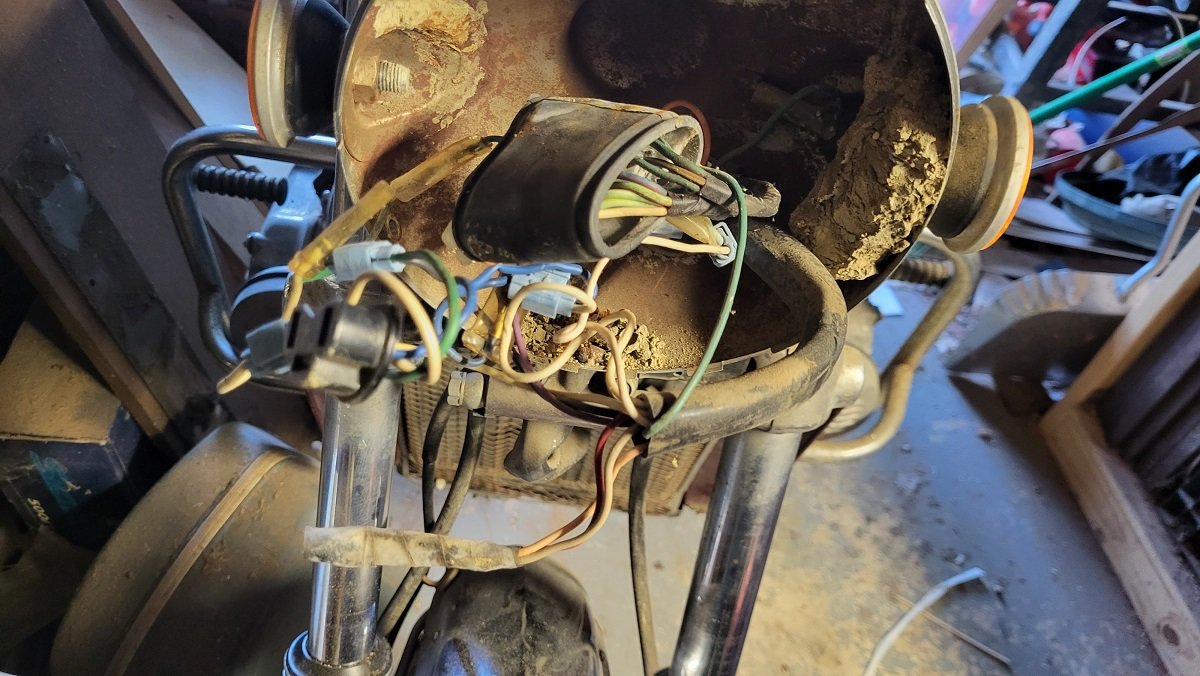
Oddly enough, whoever installed the fairing back in 1984 (according to Ed) did not remove the stock headlight, they just unplugged it. I was very thankful for that. They did remove the stock turn signals though, which Ed put in a box and apparently lost somewhere in the last 39 years... :mrgreen:

Image

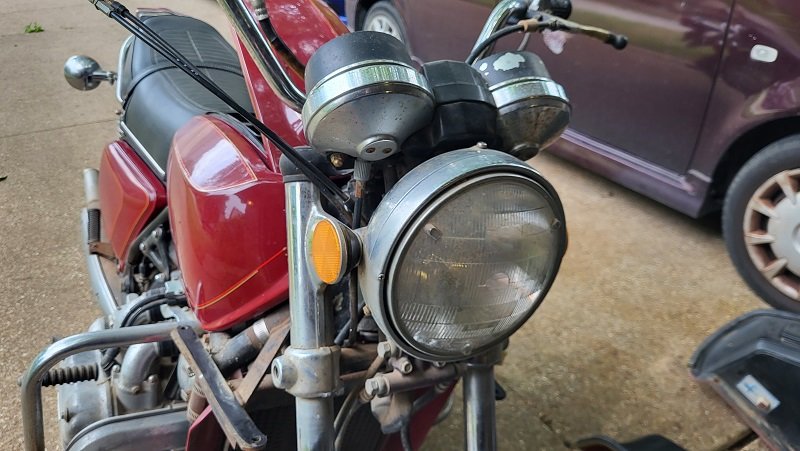
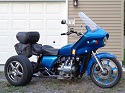
There. Much better already. anim-cheers1

Image

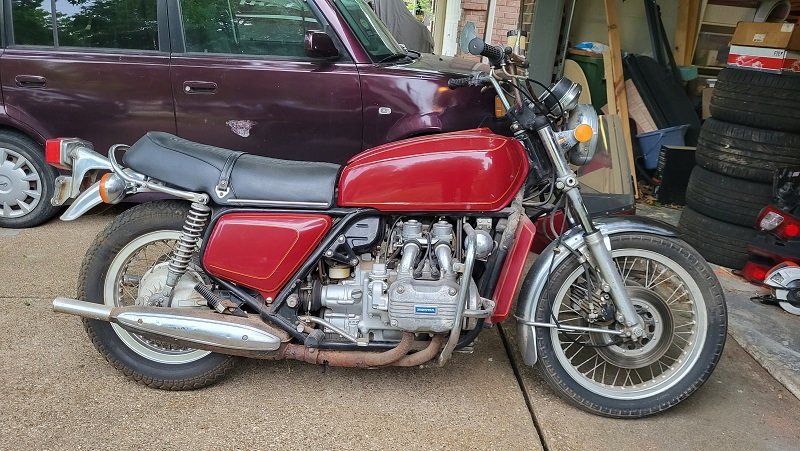
I like the color, seems pretty close to one of the original factory colors, but it is not original to the bike. This bike was originally a sort of blue/green color...

Image

When the fairing was installed, he had all the panels repainted so it would match and did a color change at that time. I will probably leave it as is and just hunt down replacement badges for it. Those were also tossed in a box and lost along the way according to Ed.

The next thing to go will be the highway bars, never could stand those. Then it's probably on to removing the tank and assessing it's conditon. Looking in through the top it looks decent enough. A little surface rust here and there but nothing too serious. But I'm sure there's molasses at the bottom that needs removal.

Been going through a lot of the threads on here to see where the logical first steps are, and hoping for the best.

I need to find some front turn signals eventually, and some headers soon. My intent was a mild custom like my last bike, but this is such a neat time capsule that this may be the first bike I ever intentionally keep all original.

Well, almost all original. Will definitely do some hidden mods, like the EI conversion to ditch the points. And will probably do Sportster mufflers instead of the stock horseshoe, but just for convenience and nothing that can't be reversed.

I am no purist, by any means, but this is just such a neat time capsule that I think preserving it's well worn original patina will serve it well. A full on restoration is not in the cards for me. Ever.

Not sure on the seat. This one is mint, and comfy, but I am sure it won't last with me riding it as much as I plan to. May need to take it off and mothball it before it splits. Unless of course I can find original style replacement upholstery for it to save for when it goes.

I may be rambling... :mrgreen:

Sorry I haven't been around much, but I am glad to see this forum still going after all these years. anim-cheers1
macmusick wrote:by the way if you get a message about a dead kitten just play along.
datsunfreak
Chrome Member
Chrome Member
Posts: 159
Joined: Mon Jul 04, 2011 1:00 am
My Album: https://datsun510.com/index.php?/galler ... 0-project/
Location: Fort Worth, TX

Re: Second time around: '75 GL1000 Project

#2

Post by datsunfreak »

A few other things of note...

Front brakes were DOA. Master is bone dry.

Rear worked when I looked at it, but were dead by the time I got it home. Looks like they only had about 3 pulls left in them. Only a tiny amount of fluid was in the system.

Throttle linkage works nice and smooth, but choke cable is seized as you'd expect.

First move will probably be to get a battery and see if any of the electrical works. If the harness is screwed, I may have bitten off a lot more than I can chew with this one...
macmusick wrote:by the way if you get a message about a dead kitten just play along.
User avatar
Fred Camper
Vice President
Vice President
Posts: 7332
Joined: Wed Aug 12, 2009 9:38 pm
My Album: http://www.ngwclub.com/gallery/v/wingmans/Jeff+Bozeman/
Location: Metro Detroit
Contact:

Re: Second time around: '75 GL1000 Project

#3

Post by Fred Camper »

Might be a way to condition the seat leather, but not sure. Many of us ride those old seats and they do not always crack and if they do some thread and liquid electrical tape can serve well. Headers are not hard to find and I agree Sportster muffs are a great practicality. Pretty sure you know to replace those camshaft belts before riding her. And Mike Nixon's pamphlet and Randakks DVD are two nice resources before you rebuild those fine carbs. Somewhat rare to find a one owner wing so you did find a great bike. Bet the hardness is just fine as anyone who leaves the stock headlight behind most likely did not molest the harness much.

And thanks for the great pictures, really tells the story well.
Proud member of the NGW Cartel (Rochester MI)
1977 GL1000 BADDOG (April 2012 BOTM)
1976 LTD - '993 LTD...and so it begins'

You should remember that it's peace of mind you're after and not just fixing the machine. R.Pirsig
datsunfreak
Chrome Member
Chrome Member
Posts: 159
Joined: Mon Jul 04, 2011 1:00 am
My Album: https://datsun510.com/index.php?/galler ... 0-project/
Location: Fort Worth, TX

Re: Second time around: '75 GL1000 Project

#4

Post by datsunfreak »

Fred Camper wrote: Wed Apr 26, 2023 9:36 am Headers are not hard to find
Here's hoping. anim-cheers1
Fred Camper wrote: Wed Apr 26, 2023 9:36 am And Mike Nixon's pamphlet and Randakks DVD are two nice resources before you rebuild those fine carbs.
My last set I had done by Pistol Pete as I recall, and worked flawlessly. And it was money well spent IMO.
Fred Camper wrote: Wed Apr 26, 2023 9:36 am And thanks for the great pictures, really tells the story well.
Thank you sir.
Fred Camper wrote: Wed Apr 26, 2023 9:36 am Pretty sure you know to replace those camshaft belts before riding her.
No doubt! Current plan of attack is as follows:

Hook up a battery to see what does/doesn't work on electrical, and see if starter will bump it
Go through fuel system and replace pretty much all of it
Go through ignition system checking/replacing as needed (new plug wires and plugs for sure)
Go through cooling system checking/replacing as needed
See if it will start/run for a few seconds

If it does, probably send carbs off for rebuild while I go through the brakes and replace the timing belts.
macmusick wrote:by the way if you get a message about a dead kitten just play along.
datsunfreak
Chrome Member
Chrome Member
Posts: 159
Joined: Mon Jul 04, 2011 1:00 am
My Album: https://datsun510.com/index.php?/galler ... 0-project/
Location: Fort Worth, TX

Re: Second time around: '75 GL1000 Project

#5

Post by datsunfreak »

Also...
Fred Camper wrote: Wed Apr 26, 2023 9:36 am Might be a way to condition the seat leather, but not sure. Many of us ride those old seats and they do not always crack
That is good to hear. I'll see what I can do on that front. :mrgreen:
macmusick wrote:by the way if you get a message about a dead kitten just play along.
User avatar
pidjones
SUPER BIKER!!!!
SUPER BIKER!!!!
Posts: 3307
Joined: Wed May 22, 2013 4:06 pm
Location: East TN

Re: Second time around: '75 GL1000 Project

#6

Post by pidjones »

Seat upholstery is readily available on ebay. Change the belts NOW - before you try to even bar it over with the kicker. Sadly, Pete passed away a couple years ago, but there are others such as Nixon that do great work. Don't try to ride on tires old enough to vote. On the wiring, if they used those gawd-awful Scotchlok connectors, you will need to remove them and carefully inspect for cut wire strands, then heal the insulation wounds with liquid electrical tape or shrink tubing. Haunt ebay for the tank badges. A self-stick type shows up occasionally. Take the fairing to the dumpster unless you can find someone that actually wants it. Don't bother trying to sell it. BTW, the best accessory that I've ever had on a GL1000 was a luggage rack.
"Love 'em all.... let God sort 'em out!"
Ex 2006 GL1800 - the Black Pearl SOLD! to make room for:
2021 Can-Am Spyder RT Limited Dark Chalk Metallic
1975 Red GL1000 project - ex Pistol Pete project
1972 Triumph T150V Trident rescue - finished and FOR SALE!
1976 Yamaha RD400c
1978 GL1000 with '75 engine - the Hunley
Ex 1978 GL1000
Ex 1979 GL1000
Ex '79 CB750F rat bike
Ex '86 SEi
Ex '77 GL1000
Ex '76 RD400
Ex '72 Penton 125 set up for flat track
Ex '73 RD250
Ex '68 TR6C - chopped
datsunfreak
Chrome Member
Chrome Member
Posts: 159
Joined: Mon Jul 04, 2011 1:00 am
My Album: https://datsun510.com/index.php?/galler ... 0-project/
Location: Fort Worth, TX

Re: Second time around: '75 GL1000 Project

#7

Post by datsunfreak »

Fred Camper wrote: Wed Mar 29, 2023 8:32 am The museums have plenty of 1975 GL's so it is up to you how you want to do her.
Stolen from another thread, but good food for thought...
pidjones wrote: Wed Apr 26, 2023 1:14 pm Seat upholstery is readily available on ebay.
Thanks, I'll take a look over there.
pidjones wrote: Wed Apr 26, 2023 1:14 pm Change the belts NOW - before you try to even bar it over with the kicker.
Well, that ship has sailed. :P

Ed went out to the garage every 3-4 months and used the kicker to roll it over a few times to avoid the engine getting stuck. I've only moved it once, but it is sound advice either way. anim-cheers1
pidjones wrote: Wed Apr 26, 2023 1:14 pm Sadly, Pete passed away a couple years ago, but there are others such as Nixon that do great work.
Sorry to hear that. He seemed like a good dude and did great work.
pidjones wrote: Wed Apr 26, 2023 1:14 pm Don't try to ride on tires old enough to vote.
Oh no, would not even dream of it.
pidjones wrote: Wed Apr 26, 2023 1:14 pm On the wiring, if they used those gawd-awful Scotchlok connectors, you will need to remove them and carefully inspect for cut wire strands, then heal the insulation wounds with liquid electrical tape or shrink tubing.
It looks like to me they just uplugged the bullets from the front lights and plugged them to the harness for the fairing. Then there is a big square wiring connector where it plugs into the fairing itself. I unplugged it from the fairing and left it dangling and will dig into it soon. Should probably try to dig up a wiring diagram first.
pidjones wrote: Wed Apr 26, 2023 1:14 pm Haunt ebay for the tank badges. A self-stick type shows up occasionally.
Did that a few minutes ago. Got some coming, along with a new tail light lens (this one has a crack).
pidjones wrote: Wed Apr 26, 2023 1:14 pm Take the fairing to the dumpster unless you can find someone that actually wants it. Don't bother trying to sell it.
My friend who hauled it to the house for me is big into vintage Hondas, has a substantial parts stash of radom bits, and he said he wants it. Fine with me. :mrgreen:
macmusick wrote:by the way if you get a message about a dead kitten just play along.
fitscott
Cast Iron Member
Cast Iron Member
Posts: 90
Joined: Thu Jul 09, 2020 8:32 am
Location: Comfort TX

Re: Second time around: '75 GL1000 Project

#8

Post by fitscott »

This is funny - I talked to Ed when you were on the way there - Cool Bike - He said they were the original tires - If the Fairing is in decent shape - I'd be interested because I already have a Pacifico Shadow - Good Luck with it!!!
datsunfreak
Chrome Member
Chrome Member
Posts: 159
Joined: Mon Jul 04, 2011 1:00 am
My Album: https://datsun510.com/index.php?/galler ... 0-project/
Location: Fort Worth, TX

Re: Second time around: '75 GL1000 Project

#9

Post by datsunfreak »

fitscott wrote: Thu Apr 27, 2023 4:44 pm This is funny - I talked to Ed when you were on the way there -
Were you thinking about buying it?
fitscott wrote: Thu Apr 27, 2023 4:44 pm He said they were the original tires
Definitely looks like it. The front one for sure.
fitscott wrote: Thu Apr 27, 2023 4:44 pm If the Fairing is in decent shape - I'd be interested because I already have a Pacifico Shadow
Hoenstly, it is in pristine condition. The "glass" isn't even hazy.
macmusick wrote:by the way if you get a message about a dead kitten just play along.
datsunfreak
Chrome Member
Chrome Member
Posts: 159
Joined: Mon Jul 04, 2011 1:00 am
My Album: https://datsun510.com/index.php?/galler ... 0-project/
Location: Fort Worth, TX

Re: Second time around: '75 GL1000 Project

#10

Post by datsunfreak »

Well, tried futzing with some electrical last night to see where I stand. So far, it's not looking good...

Battery strap was long gone, and there was no battery in it at all. Hooked a small jump box to the cables to see if anything would turn on. I was able to get the tail light to come on (no brake light though), and got the starter button working to bump the motor over. Nothing else seems to be working, though. No lights on the dash, no headlight (see below), no horn, no turn signals. I was concerned about the condition of the wiring harness (not being chopped, just old and corroded), and this isn't helping that fear subside.

Next step is to clean up the fuse box and replace all the fuses to see if that brings anything else to life.

Could use a little direction from a more seasoned tinkerer on something. I am assuming the thing circled in red is some kind of fusible link to the fuse box? Also, the thing circled in yellow, some kind of starter solenoid?

Image


As you can see, the wires coming out of it are in rough shape. I was wondering if I could just bypass it, just power straight into the fuse box lead there and see what has power at the fuse box then. Can't really tell if I need to feed power to both wires, or just one? Thinking one may be power from the fuse box to kick the "starter colenoid"?
pidjones wrote: Wed Apr 26, 2023 1:14 pm On the wiring, if they used those gawd-awful Scotchlok connectors, you will need to remove them and carefully inspect for cut wire strands, then heal the insulation wounds with liquid electrical tape or shrink tubing.
Welcome to Scotchlok city, population me. :mrgreen:

Image

As expected, the original headlight plug was just off and loose. I tried plugging it in, but that did nothing. But who knows if this 47 year old bulb is even any good, though. Need to get a test light on the plug and see if it's getting power.


This looks like a job for a wiring diagram! :mrgreen:

General consensus on who/where has the best one?
macmusick wrote:by the way if you get a message about a dead kitten just play along.
User avatar
gltriker
Honored Life Member
Honored Life Member
Posts: 5309
Joined: Fri Sep 24, 2010 9:11 pm
Location: central NY State

Re: Second time around: '75 GL1000 Project

#11

Post by gltriker »

page/ST

Colored Wiring diagrams at bottom lines of the ShopTalk library
Located under Fìles header
Cliff ;) )

Keep your eyes and ears open and you'll learn something new, everyday. tumb2

New users please visit our "Shop Talk" for common tips and help: <---jdvorchak
http://www.ngwclub.com/forum/page/ST
^^^^^^^click up here^^^^^ :oldies

RE: a thorough fuel tank cleaning
"And your carbs will thank you. They no longer live down stream from a sewage plant." -gregforesi tumb2
"Can't see the paint when your looking thru the handlebars..........." -Oldewing ;)
"I'd rather Ride than Shine" -RAT tumb2 Me Too!!

Cliff

'75 GL1000 home built trike; http://www.ngwclub.com/forum/viewtopic.php?f=30&t=39996
October,2017 BOTM :shock: https://nakedgoldwingsclub.com/forum/page/Welcome

previous rides:
1953 H-D Servi-car, naked, 1969-1978 (serial#53G1559 committed to memory!)
1980 CB900 Custom (triked) 1997-2003 .... R.I.P.
datsunfreak
Chrome Member
Chrome Member
Posts: 159
Joined: Mon Jul 04, 2011 1:00 am
My Album: https://datsun510.com/index.php?/galler ... 0-project/
Location: Fort Worth, TX

Re: Second time around: '75 GL1000 Project

#12

Post by datsunfreak »

gltriker wrote: Fri Apr 28, 2023 8:43 am page/ST

Colored Wiring diagrams at bottom lines of the ShopTalk library
Located under Fìles header
I should have known. :mrgreen:

Thank you sir! anim-cheers1
macmusick wrote:by the way if you get a message about a dead kitten just play along.
fitscott
Cast Iron Member
Cast Iron Member
Posts: 90
Joined: Thu Jul 09, 2020 8:32 am
Location: Comfort TX

Re: Second time around: '75 GL1000 Project

#13

Post by fitscott »

Were you thinking about buying it?
I was thinking about buying it but I was hoping someone else would because I have several other projects that all require Time & Money - I still think you bought a Great Bike even with all the problems - Less than 11000 miles on a 48 year old Bike is amazing to me. - I would love to have the fairing but probably won't be in your area for a while - If you have room to store it great - If you need to toss it I understand - I'm 4 or 5 hours away from you
datsunfreak
Chrome Member
Chrome Member
Posts: 159
Joined: Mon Jul 04, 2011 1:00 am
My Album: https://datsun510.com/index.php?/galler ... 0-project/
Location: Fort Worth, TX

Re: Second time around: '75 GL1000 Project

#14

Post by datsunfreak »

fitscott wrote: Fri Apr 28, 2023 9:57 am I would love to have the fairing but probably won't be in your area for a while - If you have room to store it great - If you need to toss it I understand - I'm 4 or 5 hours away from you
Well, the friend who helped me tow it home said he wanted it. But I know he isn't going to use it any time soon, just store it until the end of time. :mrgreen:

So let's let him store it, then if you get up this way any time you can hit me up and we'll get it back from him. anim-cheers1

He's a bit of a packrat and refuses to toss out anything old for a Honda, or to let me toss it out apparently. :P
macmusick wrote:by the way if you get a message about a dead kitten just play along.
User avatar
pidjones
SUPER BIKER!!!!
SUPER BIKER!!!!
Posts: 3307
Joined: Wed May 22, 2013 4:06 pm
Location: East TN

Re: Second time around: '75 GL1000 Project

#15

Post by pidjones »

Yes, fusible link - replace with an inline 30 amp receiver and fuse from the parts store. Yes, solenoid. Might work, might not.

On my projects, I just bite the bullet, disassemble the entire bike, strip off the harness, and go over it one connector at a time cleaning and replacing Budget a couple weeks of couple hours a day - clean everything well first so you can see wire true colors). Vintage Connections carries all of the connectors, crimper, etc. There is no quick, easy on them.

And, it is a MINIMUM of a $500 project (brake parts, carb kits, tires and tubes, etc.) But! A little done each day (say, 15 minutes or so) can surprise you with a safe, reliable, nun-to-ride bike is a year or so. Hint: get a Harbor Freight wooden furniture dolly, crew two ~ 1 ft long 2x4 to it, then two more to them (side-by-side). This should just slide in between the frame rails. Ratchet strap the motor down to it. Then as you take front and rear wheels off, then forks, then rear drive, etc. you can still move it around in the shop until it is just motor on the dolly.

Frame comes off easy once all is stripped by removing the left side piece and having a helper (my wife in my case) help jockey it off. The tank really needs the rear drive, rear master, shelter, and rear shocks pulled to ease removal. The engine will need the least work (except for the carbs).

NEW BELTS! Maybe new idlers (see threads about this), pull the valve covers and check valve clearances, change the screws on the neutral switch and pickup strainer cover (lower right side) to something that can be removed with the frame so close to them.

Inspect the 3 Yellow Wires connector on the back of the alternator. I replace mine with high-current RC helicopter connectors (covered with heat shrink), but many just solder and heat shrink the joint. Get a sealed battery for it. I use just AGM, but others use gel. Avoid plain vented lead acid as the acid fumes eat things in that area (like the 3 yellow wire connector). NO NEED (nor advised) to go Lithium.
"Love 'em all.... let God sort 'em out!"
Ex 2006 GL1800 - the Black Pearl SOLD! to make room for:
2021 Can-Am Spyder RT Limited Dark Chalk Metallic
1975 Red GL1000 project - ex Pistol Pete project
1972 Triumph T150V Trident rescue - finished and FOR SALE!
1976 Yamaha RD400c
1978 GL1000 with '75 engine - the Hunley
Ex 1978 GL1000
Ex 1979 GL1000
Ex '79 CB750F rat bike
Ex '86 SEi
Ex '77 GL1000
Ex '76 RD400
Ex '72 Penton 125 set up for flat track
Ex '73 RD250
Ex '68 TR6C - chopped
Post Reply

Return to “Members Restorations and Projects”