I thought about doing that as well, and would likely go that route if I had more to do. I wish there was a way to clean up the intake seat more, but it looks to me like too much material is gone to get a super smooth finish.
1986 Aspencade Resurrection
Moderators: Brant, Sagebrush, Forum Moderators
-
3KidsinAustin

- Chrome Member

- Posts: 142
- Joined: Sat Feb 08, 2025 5:04 pm
Re: 1986 Aspencade Resurrection
1985 Limited (SOLD) - Build Thread Here: https://goldwingdocs.com/forum/viewtopic.php?t=72752
1986 Aspencade (Complete!): https://ngwclub.com/forum/viewtopic.php ... 77#p829477
1986 SE-i (Current Project): https://ngwclub.com/forum/viewtopic.php ... 25#p831425
1984 Interstate (Future Project)
1986 Aspencade (Complete!): https://ngwclub.com/forum/viewtopic.php ... 77#p829477
1986 SE-i (Current Project): https://ngwclub.com/forum/viewtopic.php ... 25#p831425
1984 Interstate (Future Project)
-
Fred Camper

- Vice President

- Posts: 7382
- Joined: Wed Aug 12, 2009 9:38 pm
- My Album: http://www.ngwclub.com/gallery/v/wingmans/Jeff+Bozeman/
- Location: Metro Detroit
- Contact:
Re: 1986 Aspencade Resurrection
My bet is compression will improve in 2 up near cylinder 4. Fingers crossed.
Proud member of the NGW Cartel (Rochester MI)
1977 GL1000 BADDOG (April 2012 BOTM)
1976 LTD - '993 LTD...and so it begins'
You should remember that it's peace of mind you're after and not just fixing the machine. R.Pirsig
1977 GL1000 BADDOG (April 2012 BOTM)
1976 LTD - '993 LTD...and so it begins'
You should remember that it's peace of mind you're after and not just fixing the machine. R.Pirsig
-
3KidsinAustin
- Chrome Member
- Posts: 142
- Joined: Sat Feb 08, 2025 5:04 pm
Cylinder Head Journey Results
I am pleased to announce that Fred is WRONG!!! #2 not only beat #4, but exceeded! Bolted the head and valve train on this afternoon, filled the defoaming chamber and bled (again) the hydraulic adjusters, then hooked up the compression gauge.Fred Camper wrote: ↑Tue Apr 15, 2025 9:30 pm My bet is compression will improve in 2 up near cylinder 4. Fingers crossed.
#2 resulted in a rockstar way, handing in 145 psi. This is up from 75 when I started and as low as 60 with my first failed pass at valve lapping. #4 also improved, although not by as big an amount and not as high an end result. Given the condition of its intake valve seat, not surprising. It turned in a 135 psi result, up from 125 initially and dropping to 120 on the first valve attempt. Neither of these results are really "great" per the service manual, but I think there could be some room for improvement as it gets some miles under it and loosens up the rings. I have a bit of seafoam rolling around in the oil pan, about 4 ounces that I dumped in after cleaning and bleeding the adjusters the first time. Hopefully that might help, and then I can change the oil after a bit of riding.
Tomorrow I'll hook the cooling system back up and run it up for awhile to sync the carbs. Hopefully no white smoke out the exhaust this time either! Ran it for about 30 seconds and no wild smoke then, but I'm so low on gas in my aux tank that it didn't like it when I rolled on the throttle.
You do not have the required permissions to view the files attached to this post.
1985 Limited (SOLD) - Build Thread Here: https://goldwingdocs.com/forum/viewtopic.php?t=72752
1986 Aspencade (Complete!): https://ngwclub.com/forum/viewtopic.php ... 77#p829477
1986 SE-i (Current Project): https://ngwclub.com/forum/viewtopic.php ... 25#p831425
1984 Interstate (Future Project)
1986 Aspencade (Complete!): https://ngwclub.com/forum/viewtopic.php ... 77#p829477
1986 SE-i (Current Project): https://ngwclub.com/forum/viewtopic.php ... 25#p831425
1984 Interstate (Future Project)
-
ericheath

- Honored Life Member

- Posts: 9615
- Joined: Wed Jul 29, 2009 11:20 am
- Location: Winnipeg, Manituba
Re: 1986 Aspencade Resurrection
It looks like you’re using a long tube/hose from cylinder to gauge. I think Cliff had some info on this causing numbers to be lower than spec, but actually might be close to spec? Anyone?
Whatever I suggest here should be given ample time for a moderator to delicately correct. I apologize in advance.
77 WING, 1200 engine with 77 heads, cams, gl1100 foot pegs, Magna V65 front end, 764A carbs, [-gone Suzuki M109 monoshock--, replaced with gl1100 shocks] gl 1200 swing arm, gl1500 final drive, wheel and rear brakes Valkyrie seat, Meanstreak tank, Sportster pipes, Power Arc ignition off crank.
77 Wing. black
83 Wing, in pieces
"Continuing education is important even if the subject matter is fairly useless (as in this case)."---Greg Foresi
-
3KidsinAustin
- Chrome Member
- Posts: 142
- Joined: Sat Feb 08, 2025 5:04 pm
Re: 1986 Aspencade Resurrection
I think the perspective of the picture might make the hose look longer than it really is. At least the same equipment was used for each of the trials for comparison.
Interesting about the length of hose altering the numbers, though. At least. Is the cylinders are now all close to each other in readings.
1985 Limited (SOLD) - Build Thread Here: https://goldwingdocs.com/forum/viewtopic.php?t=72752
1986 Aspencade (Complete!): https://ngwclub.com/forum/viewtopic.php ... 77#p829477
1986 SE-i (Current Project): https://ngwclub.com/forum/viewtopic.php ... 25#p831425
1984 Interstate (Future Project)
1986 Aspencade (Complete!): https://ngwclub.com/forum/viewtopic.php ... 77#p829477
1986 SE-i (Current Project): https://ngwclub.com/forum/viewtopic.php ... 25#p831425
1984 Interstate (Future Project)
-
3KidsinAustin
- Chrome Member
- Posts: 142
- Joined: Sat Feb 08, 2025 5:04 pm
Electrons and Coolant...
Bolted the cooling system back onto the bike and filled the system with fluid. No matter how hard I try, I manage to dump coolant down the front of the engine - even using a nice angled filter. Clearly just a glutton for punishment. More on coolant later...
With everything bolted up, I was having no luck getting the bike to start. Couldn't figure what could have gone wrong as I'd done a short run yesterday and it fired up fine. Turns out I was getting no spark to cylinders 3 & 4. Went thru the troubleshooting manual, even swapped signal wires to the coils - which made 3&4 spark but lost on 1&2. OK - coil is good, just not getting a signal from the ICM. Fortunately, this bike came with four or five extra ignition control modules. Put another one on and had good spark on all cylinders. Yeah! Ran it up for a bit but not for long as I think I might have a bad water pump and water coolant leaking into the oil. Will drain tomorrow and see what it looks like.
After this bike is done, and I'm looking for a different type of project, I might take this apart and see what it looks like on the inside. Wonder if there are any fix-it guides for these modules?
On to coolant - the oil looked a little chocolate-y when I pulled the valve cover and the oil level seemed higher than it should when I checked the dipstick. Plus, I spotted a drip coming from the weep hole under the pump. All signs seem to point towards a failing water pump. Another challenge before getting this old gal back on the road!
You do not have the required permissions to view the files attached to this post.
1985 Limited (SOLD) - Build Thread Here: https://goldwingdocs.com/forum/viewtopic.php?t=72752
1986 Aspencade (Complete!): https://ngwclub.com/forum/viewtopic.php ... 77#p829477
1986 SE-i (Current Project): https://ngwclub.com/forum/viewtopic.php ... 25#p831425
1984 Interstate (Future Project)
1986 Aspencade (Complete!): https://ngwclub.com/forum/viewtopic.php ... 77#p829477
1986 SE-i (Current Project): https://ngwclub.com/forum/viewtopic.php ... 25#p831425
1984 Interstate (Future Project)
-
gltriker
- Honored Life Member
- Posts: 5330
- Joined: Fri Sep 24, 2010 9:11 pm
- Location: central NY State
Re: 1986 Aspencade Resurrection
3KidsinAustin wrote: ↑Wed Apr 16, 2025 9:54 pmI think the perspective of the picture might make the hose look longer than it really is. At least the same equipment was used for each of the trials for comparison.
Interesting about the length of hose altering the numbers, though. At least. Is the cylinders are now all close to each other in readings.
Last edited by gltriker on Mon Apr 21, 2025 10:20 pm, edited 3 times in total.
Cliff  )
)
Keep your eyes and ears open and you'll learn something new, everyday.
New users please visit our "Shop Talk" for common tips and help: <---jdvorchak
http://www.ngwclub.com/forum/page/ST
^^^^^^^click up here^^^^^
RE: a thorough fuel tank cleaning
"And your carbs will thank you. They no longer live down stream from a sewage plant." -gregforesi
"Can't see the paint when your looking thru the handlebars..........." -Oldewing
"I'd rather Ride than Shine" -RAT Me Too!!
Cliff
'75 GL1000 home built trike; http://www.ngwclub.com/forum/viewtopic.php?f=30&t=39996
October,2017 BOTM https://nakedgoldwingsclub.com/forum/page/Welcome
previous rides:
1953 H-D Servi-car, naked, 1969-1978 (serial#53G1559 committed to memory!)
1980 CB900 Custom (triked) 1997-2003 .... R.I.P.
Keep your eyes and ears open and you'll learn something new, everyday.
New users please visit our "Shop Talk" for common tips and help: <---jdvorchak
http://www.ngwclub.com/forum/page/ST
^^^^^^^click up here^^^^^
RE: a thorough fuel tank cleaning
"And your carbs will thank you. They no longer live down stream from a sewage plant." -gregforesi
"Can't see the paint when your looking thru the handlebars..........." -Oldewing
"I'd rather Ride than Shine" -RAT
Cliff
'75 GL1000 home built trike; http://www.ngwclub.com/forum/viewtopic.php?f=30&t=39996
October,2017 BOTM
previous rides:
1953 H-D Servi-car, naked, 1969-1978 (serial#53G1559 committed to memory!)
1980 CB900 Custom (triked) 1997-2003 .... R.I.P.
-
ericheath
- Honored Life Member
- Posts: 9615
- Joined: Wed Jul 29, 2009 11:20 am
- Location: Winnipeg, Manituba
Re: 1986 Aspencade Resurrection
My Harbor Fright tube held 10.1 cc’s of liquid. I believe a 1000 combustion chamber is around 33cc’s. It would drop compression a lot.
My hybrid 1200 would put 185psi to the same gauge after shaved heads and advancing the cams 4 degrees. If my guesstimate is correct that would have made mine 230 or 240psi, which would have gone poof real fast on pump gas , wouldn’t it?
My hybrid 1200 would put 185psi to the same gauge after shaved heads and advancing the cams 4 degrees. If my guesstimate is correct that would have made mine 230 or 240psi, which would have gone poof real fast on pump gas , wouldn’t it?
Whatever I suggest here should be given ample time for a moderator to delicately correct. I apologize in advance.
77 WING, 1200 engine with 77 heads, cams, gl1100 foot pegs, Magna V65 front end, 764A carbs, [-gone Suzuki M109 monoshock--, replaced with gl1100 shocks] gl 1200 swing arm, gl1500 final drive, wheel and rear brakes Valkyrie seat, Meanstreak tank, Sportster pipes, Power Arc ignition off crank.
77 Wing. black
83 Wing, in pieces
"Continuing education is important even if the subject matter is fairly useless (as in this case)."---Greg Foresi
77 WING, 1200 engine with 77 heads, cams, gl1100 foot pegs, Magna V65 front end, 764A carbs, [-gone Suzuki M109 monoshock--, replaced with gl1100 shocks] gl 1200 swing arm, gl1500 final drive, wheel and rear brakes Valkyrie seat, Meanstreak tank, Sportster pipes, Power Arc ignition off crank.
77 Wing. black
83 Wing, in pieces
"Continuing education is important even if the subject matter is fairly useless (as in this case)."---Greg Foresi
-
3KidsinAustin
- Chrome Member
- Posts: 142
- Joined: Sat Feb 08, 2025 5:04 pm
Re: 1986 Aspencade Resurrection
Picked up another leakdown tester from Amazon to double check that no coolant was getting into the combustion chamber through a bad head gasket or warped head. The second tester was a little higher quality, but not great. I had to work up some adapters or my air compressor hose would keep blowing off. This worked ok.
I wanted to see if any bubbles showed up at the top of the radiator neck, so had to leave the cooling system in place, which makes turning the engine over a bit harder. Finally realized I could mount a rear tire and put the bike in high gear, then rotate the tire by hand. I removed all the spark plugs to make it a bit easier, but it was still a challenge.
One tool that has been very handy through this is an old boroscope camera that I got from Harbor Freight years ago. Gives a nice view of the piston as it rides up the cylinder bore, then when it reaches the top of its stroke and stops moving. If doing the leakdown test and filling the combustion chamber with air, that is the time you want to do it as the piston will stay in place. Otherwise, the pressure in the cylinder will force the piston down.
Test results were great. Both #2 and #4 had leakdown in the 5-6% range, which I'll take. #4 still had a little air leaking into the intake, which was expected following the fluid test. Next, I ran the bike for awhile to warm up the oil so I could drain it out and confirm it didn't look like a milkshake. The good news is that it was just old and dirty, not contaminated with coolant. The bad news is that I created a huge mess to clean up because the oil shot right past the back of my drain pan. Many paper towels were sacrificed in this stage of the project!
Might get a couple hours late afternoon to change filter, and add oil. Going to bolt the gas tank and rear tire back on and start mounting things back on the bike to get it rideable. It will be exciting to see pieces get back on! I know I need to check on the air compressor in the fairing, probably do that while it is still off the bike.
Happy Easter everyone!
Happy Easter everyone!
You do not have the required permissions to view the files attached to this post.
1985 Limited (SOLD) - Build Thread Here: https://goldwingdocs.com/forum/viewtopic.php?t=72752
1986 Aspencade (Complete!): https://ngwclub.com/forum/viewtopic.php ... 77#p829477
1986 SE-i (Current Project): https://ngwclub.com/forum/viewtopic.php ... 25#p831425
1984 Interstate (Future Project)
1986 Aspencade (Complete!): https://ngwclub.com/forum/viewtopic.php ... 77#p829477
1986 SE-i (Current Project): https://ngwclub.com/forum/viewtopic.php ... 25#p831425
1984 Interstate (Future Project)
-
3KidsinAustin
- Chrome Member
- Posts: 142
- Joined: Sat Feb 08, 2025 5:04 pm
Maintenance & Reassembly
After a bountiful brunch, spent some time in the garage this afternoon. New oil and fuel filters and a whole lot of Rotella 15w-40 in the crank case.
Next was sliding the fuel tank in, which is always a challenge - although I believe the carburetor tanks are easier to position than the fuel injection ones given their low-hanging fuel outlet and tying it to the petcock. Anyway, this is probably common knowledge, but I found a heat gun is great for softening up the rubber cover on the fuel sender connector. I used that when disassembling to get it pliable enough to slide over, and did the same thing to put it back on. Just some time on the low-heat setting, not enough to melt it.
Routed the rear suspension but leaving them off the bike for the moment so I can get the rear shield on (after cleaning it) and the rear tire. Always a tight squeeze to get the tire past the final drive. I'm open to any tips!
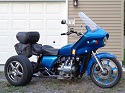
Here is the current state. With the tank in and the rear wheel soon, it will start looking like a motorcycle again!
Here is the current state. With the tank in and the rear wheel soon, it will start looking like a motorcycle again!
You do not have the required permissions to view the files attached to this post.
1985 Limited (SOLD) - Build Thread Here: https://goldwingdocs.com/forum/viewtopic.php?t=72752
1986 Aspencade (Complete!): https://ngwclub.com/forum/viewtopic.php ... 77#p829477
1986 SE-i (Current Project): https://ngwclub.com/forum/viewtopic.php ... 25#p831425
1984 Interstate (Future Project)
1986 Aspencade (Complete!): https://ngwclub.com/forum/viewtopic.php ... 77#p829477
1986 SE-i (Current Project): https://ngwclub.com/forum/viewtopic.php ... 25#p831425
1984 Interstate (Future Project)
-
Fred Camper
- Vice President
- Posts: 7382
- Joined: Wed Aug 12, 2009 9:38 pm
- My Album: http://www.ngwclub.com/gallery/v/wingmans/Jeff+Bozeman/
- Location: Metro Detroit
- Contact:
Re: 1986 Aspencade Resurrection
Nice that you are now in the rebuild process. What are your plans for the F-body? Was a development/release engineer on those back in the day.
Proud member of the NGW Cartel (Rochester MI)
1977 GL1000 BADDOG (April 2012 BOTM)
1976 LTD - '993 LTD...and so it begins'
You should remember that it's peace of mind you're after and not just fixing the machine. R.Pirsig
1977 GL1000 BADDOG (April 2012 BOTM)
1976 LTD - '993 LTD...and so it begins'
You should remember that it's peace of mind you're after and not just fixing the machine. R.Pirsig
-
3KidsinAustin
- Chrome Member
- Posts: 142
- Joined: Sat Feb 08, 2025 5:04 pm
Re: 1986 Aspencade Resurrection
Wow! Those are stories I would love to hear. My first car that I drove all through college in the early 90s was an 85 Trans Am, in yellow. Around 2017, I decided to look seriously for another Trans Am to rebuild, and it had to be in yellow. Little did I know at the time at the only years that yellow was available was 85 and 86. Took a couple of years to find one - this one came out of Tulsa, roughly 500 miles away - so a 1000 mile roadtrip ensued. Body is ok - dents in the front that I've covered up with a bra. I found a small crack in the engine block (Jasper rebuild), so I sourced an engine, had machine work done, and reassembled it myself. Interior is in pretty good shape for its age. Bought an 88 TPI car as my college one was fuel injected, so polished up the TPI intake to a high shine. The car originally came with the 305 HO and 5 speed, plus the handling package (can't remember the option code at the moment). I've put subframe connectors and all new brakes and suspension throughout, so it handles much better than my original and much fewer squeaks and rattles. It has been repainted once in a non-correct color (closer to the 87 Formula yellow) and the clearcoat is peeling in areas.Fred Camper wrote: ↑Mon Apr 21, 2025 5:21 pm Nice that you are now in the rebuild process. What are your plans for the F-body? Was a development/release engineer on those back in the day.
I'd love to get the front fenders replaced and do a correct paint job on it, but they aren't bringing the money yet that would justify the now sky-high price for paint and bodywork. Kids have fun riding it in with the tops off, so we break it out on nice days. I've put maybe 1000 miles on it since I bought it six years ago.
1985 Limited (SOLD) - Build Thread Here: https://goldwingdocs.com/forum/viewtopic.php?t=72752
1986 Aspencade (Complete!): https://ngwclub.com/forum/viewtopic.php ... 77#p829477
1986 SE-i (Current Project): https://ngwclub.com/forum/viewtopic.php ... 25#p831425
1984 Interstate (Future Project)
1986 Aspencade (Complete!): https://ngwclub.com/forum/viewtopic.php ... 77#p829477
1986 SE-i (Current Project): https://ngwclub.com/forum/viewtopic.php ... 25#p831425
1984 Interstate (Future Project)
-
3KidsinAustin
- Chrome Member
- Posts: 142
- Joined: Sat Feb 08, 2025 5:04 pm
Compressor Work
Before I mount the front fairing, I wanted to make sure the air compressor for the suspension functioned properly as access is a whole lot easier without the cycle in the way. It is a tight fit to get things in and out of the area, although I can tell you the 86 Aspencade is a whole lot easier to get out than the 85 Limited! The electronic controls take up a lot of space and there are a lot of extra plugs and wires running into the right side of the fairing.
Everything came out as it should, I disconnected and labeled the wires that needed it. I just realized while typing this that the side marker light has its wiring screwed up and I'll have to figure out how to get it back into place and functional... Leave that for later!
The air part of the suspension is fairly simple and easy to diagnose, especially compared to the Limited. The FSM does an excellent job of walking through each step, but anyone mechanically minded and semi-familiar with compressors wouldn't have a problem. I first disassembled the drier so I could begin recharging the desiccant. The color tells you right away that it needs recharged, but at least it is there and not turned to powder! The factory manual doesn't specify baking times, but I had to purchase some desiccant for the Limited as its material was totally shot. According to its label, recharge is 3 hours at 250F. Went thru the steps in the FSM to test the air solenoid and the control valves for selecting front or rear suspension. The center switch was a bit crusty from lack of use, so I sprayed it with some electronics cleaner and cycled it several times. Came back nicely. When 12V was applied to the pump, it purred and started ejecting air, so didn't need to do anything there. Switches got tested for continuity and then vacuum was applied to make sure the selector and dump valve were working properly. Unit is all squeezed back into the right fairing and one more thing is crossed off the list!
You do not have the required permissions to view the files attached to this post.
1985 Limited (SOLD) - Build Thread Here: https://goldwingdocs.com/forum/viewtopic.php?t=72752
1986 Aspencade (Complete!): https://ngwclub.com/forum/viewtopic.php ... 77#p829477
1986 SE-i (Current Project): https://ngwclub.com/forum/viewtopic.php ... 25#p831425
1984 Interstate (Future Project)
1986 Aspencade (Complete!): https://ngwclub.com/forum/viewtopic.php ... 77#p829477
1986 SE-i (Current Project): https://ngwclub.com/forum/viewtopic.php ... 25#p831425
1984 Interstate (Future Project)
-
Fred Camper
- Vice President
- Posts: 7382
- Joined: Wed Aug 12, 2009 9:38 pm
- My Album: http://www.ngwclub.com/gallery/v/wingmans/Jeff+Bozeman/
- Location: Metro Detroit
- Contact:
Re: 1986 Aspencade Resurrection
It will be in the Market this spring then. Good progress.
Proud member of the NGW Cartel (Rochester MI)
1977 GL1000 BADDOG (April 2012 BOTM)
1976 LTD - '993 LTD...and so it begins'
You should remember that it's peace of mind you're after and not just fixing the machine. R.Pirsig
1977 GL1000 BADDOG (April 2012 BOTM)
1976 LTD - '993 LTD...and so it begins'
You should remember that it's peace of mind you're after and not just fixing the machine. R.Pirsig
-
3KidsinAustin
- Chrome Member
- Posts: 142
- Joined: Sat Feb 08, 2025 5:04 pm
Tire Trick
EDIT: This was not as successful as I'd hoped. Post #92 has some more details.
Learned a neat trick from my uncle a couple of days ago. I had mounted up the rear wheel along with the caliper and suspension, then proceeded to fill the tire with air. Was cleaning off the plastics to go back on the bike and thought I'd give the wheel a quick cleaning (whole lot easier to do with it OFF the bike, will remember for next time). Was disappointed to see just the faintest bit of foaming occur around the wheel rim, making me think there was some corrosion in that area. I learned how to mount tires on my last Goldwing project - something that will happen often on these bikes that have sat for so long, leading their tires to age out. This bike has practically unused tires that are only a few years old, so I wasn't expecting any trouble. Really not wanting to remove everything and go through the work of unmounting the tire, cleaning the rim, and remounting it, I even considered filling it with tire slime. Fortunately, I followed this tip from my uncle - an old car nut.
He recommended deflating the tire then spraying it with any kind of lubricant (WD40, garage lube, etc) and letting it sit for 24 hours. Periodically turn the wheel and reapply. (It doesn't take much, just a gentle squirt with a straw applicator and it will run around the rim without flooding over). Presumably, the lube gets into the bead area, helps it soften up a bit, and seal better to the rim. I also tapped it a few times on the tire body with a rubber mallet while spinning it.
Went through that process and checked it again yesterday with the tire inflated to 40PSI. Success! Holding air perfectly and no foaming. Hopefully this will help anyone else that bumps into this.
You do not have the required permissions to view the files attached to this post.
Last edited by 3KidsinAustin on Thu Apr 24, 2025 3:33 pm, edited 1 time in total.
1985 Limited (SOLD) - Build Thread Here: https://goldwingdocs.com/forum/viewtopic.php?t=72752
1986 Aspencade (Complete!): https://ngwclub.com/forum/viewtopic.php ... 77#p829477
1986 SE-i (Current Project): https://ngwclub.com/forum/viewtopic.php ... 25#p831425
1984 Interstate (Future Project)
1986 Aspencade (Complete!): https://ngwclub.com/forum/viewtopic.php ... 77#p829477
1986 SE-i (Current Project): https://ngwclub.com/forum/viewtopic.php ... 25#p831425
1984 Interstate (Future Project)
