If you find yourself "Blocked" please contact me via the link below
https://ngwclub.com/forum/app.php/contactadmin
https://ngwclub.com/forum/app.php/contactadmin
Unpimp ze motorrad: 1975 GL1000
Moderators: Brant, Sagebrush, Forum Moderators
-
gargoyle

- Chrome Member

- Posts: 122
- Joined: Fri Sep 16, 2016 12:37 pm
- Location: Northern Illinois
Re: Unpimp ze motorrad: 1975 GL1000
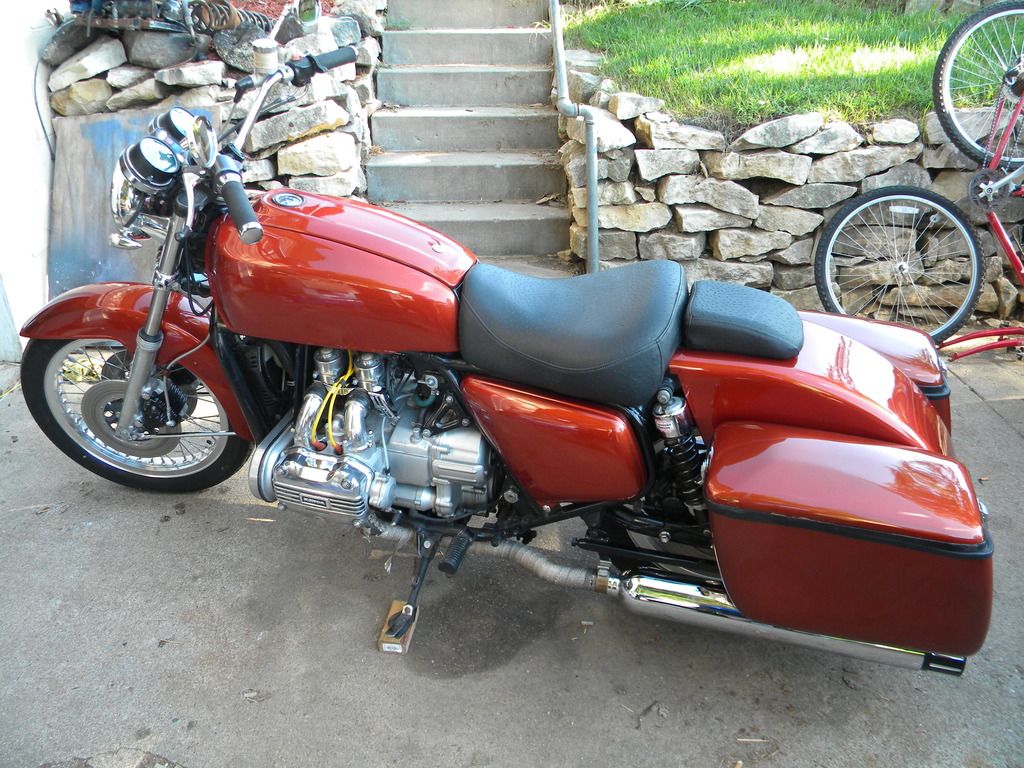
What seat is this? It looks like a Valkyrie that has been modded. It would be nice to also see how it was mounted. Since you're using a different seat might this one be for sale? I want to convert my 76 to a solo seat and this looks like the ticket.
-
MegaDan
- Titanium Member

- Posts: 373
- Joined: Mon Jul 25, 2016 11:05 pm
- Location: Omaha, NE
Re: Unpimp ze motorrad: 1975 GL1000
I have no clue what the seat came from. Yes I still have it, and yes it is easily sold to you if you want it. I will Inbox you to discuss the sale at greater length.gargoyle wrote:What seat is this? It looks like a Valkyrie that has been modded. It would be nice to also see how it was mounted. Since you're using a different seat might this one be for sale? I want to convert my 76 to a solo seat and this looks like the ticket.
As far as how it is mounted, in the below attachment you will see how the previous owner modified the rear in order to mount that fender and seat. The bar at the front of the struts was welded in with the rest of that now removed metal with a couple of nuts welded in place for bolts to go into so the seat could be secured. The tabs for said bolts stick out the back of the seat and are covered by that rear seat pad on the fender. This could be easily modified to mount however you want it to be mounted, but this is how the PO did so. If you wanted to do something similar to this, word of advice. This could be easily made to simply bolt in. Having to carefully cut away all of that welding sucked.
You do not have the required permissions to view the files attached to this post.
1975 GL1000 - Delkevic exhaust with stainless studs, Corbin Touring seat, Race Tech Gold Valve cartridge emulators, Progressive 11-1100 springs, Progressive 412HD rear shocks, Shinko 230 tires, Fork Brace, Trucklite 27270c headlight, X-Arc Signals (run, brake, turn), Hydraulic Clutch conversion, EBC Clutch discs, HD springs, and Barnett Steels + Plate B eliminated. BikeMaster DLFP-50N18L Lithium battery, Rick's Motorsports CBR600F4 Mosfet Regulator/Rectifier upgrade.
-
gargoyle
- Chrome Member
- Posts: 122
- Joined: Fri Sep 16, 2016 12:37 pm
- Location: Northern Illinois
Re: Unpimp ze motorrad: 1975 GL1000
Very interested and great timing!MegaDan wrote:I will Inbox you to discuss the sale at greater length.gargoyle wrote:What seat is this? It looks like a Valkyrie that has been modded. It would be nice to also see how it was mounted. Since you're using a different seat might this one be for sale? I want to convert my 76 to a solo seat and this looks like the ticket.
-
gargoyle
- Chrome Member
- Posts: 122
- Joined: Fri Sep 16, 2016 12:37 pm
- Location: Northern Illinois
Re: Unpimp ze motorrad: 1975 GL1000
PM reply sent...
-
MegaDan
- Titanium Member
- Posts: 373
- Joined: Mon Jul 25, 2016 11:05 pm
- Location: Omaha, NE
Re: Unpimp ze motorrad: 1975 GL1000
I haven't updated in a little while on here, so why not.
In the following pictures:
Put the carbs back on and started to put the bike together. Drilled the new bars and ran the wires - then installed with new Pro Grip Rally grips. Installed Clutch MC and ran line, installed matching smaller diameter brake master cylinder and re-routed upper line behind right fork tube for better routing. I also installed my new, much nicer and way more adjustable CNC mirrors.
I also installed my Trucklite headlight and front X-Arc LED turn signals - which are insanely bright - with a set of polished cast aluminum L brackets I found on Amazon for 10 bucks (for all 4). I really love how they turned out.
As far as the rear, after cutting out all of the welds for the rear bracket added to mount the old seat and fender, I repainted the struts with some Eastwood Extreme Chassis Black Satin, mounted an OE rear fender and trimmed it to match the Corbin seat profile. I then drilled holes for the Billet aluminum license plate bracket seen under the fender. Also used the other 2 before mentioned L brackets, painted them with the same chassis black, and mounted the rear X-Arc Run, Brake, Turn signals. I would like to note that the last picture was taken before the second to last. In the second to last picture you will notice the angle of the plate bracket has changed, I drilled the upper mounting bracket to re-angle the arms and plate mounting surface to flow with the rear fender/tire more.
They look tiny right? Just wait...
You do not have the required permissions to view the files attached to this post.
1975 GL1000 - Delkevic exhaust with stainless studs, Corbin Touring seat, Race Tech Gold Valve cartridge emulators, Progressive 11-1100 springs, Progressive 412HD rear shocks, Shinko 230 tires, Fork Brace, Trucklite 27270c headlight, X-Arc Signals (run, brake, turn), Hydraulic Clutch conversion, EBC Clutch discs, HD springs, and Barnett Steels + Plate B eliminated. BikeMaster DLFP-50N18L Lithium battery, Rick's Motorsports CBR600F4 Mosfet Regulator/Rectifier upgrade.
-
MegaDan
- Titanium Member
- Posts: 373
- Joined: Mon Jul 25, 2016 11:05 pm
- Location: Omaha, NE
Re: Unpimp ze motorrad: 1975 GL1000
Once I had all of the wiring sorted and rear end done to my liking, minus a third brake light for under the fender at the rear, which is delayed in shipping for some reason, I put the shelter and false tank panels back on and reconnected all of the wires. In the second picture, I wanted to demonstrate just how bright those tail lights are, being only .875" in Diameter. No, those are not the brake lights lol, that is the running lights. I honestly don't need a third brake light, but I feel safer with the idea.
At this point, my next project was to finish the clutch setup. At first I was going to simply bolt on the hydraulic clutch parts and call it good, but I was glad I didn't. I had a hunch that something was amiss with my clutch pack, so I ordered EBC HD discs, Steels from Barnett, and HD EBC Springs (hey, why not). My hunch was correct, because at some point someone did something with the clutch, and did it wrong. over half of the clutch pads were worn super thin and installed backwards, the steels were all burned and glazed - at 28k miles...and I only put maybe 800 miles on the bike after I bought it to this point. I also decided to eliminate the "Plate B" clutch plate per Wingovations write up with 2 more steels added to take up the space. You will also notice my restored and installed center stand that I got used. Waiting on the spring for it.
I couldn't get that project finished this weekend because I had a moment of stupidity and managed to crack my pressure plate and break a bolt off in one fell stroke. Fortunately I had access to a good low mile unit for cheap to get "new" parts. I won't make the same mistake twice.
Other than that, I installed a fork brace, yay. I am going to see if I can get away without using those spacers if I can, but I have to wait until I get the front fender back on.
I also bled the front brakes with the new MC and did the rear for good measure. Did my valve clearances as well. Ran new, black, spark plug wires. I am currently awaiting a few other parts. Namely inner tubes for my new tires, the before mentioned third brake light, Gold Valves from Racetech, some stainless steel studs and hardware for the exhaust headers so I can mount it permanently instead of the zip ties in the pictures lol. I also ordered a Bikemaster 500cca Lithium battery (same size as the standard battery, but only 5lbs) and a Ricks Motorsport "Hot Shot" Mofset regulator/rectifier for a CB600F4 to replace the factory separate ones - necessary for lithium battery charging as the standard stuffs voltage output is too low.
You do not have the required permissions to view the files attached to this post.
1975 GL1000 - Delkevic exhaust with stainless studs, Corbin Touring seat, Race Tech Gold Valve cartridge emulators, Progressive 11-1100 springs, Progressive 412HD rear shocks, Shinko 230 tires, Fork Brace, Trucklite 27270c headlight, X-Arc Signals (run, brake, turn), Hydraulic Clutch conversion, EBC Clutch discs, HD springs, and Barnett Steels + Plate B eliminated. BikeMaster DLFP-50N18L Lithium battery, Rick's Motorsports CBR600F4 Mosfet Regulator/Rectifier upgrade.
-
ericheath

- Honored Life Member

- Posts: 9617
- Joined: Wed Jul 29, 2009 11:20 am
- Location: Winnipeg, Manituba
Re: Unpimp ze motorrad: 1975 GL1000
Still have the batwing fairing for sale? I'm still interested
Whatever I suggest here should be given ample time for a moderator to delicately correct. I apologize in advance.
77 WING, 1200 engine with 77 heads, cams, gl1100 foot pegs, Magna V65 front end, 764A carbs, [-gone Suzuki M109 monoshock--, replaced with gl1100 shocks] gl 1200 swing arm, gl1500 final drive, wheel and rear brakes Valkyrie seat, Meanstreak tank, Sportster pipes, Power Arc ignition off crank.
77 Wing. black
83 Wing, in pieces
"Continuing education is important even if the subject matter is fairly useless (as in this case)."---Greg Foresi
-
Sugs

- Gold Member

- Posts: 1071
- Joined: Sun Aug 09, 2015 6:12 pm
- Location: Springfield, MO
Re: Unpimp ze motorrad: 1975 GL1000
Lights look good and bright. What license plate braket is that?
_______________________
'79 Honda GL1000 Goldwing
'79 Honda GL1000 Goldwing
-
MegaDan
- Titanium Member
- Posts: 373
- Joined: Mon Jul 25, 2016 11:05 pm
- Location: Omaha, NE
Re: Unpimp ze motorrad: 1975 GL1000
That actually did sell. I should probably note that in the sale thread. I appologize. I guess I should have checked on the site more often.ericheath wrote:Still have the batwing fairing for sale? I'm still interested
Plate bracket is something I came across on Amazon after looking for hours for something I liked.Sugs wrote:Lights look good and bright. What license plate braket is that?
Link: https://www.amazon.com/gp/product/B01EZ ... UTF8&psc=1
It's nice thick CNC aluminum with exception to the very top bracket, which is thinner steel. It worked out well for fitting it under the fender too, as it bent easily enough to conform to the shape of the fender for mounting. I also redrilled the forward 2 most holes for the arms so I could re-angle it up to get it where it sits now. The plate section itself has angular adjustment too. Makes it easy to get everything kind of how you want it.
1975 GL1000 - Delkevic exhaust with stainless studs, Corbin Touring seat, Race Tech Gold Valve cartridge emulators, Progressive 11-1100 springs, Progressive 412HD rear shocks, Shinko 230 tires, Fork Brace, Trucklite 27270c headlight, X-Arc Signals (run, brake, turn), Hydraulic Clutch conversion, EBC Clutch discs, HD springs, and Barnett Steels + Plate B eliminated. BikeMaster DLFP-50N18L Lithium battery, Rick's Motorsports CBR600F4 Mosfet Regulator/Rectifier upgrade.
-
gargoyle
- Chrome Member
- Posts: 122
- Joined: Fri Sep 16, 2016 12:37 pm
- Location: Northern Illinois
Re: Unpimp ze motorrad: 1975 GL1000
Sorry for the interruption...ericheath wrote:Still have the batwing fairing for sale? I'm still interested
Eric, I still have a fairing for sale... viewtopic.php?f=6&t=62427


We now return you to the regularly scheduled topic.
-
MegaDan
- Titanium Member
- Posts: 373
- Joined: Mon Jul 25, 2016 11:05 pm
- Location: Omaha, NE
Re: Unpimp ze motorrad: 1975 GL1000
Got the clutch installed without breaking anything (yay). Got a few more knick nacks in; battery, reg/rec., a solid state flasher for my LED lights - because it appears the chips that control X-arc LED's cause them to draw so little current that the "electronic flasher" currently installed on the bike isn't getting enough current draw to activate the flashers without shorting the signal switch to increase the resistance on the circuit.
I also got in the last piece of my front suspension upgrades, Racetech Emulators with adapters along with 15wt PJ-1 Synthetic fork oil. These will be going in with Progressive 11-1100 fork springs, dual rate 45/70 lb/in, aka .80/1.25 kg/mm. I would have gone with straight 1kg springs, but I already had the Progressives, and the overall spring rate works perfectly with my intended use and rider weight.
Initially I contemplated doing a GSXR fork swap, but the cost to solve other issues with the swap held me back. I decided to try and make the most of the stock setup for now. When I get around to the next phase of my bike, I may reconsider it.
Last edited by MegaDan on Sat May 13, 2017 10:16 pm, edited 1 time in total.
1975 GL1000 - Delkevic exhaust with stainless studs, Corbin Touring seat, Race Tech Gold Valve cartridge emulators, Progressive 11-1100 springs, Progressive 412HD rear shocks, Shinko 230 tires, Fork Brace, Trucklite 27270c headlight, X-Arc Signals (run, brake, turn), Hydraulic Clutch conversion, EBC Clutch discs, HD springs, and Barnett Steels + Plate B eliminated. BikeMaster DLFP-50N18L Lithium battery, Rick's Motorsports CBR600F4 Mosfet Regulator/Rectifier upgrade.
-
MegaDan
- Titanium Member
- Posts: 373
- Joined: Mon Jul 25, 2016 11:05 pm
- Location: Omaha, NE
Re: Unpimp ze motorrad: 1975 GL1000
Decided against doing the Gold Valves this weekend. I decided to wait until my tube arrives so I can do the front tire along with the rest of the work since it all has to come off anyway.
Instead, I decided to tackle installing my new Bikemaster LiFePO battery and Rick's "hot shot" Mosfet Regulator/Rectifier. The Battery is a DFLON5018L unit - close to the factory size, but still a bit smaller. 5lbs vs 14 of the AGM that was in the bike, and 500cca to boot. I probably could have gone smaller, but I like knowing I have the capacity. I need to make or find a new ground strap as the current one is corroded and already just barely too short.
The Reg/Rec. is for an early-mid 2000's CBR600F4i. Same wire count, same wire colors with exception to the grounds being the traditional black vs. the green of the factory wiring. It does indeed bolt up where the factory rectifier was located, and comes with about 18 inches of wiring. Since my factory connector was in good shape I went ahead and cut it off the old one, trimmed down the wiring on the Rick's unit, and soldered it on. This unit is thinner than the factory rectifier the original bolts are too long, so in the grand old tradition of recycling I used the pressure plate bolts I had left over from my screw up because they are the same M6x1.0 thread and 10mm flanged hex head. What's dead may never die.
It didn't end up quite as pretty as I would have liked, but that's because I had to change the routing a bit when I discovered that it would only bolt in wires out. Thankfully I left myself with enough slack that I made it work, and since it's thinner than the factory rectifier, I had more room to tuck the wiring back up. The side cover goes on with no rubbing anywhere.
After the regulator was removed, it also gave me a handy spot to bolt up my new solid state signal flasher.
You do not have the required permissions to view the files attached to this post.
1975 GL1000 - Delkevic exhaust with stainless studs, Corbin Touring seat, Race Tech Gold Valve cartridge emulators, Progressive 11-1100 springs, Progressive 412HD rear shocks, Shinko 230 tires, Fork Brace, Trucklite 27270c headlight, X-Arc Signals (run, brake, turn), Hydraulic Clutch conversion, EBC Clutch discs, HD springs, and Barnett Steels + Plate B eliminated. BikeMaster DLFP-50N18L Lithium battery, Rick's Motorsports CBR600F4 Mosfet Regulator/Rectifier upgrade.
-
wingrider

- SUPER BIKER!!!!

- Posts: 3848
- Joined: Thu May 24, 2012 12:15 pm
- Location: Center City, MN USA
Re: Unpimp ze motorrad: 1975 GL1000
Where did you pick up the Mosfet Regulator/Rectifier?
2002 1800 Wing
2001 Valkyrie Interstate
1978 1200 EFI Wing with Motorvation Coupe Royale sidecar
1977 1200 Wing cafe/bobber project
1974 Suzuki GT550
2001 Valkyrie Interstate
1978 1200 EFI Wing with Motorvation Coupe Royale sidecar
1977 1200 Wing cafe/bobber project
1974 Suzuki GT550
-
MegaDan
- Titanium Member
- Posts: 373
- Joined: Mon Jul 25, 2016 11:05 pm
- Location: Omaha, NE
Re: Unpimp ze motorrad: 1975 GL1000
Directly from the manufacturers website in this case. https://ricksmotorsportelectrics.com/Ho ... or-10_120Hwingrider wrote:Where did you pick up the Mosfet Regulator/Rectifier?
There are other alternatives that may be cheaper, but I have heard nothing but great things about Rick's units.
1975 GL1000 - Delkevic exhaust with stainless studs, Corbin Touring seat, Race Tech Gold Valve cartridge emulators, Progressive 11-1100 springs, Progressive 412HD rear shocks, Shinko 230 tires, Fork Brace, Trucklite 27270c headlight, X-Arc Signals (run, brake, turn), Hydraulic Clutch conversion, EBC Clutch discs, HD springs, and Barnett Steels + Plate B eliminated. BikeMaster DLFP-50N18L Lithium battery, Rick's Motorsports CBR600F4 Mosfet Regulator/Rectifier upgrade.
-
wingrider
- SUPER BIKER!!!!
- Posts: 3848
- Joined: Thu May 24, 2012 12:15 pm
- Location: Center City, MN USA
Re: Unpimp ze motorrad: 1975 GL1000
Thanks for the link!
2002 1800 Wing
2001 Valkyrie Interstate
1978 1200 EFI Wing with Motorvation Coupe Royale sidecar
1977 1200 Wing cafe/bobber project
1974 Suzuki GT550
2001 Valkyrie Interstate
1978 1200 EFI Wing with Motorvation Coupe Royale sidecar
1977 1200 Wing cafe/bobber project
1974 Suzuki GT550